- 首页
- » 搜索
- » pythinker 发表的帖子

#4 Re: 全志 SOC » 编译Buildroot-tiny200时出现错误,请大佬指教,急急!!!!!!!!!!!!!!!!!!!!!!!1 (平台: 树梅派) » 2021-02-23 10:05:37
#5 Re: 全志 SOC » 全志V3s采用UDP视频传输H264效果很好 » 2021-02-07 23:05:37
#6 Re: DIY/综合/Arduino/写字机/3D打印机/智能小车/平衡车/四轴飞行/MQTT/物联网 » 嫌全字库ttf文件太肥的朋友,可以进来看看了,按需剪裁, 减肥/瘦身/不留赘肉 » 2021-02-07 23:04:21
拉轰的脚踏车 说:学 #17 楼, 最外层用双引号
我试过 然后经过您的体香 我就照搬了下又试了下 还是不行...
我突然想到了一个问题 很可能是我用的系统问题..苹果电脑有bug....或者java有问题 例如版本太旧 我回来在升级下java试试
用win7在试试...
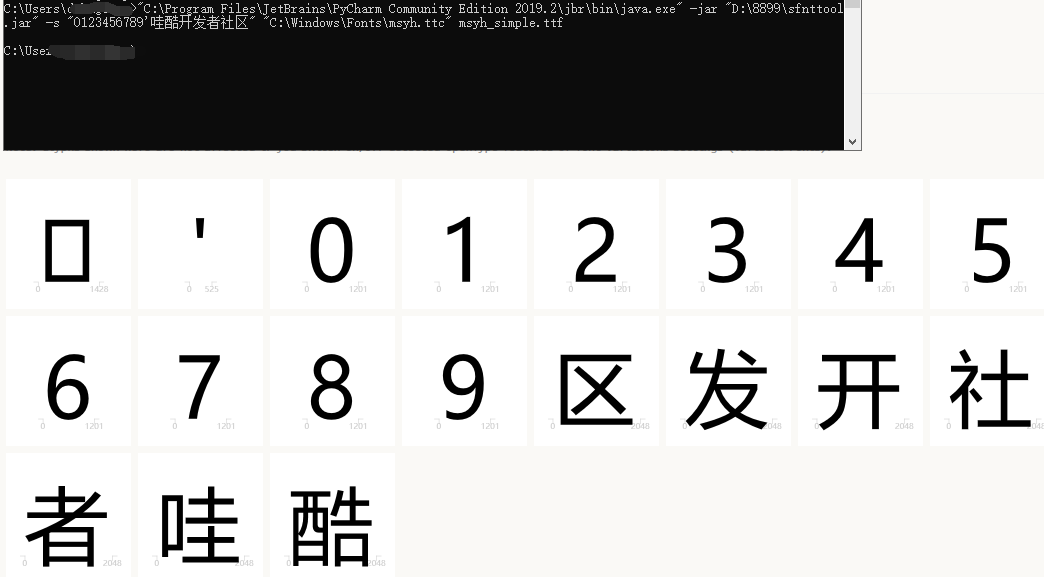
windows测试是没问题的:
"C:\Program Files\JetBrains\PyCharm Community Edition 2019.2\jbr\bin\java.exe" -jar "D:\8899\sfnttool.jar" -s "0123456789'哇酷开发者社区" "C:\Windows\Fonts\msyh.ttc" msyh_simple.ttf
#7 Re: 全志 SOC » 匠芯 AIC502 有没有朋友用过? » 2021-02-01 11:53:50
#8 Re: 计算机图形/GUI/RTOS/FileSystem/OpenGL/DirectX/SDL2 » LVGL的linux_frame_buffer项目加入FB双缓 » 2021-01-30 10:52:30
#9 Re: DIY/综合/Arduino/写字机/3D打印机/智能小车/平衡车/四轴飞行/MQTT/物联网 » 请问停车场摄像头抬杠程序一般与服务器是不是mqtt通讯吗? » 2021-01-29 17:41:36
#10 Re: 全志 SOC » V3S禁用屏幕log,用于显示qt » 2021-01-29 10:27:14
#11 Re: DIY/综合/Arduino/写字机/3D打印机/智能小车/平衡车/四轴飞行/MQTT/物联网 » 请问停车场摄像头抬杠程序一般与服务器是不是mqtt通讯吗? » 2021-01-28 14:42:18
#12 Re: DIY/综合/Arduino/写字机/3D打印机/智能小车/平衡车/四轴飞行/MQTT/物联网 » ZLG发布了一个资源超级丰富的吗ARM9 ZMP110 芯片,不知道价格如何,发在公众号的文章随后删了,不知道啥意思 » 2021-01-28 14:41:20
#13 Re: 全志 SOC » 请问有人在f1c100s成功打通过usb camera了吗? » 2021-01-26 10:19:52
#14 Re: 全志 SOC » 抽空画了一个RGB40PIN接口转VGA接口模块的板子,再也不用到处找40pin的液晶屏啦,直接拿电脑显示器调试,PCB工程分享给大家 » 2020-12-14 19:40:31
求助,v3s-zero有人调试过1024x768分辨率的屏幕没有?
http://whycan.com/t_3267.html#p28255
(出处:哇酷开发者社区【全志 V3S/F1C100s/X3】)
好像荔枝派也有做这个模块
#16 Re: Php/Nodejs/Web/HTML5/Javascript/微信开发/Python » 发现一个好用的一个正则表达式可视化网站 https://regexper.com/ » 2020-10-27 08:33:18
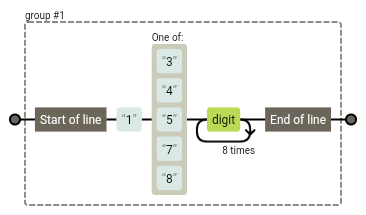
这个正则表达式在线调试网站也不错,只是打开速度有点慢
#17 Re: Php/Nodejs/Web/HTML5/Javascript/微信开发/Python » 发现一个好用的一个正则表达式可视化网站 https://regexper.com/ » 2020-10-25 12:14:52
.png)
#18 Re: Php/Nodejs/Web/HTML5/Javascript/微信开发/Python » 发现一个好用的一个正则表达式可视化网站 https://regexper.com/ » 2020-10-25 12:05:30
#19 Re: 全志 SOC » buildroot-tiny200 (F1C100/200s) 开发包近期更新内容 * 已支持DVP摄像头 *,支持SPI NAND » 2020-10-24 15:02:33
#21 Re: DIY/综合/Arduino/写字机/3D打印机/智能小车/平衡车/四轴飞行/MQTT/物联网 » 淘宝购买的开源写字机器人散件,粗略组装起来, 能写出像模像样的字了。 » 2020-10-22 16:07:47
#22 Re: 全志 SOC » uboot串口输出如何关闭,直接设备树disalbe串口吗? » 2020-10-19 14:19:43
https://whycan.com/t_1177.html
看到这个帖子,你实践一下。
对对对, 说的就是这个, 那天找了很久都没找到。
#23 Re: 全志 SOC » V3s主线u-boot如何禁用交互终端,因为串口接到了加密芯片,导致u-boot以为按下了任意键, 结果进入了命令行状态,系统无法启动。 » 2020-10-19 14:19:12
#25 Re: 全志 SOC » uboot串口输出如何关闭,直接设备树disalbe串口吗? » 2020-10-14 15:31:14
#26 Re: DIY/综合/Arduino/写字机/3D打印机/智能小车/平衡车/四轴飞行/MQTT/物联网 » Zxing Zbar 结合真正的极速秒扫二维码(qrcode) (转) » 2020-10-11 10:20:11
#29 Re: 全志 SOC » 分享个licheepi nano镜像,支持adb调试 » 2020-09-25 14:25:26
#30 Re: Php/Nodejs/Web/HTML5/Javascript/微信开发/Python » 给大家推荐一个Web API 开发调试工具 ---- Postman » 2020-09-23 08:26:15

#31 Re: Php/Nodejs/Web/HTML5/Javascript/微信开发/Python » 给大家推荐一个Web API 开发调试工具 ---- Postman » 2020-09-23 08:25:27
#32 Re: Php/Nodejs/Web/HTML5/Javascript/微信开发/Python » 给大家推荐一个Web API 开发调试工具 ---- Postman » 2020-09-21 17:37:40
#33 Php/Nodejs/Web/HTML5/Javascript/微信开发/Python » 给大家推荐一个Web API 开发调试工具 ---- Postman » 2020-09-21 17:37:19
- pythinker
- 回复: 5
#35 Re: Php/Nodejs/Web/HTML5/Javascript/微信开发/Python » 微信支付成功后, 这个服务器通知本机(notify)协议, 感觉不合理 » 2020-09-18 08:30:05
#36 Re: Php/Nodejs/Web/HTML5/Javascript/微信开发/Python » 微信支付成功后, 这个服务器通知本机(notify)协议, 感觉不合理 » 2020-09-18 00:01:05
#37 Re: DIY/综合/Arduino/写字机/3D打印机/智能小车/平衡车/四轴飞行/MQTT/物联网 » 超市货架上的墨水屏不停刷屏,是不是很快就报废了? » 2020-09-17 23:46:26
#38 Re: Php/Nodejs/Web/HTML5/Javascript/微信开发/Python » 微信支付成功后, 这个服务器通知本机(notify)协议, 感觉不合理 » 2020-09-17 23:45:19
#39 Re: Php/Nodejs/Web/HTML5/Javascript/微信开发/Python » 微信支付成功后, 这个服务器通知本机(notify)协议, 感觉不合理 » 2020-09-14 23:37:58
#40 Php/Nodejs/Web/HTML5/Javascript/微信开发/Python » 微信支付成功后, 这个服务器通知本机(notify)协议, 感觉不合理 » 2020-09-14 23:24:59
- pythinker
- 回复: 9
https://pay.weixin.qq.com/wiki/doc/api/jsapi.php?chapter=9_7
微信的服务器发送数据告诉本机支付成功了:
<xml>
<appid><![CDATA[wx2421b1c4370ec43b]]></appid>
<attach><![CDATA[支付测试]]></attach>
<bank_type><![CDATA[CFT]]></bank_type>
<fee_type><![CDATA[CNY]]></fee_type>
<is_subscribe><![CDATA[Y]]></is_subscribe>
<mch_id><![CDATA[10000100]]></mch_id>
<nonce_str><![CDATA[5d2b6c2a8db53831f7eda20af46e531c]]></nonce_str>
<openid><![CDATA[oUpF8uMEb4qRXf22hE3X68TekukE]]></openid>
<out_trade_no><![CDATA[1409811653]]></out_trade_no>
<result_code><![CDATA[SUCCESS]]></result_code>
<return_code><![CDATA[SUCCESS]]></return_code>
<sign><![CDATA[B552ED6B279343CB493C5DD0D78AB241]]></sign>
<time_end><![CDATA[20140903131540]]></time_end>
<total_fee>1</total_fee>
<coupon_fee><![CDATA[10]]></coupon_fee>
<coupon_count><![CDATA[1]]></coupon_count>
<coupon_type><![CDATA[CASH]]></coupon_type>
<coupon_id><![CDATA[10000]]></coupon_id>
<trade_type><![CDATA[JSAPI]]></trade_type>
<transaction_id><![CDATA[1004400740201409030005092168]]></transaction_id>
</xml>
本机回应以下数据:
<xml>
<return_code><![CDATA[SUCCESS]]></return_code>
<return_msg><![CDATA[OK]]></return_msg>
</xml>
如果本机不回, 那么微信服务器会继续再发几次, 但是我感觉这个回应数据什么信息都不用带, 要是有很多订单, 怎么知道是回应哪个订单?
#42 Re: Php/Nodejs/Web/HTML5/Javascript/微信开发/Python » 神奇的php函数 password_hash / password_verify , 每次加密得到的字符串都不相同. » 2020-09-14 14:40:57
#43 Php/Nodejs/Web/HTML5/Javascript/微信开发/Python » 神奇的php函数 password_hash / password_verify , 每次加密得到的字符串都不相同. » 2020-09-14 14:31:08
- pythinker
- 回复: 2
https://learnku.com/articles/5156/using-password-hash-to-hash-passwords
上面的操作是将明文密码 123456 使用 CRYPT_BLOWFISH 算法处理成一个由 60 个字符组成的字符串,类似
$2y$10$3qI4IKS6XOiisBDTTgp17eruMdcd3dDJaqaB6pQkEHR0Uk7od2A1a,这称之为「哈希值」。
经过 password_hash 方法加密得到的哈希值有个特点:不可逆 —— 不能从这个哈希值反推出明文密码(也就是之前的 123456)。
你可能傲娇了,心想我就知道你密码设定不复杂,直接用 password_hash('123456', PASSWORD_BCRYPT) 得到哈希值,
再细心的和 $2y$10$3qI4IKS6XOiisBDTTgp17eruMdcd3dDJaqaB6pQkEHR0Uk7od2A1a 比对,
发现一样,不就 OK 了…… 这也行不通,
因为每次执行 password_hash('123456', PASSWORD_BCRYPT) 语句后,得到哈希值都不一样!
https://blog.csdn.net/i_lost/article/details/104637027
#44 Re: Php/Nodejs/Web/HTML5/Javascript/微信开发/Python » thinkphp6 入门教程 (转载) 作者 李炎恢 » 2020-09-14 10:42:53
#安装Windows版本Composer
https://getcomposer.org/Composer-Setup.exe
#创建工程 ./ 代表当前目录
composer create-project topthink/think ./
#安装多应用
composer require topthink/think-multi-app
#安装验证码
composer require topthink/think-captcha
#安装模板引擎
composer require topthink/think-view
#阿里云的软件源
composer config -g repo.packagist composer https://mirrors.aliyun.com/composer/
#45 Re: Php/Nodejs/Web/HTML5/Javascript/微信开发/Python » thinkphp6 入门教程 (转载) 作者 李炎恢 » 2020-09-14 10:42:20
#46 Php/Nodejs/Web/HTML5/Javascript/微信开发/Python » thinkphp6 入门教程 (转载) 作者 李炎恢 » 2020-09-14 10:39:21
- pythinker
- 回复: 2
01.ThinkPHP6.x入门开启.pdf
02.开发规范和目录结构.pdf
03.开启调试与配置文件.pdf
04.URL访问模式.pdf
05.控制器定义.pdf
06.基础.空.多级控制器.pdf
07.连接数据库与模型初探.pdf
08.数据库的数据查询.pdf
09.数据库的链式查询.pdf
10.数据库的数据新增.pdf
11.数据库的修改删除.pdf
12.数据库的查询表达式.pdf
13.数据库的时间查询.pdf
14.聚合.原生.子查询.pdf
15.链式查询方法.上.pdf
16.链式查询方法.下.pdf
17.数据库的高级查询.pdf
18.数据库的快捷查询.pdf
19.数据库的事务和获取器.pdf
20.数据库的数据集和代码提示.pdf
21.模型的定义方式.pdf
22.模型的新增和删除.pdf
23.模型的数据更新.pdf
24.模型的数据查询.pdf
25.模型的字段设置.pdf
26.模型的获取器和修改器.pdf
27.模型的查询范围.pdf
28.模型的搜索器和数据集.pdf
29.模型的自动时间戳和只读字段.pdf
30.模型的数据类型和转换.pdf
31.JSON字段.pdf
32.模型的软删除.pdf
33.模型和数据库的事件.pdf
34.关联模型初探.pdf
35.一对一关联查询.pdf
36.一对多关联查询.pdf
37.关联预载入.pdf
38.关联统计和输出.pdf
39.多对多关联查询.pdf
40.路由的定义.pdf
41.路由的变量规则和闭包.pdf
42.路由的地址和参数.pdf
43.路由的域名和跨域请求.pdf
44.路由的分组和MISS.pdf
45.资源路由.pdf
46.注解路由和URL生成.pdf
47.容器和依赖注入.pdf
48.门面Facade.pdf
49.请求对象和信息.pdf
50.请求变量.pdf
51.请求类型和HTTP头信息.pdf
52.伪静态.参数绑定.请求缓存.pdf
53.响应输出和重定向.pdf
54.验证器定义.pdf
55.验证规则和错误信息.pdf
56.验证场景和路由验证.pdf
57.验证内置规则.pdf
58.单个验证和注解验证.pdf
59.模版引擎驱动和赋值变量.pdf
60.模版引擎配置和渲染.pdf
61.模版的变量输出.pdf
62.模版的函数和运算符.pdf
63.模版的循环标签.pdf
64.模版的比较和定义标签.pdf
65.模版的条件判断标签.pdf
66.模版的加载包含输出.pdf
67.模版的布局和继承.pdf
68.模版的杂项和表单令牌.pdf
69.Session.pdf
70.Cookie.pdf
71.缓存功能.pdf
72.上传功能.pdf
73.多语言.pdf
74.验证码功能.pdf
75.分页功能.pdf
76.图像处理功能.pdf
77.异常处理.pdf
78.日志处理.pdf
79.中间件.上.pdf
80.中间件.下.pdf
81.服务系统.pdf
82.事件.pdf
83.多应用模式.pdf
#47 Re: VMWare/Linux/Ubuntu/Fedora/CentOS/U-BOOT » 【小技巧分享】在不退出vim的情况下使用sudo完成写入 » 2020-09-03 21:36:20
#48 Re: 计算机图形/GUI/RTOS/FileSystem/OpenGL/DirectX/SDL2 » 分享一个好用的 littlevgl / lvgl 字体生成工具. 作者 @阿里 » 2020-08-03 20:43:37
#49 君正Ingenic/X1000/X2000/T10/T20/T30 » 我的硬件方案是君正 X1000 + AP6212, 请问 Qt 界面上面能不能做到切换 AP / STA ? » 2020-06-05 17:19:57
#50 Re: VMWare/Linux/Ubuntu/Fedora/CentOS/U-BOOT » 在 ubuntu@x86 用 chroot 到 ARM 平台的 rootfs » 2020-06-02 19:14:12
#51 Re: 全志 SOC » lichee zero 的I2C的问题 » 2020-05-29 20:32:20
#52 Re: 全志 SOC » Tiny200 SPINAND固件分享 » 2020-05-29 20:15:11
buildroot是2020.2月的
改改编译器配置就行了
tiny200.zip
真是神奇, 我的 2019.08 死活没找到这个功能.
----------------
眼拙, 找到了
先开启:
BR2_PACKAGE_PYTHON3=y
然后就有PYQT5了, 开启即可:
BR2_PACKAGE_PYTHON_PYQT5=y
#53 Re: 全志 SOC » 求大佬们赐一busybox脚本, 轮询检测 以太网eth0检测网线是否插入,如果插入就调用 dhcpc 获取IP地址. » 2020-05-03 19:01:53
https://blog.csdn.net/g457499940/article/details/16960773
用这个命令就行了:
udhcpc -b -i eth0 -p /var/run/udhcpc.pid -R
后台执行, 插上就会自动从dhcpd服务器获取IP
#54 Re: Php/Nodejs/Web/HTML5/Javascript/微信开发/Python » 试一试 Ubuntu18.04 php5.6 与 php7.4 共存 » 2020-04-14 15:49:14
https://mobilefish.de/use-multiple-php-versions-ubuntu-apache-2cli-and-switch-php-modules
sudo apt install php7.1 php5.6 php7.0

sudo apt install libapache2-mod-php7.0
sudo apt install libapache2-mod-php7.1
sudo apt install libapache2-mod-php5.6

sudo apt-get install php5.6-curl php5.6-mysqli php5.6-mbstring -y
sudo apt-get install php7.0-curl php7.0-mysqli php7.0-mbstring -y
sudo apt-get install php7.4-curl php7.4-mysqli php7.4-mbstring -y
#禁用php7.4
sudo a2dismod php7.4
#启用php5.6
sudo a2enmod php5.6
#apache2 重启
sudo service apache2 restart要注意 php7.4-mysql 已经不存在了, 现在是 php7.4-mysqli
#55 Php/Nodejs/Web/HTML5/Javascript/微信开发/Python » 试一试 Ubuntu18.04 php5.6 与 php7.4 共存 » 2020-04-14 15:28:47
- pythinker
- 回复: 1
先用这位网友的: https://whycan.cn/t_3445.html#p30643
找到一个网站
https://vitux.com/how-to-install-php5-and-php7-on-ubuntu-18-04-lts/
安装 php5.6:
sudo apt-get update
sudo apt-get install software-properties-common -y
sudo add-apt-repository ppa:ondrej/php
sudo apt-get update
sudo apt-get install -y php5.6
php7.4 很容易安装:
sudo apt-get install -y php7.4
#56 Re: VMWare/Linux/Ubuntu/Fedora/CentOS/U-BOOT » ubuntu 18.04 重设 mysql 服务器密码 » 2020-04-14 14:11:38
在MySQL5.6跑得好好的代码,到5.7就出问题了:
#1140 - In aggregated query without GROUP BY, expression #1 of SELECT list contains nonaggregated column 'bb_20200414.f.forum_name'; this is incompatible with sql_mode=only_full_group_by
解决方案: http://xstarcd.github.io/wiki/MySQL/MySQL-sql-mode.html
打开 /etc/mysql/my.cnf 添加:
[mysqld]
#set the SQL mode to strict
sql-mode = "STRICT_TRANS_TABLES,NO_AUTO_CREATE_USER,NO_ENGINE_SUBSTITUTION"#57 Re: VMWare/Linux/Ubuntu/Fedora/CentOS/U-BOOT » ubuntu 18.04 重设 mysql 服务器密码 » 2020-04-14 11:27:42
https://devanswers.co/phpmyadmin-access-denied-for-user-root-localhost/
找到问题了, 可能 phpmyadmin 禁用了root登录,需要重新注册一个用户才行:
CREATE USER 'pmauser'@'localhost' IDENTIFIED BY 'password_here';
GRANT ALL PRIVILEGES ON *.* TO 'pmauser'@'localhost' WITH GRANT OPTION;
记得密码要 大小写字母和特殊字符,密码长度也有要求,否则一样会提示楼上一样的错误。
#58 Re: VMWare/Linux/Ubuntu/Fedora/CentOS/U-BOOT » ubuntu 18.04 重设 mysql 服务器密码 » 2020-04-14 11:20:12
mysql> select VERSION() ;
+-------------------------+
| VERSION()               |
+-------------------------+
| 5.7.29-0ubuntu0.18.04.1 |
+-------------------------+
1 row in set (0.00 sec)
命令行进入正常, 但是 pma 提示:
#1698 - Access denied for user 'root'@'localhost'
mysqli_real_connect(): (HY000/1698): Access denied for user 'root'@'localhost'
一脸懵x
#59 Re: VMWare/Linux/Ubuntu/Fedora/CentOS/U-BOOT » 请问大家Linux shell 脚本如何检测一个指定的文件夹有变化, 包括文件新增,修改,删除等 » 2020-04-08 14:09:11
递归监测 /tmp 目录变化:
inotifywait --recursive -m /tmp -e create -e moved_to |
    while read dir action file; do
        echo "The file '$file' appeared in directory '$dir' via '$action'"
        # do something with the file
    done
$ inotifywait --recursive -m /tmp -e create -e moved_to |
> while read dir action file; do
> echo "The file '$file' appeared in directory '$dir' via '$action'"
> # do something with the file
> done
Setting up watches. Beware: since -r was given, this may take a while!
Watches established.
The file 'aaaanb' appeared in directory '/tmp/ccc/ddd/ee/ff/g/' via 'CREATE'
The file 'sh-thd.mdd8J1' appeared in directory '/tmp/' via 'CREATE'
The file 'sh-thd.WX0x9Z' appeared in directory '/tmp/' via 'CREATE'
The file '555' appeared in directory '/tmp/ccc/ddd/ee/ff/' via 'CREATE'#60 Re: VMWare/Linux/Ubuntu/Fedora/CentOS/U-BOOT » 请问大家Linux shell 脚本如何检测一个指定的文件夹有变化, 包括文件新增,修改,删除等 » 2020-04-08 13:57:16
试一试 inotifywait 命令。
谢谢啊, 这个不错, 试了一下
https://unix.stackexchange.com/questions/24952/script-to-monitor-folder-for-new-files
$ inotifywait -m /tmp -e create -e moved_to
Setting up watches.
Watches established.
/tmp/ CREATE sh-thd.HxgPGz
/tmp/ CREATE aaaa
/tmp/ CREATE,ISDIR ccc
现在正在找怎么获取新增文件的全路径。
#61 VMWare/Linux/Ubuntu/Fedora/CentOS/U-BOOT » 请问大家Linux shell 脚本如何检测一个指定的文件夹有变化, 包括文件新增,修改,删除等 » 2020-04-08 13:51:55
#62 Re: 计算机图形/GUI/RTOS/FileSystem/OpenGL/DirectX/SDL2 » littlevgl如何读取nand flash里面的字库和图片 » 2020-04-07 18:30:10
#64 Re: Php/Nodejs/Web/HTML5/Javascript/微信开发/Python » 推荐一个 chrome 导入导出 cookie 的插件 -------- EditThisCookie » 2020-03-24 17:05:16
#65 Php/Nodejs/Web/HTML5/Javascript/微信开发/Python » 推荐一个 chrome 导入导出 cookie 的插件 -------- EditThisCookie » 2020-03-24 16:48:00
#66 Re: Php/Nodejs/Web/HTML5/Javascript/微信开发/Python » 用 php 测试 阿里云的 oss 对象存储云服务 » 2020-03-16 14:54:14
根据关键字security-token 搜到资料了:
https://help.aliyun.com/document_detail/100624.html
OSS可以通过阿里云STS(Security Token Service)进行临时授权访问。通过STS,您可以为第三方应用或子用户(即用户身份由您自己管理的用户)颁发一个自定义时效和权限的访问凭证。
#67 Re: Php/Nodejs/Web/HTML5/Javascript/微信开发/Python » 用 php 测试 阿里云的 oss 对象存储云服务 » 2020-03-16 14:29:26
#68 Re: Php/Nodejs/Web/HTML5/Javascript/微信开发/Python » 用 php 测试 阿里云的 oss 对象存储云服务 » 2020-03-16 14:18:38
referer是最简单的防盗链,很容易伪造的。
看你安全的要求,referer是由浏览器,根据当前页面发送的,很容易摸拟。直接在浏览器中输入的地址referer是null.
如果在whycan中的某个页面引用,浏览器发送的 referer=whycan.com/
r安全要求高的话每一个下载链接都要通过时间戳生成密钥。
刚刚模拟了一下 http://download.csdn.net/ 的 referer,
还是用上面的下载链接,
出现了下面的错误: https://public-download.csdn.net/500.html
<Error>
<Code>NoSuchKey</Code>
<Message>The specified key does not exist.</Message>
<RequestId>5E6F18CF6B3F22383545651F</RequestId>
<HostId>csdn-dl-public.oss-cn-beijing.aliyuncs.com</HostId>
<Key>500.html</Key>
</Error>从这个错误The specified key does not exist.看来,
referer 只是第一道防线,后面还要验证 key,
我推测 csdn 为每个用户在 aliyun oss 申请了一个独立的 key。
现在我还没找到上面这步如何操作实现的,
如果这个能实现, 我觉得 aliyun oss 还是挺实用的。
#69 Re: Php/Nodejs/Web/HTML5/Javascript/微信开发/Python » 用 php 测试 阿里云的 oss 对象存储云服务 » 2020-03-16 11:59:15
#70 Re: Php/Nodejs/Web/HTML5/Javascript/微信开发/Python » 用 php 测试 阿里云的 oss 对象存储云服务 » 2020-03-14 15:56:22
#71 Php/Nodejs/Web/HTML5/Javascript/微信开发/Python » 用 php 测试 阿里云的 oss 对象存储云服务 » 2020-03-14 15:54:29
- pythinker
- 回复: 12
1. 安装php:
sudo apt-get install php php-curl php-mbstring -y
2. 安装阿里云php oss sdk:
composer require aliyuncs/oss-sdk-php
3. 建立一个测试程序:
<?php
require_once __DIR__ . '/vendor/autoload.php';
use OSS\OssClient;
use OSS\Core\OssException;$accessKeyId = "你的阿里云oss key id";
$accessKeySecret = "你的key密码";
$endpoint = "oss-cn-beijing.aliyuncs.com";try {
$ossClient = new OssClient($accessKeyId, $accessKeySecret, $endpoint);
} catch (OssException $e) {
print $e->getMessage();
}$bucket= "pythinker";
$object = "filename.txt";
$content = "Hello, OSS!"; // Content of the uploaded filetry {
$ossClient->putObject($bucket, $object, $content);
} catch (OssException $e) {
print $e->getMessage();
}
?>
4. 运行
php test.php
这样在阿里云oss对象存储服务器新建 filename.txt 文件成功了。
#72 Re: DIY/综合/Arduino/写字机/3D打印机/智能小车/平衡车/四轴飞行/MQTT/物联网 » 嫌全字库ttf文件太肥的朋友,可以进来看看了,按需剪裁, 减肥/瘦身/不留赘肉 » 2020-03-09 19:58:25
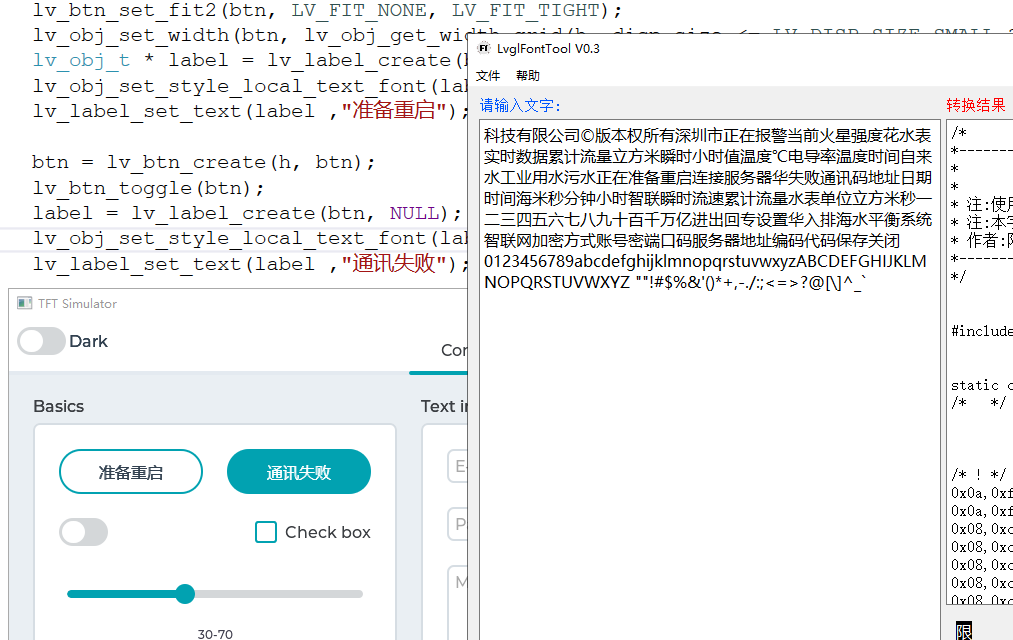
"C:\Program Files\JetBrains\PyCharm Community Edition 2019.2\jbr\bin\java.exe" -jar "D:\8899\sfnttool.jar" -s "科技有限公司©版本权所有深圳市正在报警当前火星强度花水表实时数据累计流量立方米瞬时小时值温度℃电导率温度时间自来水工业用水污水正在准备重启连接服务器华失败通讯码地址日期时间海米秒分钟小时智联瞬时流速累计流量水表单位立方米秒一二三四五六七八九十百千万亿进出回专设置华入排海水平衡系统智联网加密方式账号密端口码服务器地址编码代码保存关闭0123456789abcdefghijklmnopqrstuvwxyzABCDEFGHIJKLMNOPQRSTUVWXYZ ""!#$%&'()*+,-./:;<=>?@[\]^_`" "C:\Windows\Fonts\msyh.ttc" msyh_simple.ttf
学到一招, 谢谢楼主, 我也会剪裁字库了.
#75 Qt/MSVC/MINGW/C++/MFC/GTK+/Delphi/BCB » 《Game Programming Using Qt5 Beginners Guide Second Edition》Qt5游戏编程第二版 » 2020-02-22 17:13:12
- pythinker
- 回复: 1
书本附带源码: https://github.com/PacktPublishing/Game-Programming-Using-Qt-5-Beginners-Guide-Second-Edition
搜了一下没有pdf版本, 也没有中文翻译数据售卖,亚马逊纸质书原版书要 50$左右, 美国人的书还真贵。
#77 Re: 计算机图形/GUI/RTOS/FileSystem/OpenGL/DirectX/SDL2 » 水一贴,用littlevgl做一个简单的手环UI » 2020-02-22 15:45:30
#78 Re: Qt/MSVC/MINGW/C++/MFC/GTK+/Delphi/BCB » python3.7 运行 nodz ---- 免费的基于节点的图形生成器 » 2020-02-22 09:22:12
#79 Re: Qt/MSVC/MINGW/C++/MFC/GTK+/Delphi/BCB » PyQt5与PySide2:两个Python Qt库之间有什么区别? (转载) » 2020-02-21 23:28:12
import sys, os

os.environ["QT_BINDING"] = "PyQt5"
# os.environ["QT_BINDING"] = "PySide2"

if os.environ["QT_BINDING"] == "PyQt5": ###'PyQt5.Widgets' in sys.modules:
    print("import PyQt5")
    from PyQt5.QtWidgets import QApplication, QLabel, QPushButton, QMainWindow, QVBoxLayout, QDialog
    from PyQt5.QtCore import pyqtSignal as Signal, pyqtSlot as Slot, QTimer
    from PyQt5 import uic
elif os.environ["QT_BINDING"] == "PySide2":
    print("import PySide2")
    from PySide2.QtWidgets import QApplication, QLabel, QPushButton, QMainWindow, QVBoxLayout, QDialog
    from PySide2.QtCore import Signal, Slot, QTimer
    from PySide2.QtUiTools import QUiLoader


@Slot(int)
def SlotTimeOut(i):
    print("定时器" + str(i) + "超时 timout: ")

@Slot(bool)
def SlotDelButtonClicked(checked):
    print("按钮被选中? " + str(checked))

if __name__ == '__main__':
    app = QApplication(sys.argv)

    if os.environ["QT_BINDING"] == "PyQt5":
        window = uic.loadUi("mainwindow.ui")
    elif os.environ["QT_BINDING"] == "PySide2":
        uiloader = QUiLoader()
        window = uiloader.load("mainwindow.ui")

    a = 0
    timer1 = QTimer()
    timer1.timeout.connect(lambda: SlotTimeOut(1))
    timer1.start(1000)

    timer2 = QTimer()
    timer2.timeout.connect(lambda: SlotTimeOut(2))
    timer2.start(3005)

    window.startStopButton.clicked.connect(lambda: SlotTimeOut(3))

    window.DelPointButton.setCheckable(True)
#    window.DelPointButton.setChecked(True)
    window.DelPointButton.clicked.connect(SlotDelButtonClicked)
    window.show()

    sys.exit(app.exec_())
再添加一个按钮点击的槽函数.
#80 Re: Qt/MSVC/MINGW/C++/MFC/GTK+/Delphi/BCB » PyQt5与PySide2:两个Python Qt库之间有什么区别? (转载) » 2020-02-21 23:03:51
import sys, os

os.environ["QT_BINDING"] = "PyQt5"
# os.environ["QT_BINDING"] = "PySide2"

if os.environ["QT_BINDING"] == "PyQt5": ###'PyQt5.Widgets' in sys.modules:
    print("import PyQt5")
    from PyQt5.QtWidgets import QApplication, QLabel, QPushButton, QMainWindow, QVBoxLayout, QDialog
    from PyQt5.QtCore import pyqtSignal as Signal, pyqtSlot as Slot, QTimer
    from PyQt5 import uic
elif os.environ["QT_BINDING"] == "PySide2":
    print("import PySide2")
    from PySide2.QtWidgets import QApplication, QLabel, QPushButton, QMainWindow, QVBoxLayout, QDialog
    from PySide2.QtCore import Signal, Slot, QTimer
    from PySide2.QtUiTools import QUiLoader


@Slot(int)
def SlotTimeOut(i):
    print("定时器" + str(i) + "超时 timout: ")


if __name__ == '__main__':
    app = QApplication(sys.argv)

    if os.environ["QT_BINDING"] == "PyQt5":
        window = uic.loadUi("mainwindow.ui")
    elif os.environ["QT_BINDING"] == "PySide2":
        uiloader = QUiLoader()
        window = uiloader.load("mainwindow.ui")

    a = 0
    timer1 = QTimer()
    timer1.timeout.connect(lambda: SlotTimeOut(1))
    timer1.start(1000)

    timer2 = QTimer()
    timer2.timeout.connect(lambda: SlotTimeOut(2))
    timer2.start(3005)

    window.show()

    sys.exit(app.exec_())
槽函数加了一个签名, 用了 lambda 表达式.
输出:
import PyQt5
定时器1超时 timout:
定时器1超时 timout:
定时器1超时 timout:
定时器2超时 timout:
定时器1超时 timout:
定时器1超时 timout:
定时器1超时 timout:
定时器2超时 timout:
定时器1超时 timout: #81 Re: Qt/MSVC/MINGW/C++/MFC/GTK+/Delphi/BCB » PyQt5与PySide2:两个Python Qt库之间有什么区别? (转载) » 2020-02-21 23:00:41
import sys, os

#os.environ["QT_BINDING"] = "PyQt5"
os.environ["QT_BINDING"] = "PySide2"

if os.environ["QT_BINDING"] == "PyQt5": ###'PyQt5.Widgets' in sys.modules:
    print("import PyQt5")
    from PyQt5.QtWidgets import QApplication, QLabel, QPushButton, QMainWindow, QVBoxLayout, QDialog
    from PyQt5.QtCore import pyqtSignal as Signal, pyqtSlot as Slot, QTimer
    from PyQt5 import uic
elif os.environ["QT_BINDING"] == "PySide2":
    print("import PySide2")
    from PySide2.QtWidgets import QApplication, QLabel, QPushButton, QMainWindow, QVBoxLayout, QDialog
    from PySide2.QtCore import Signal, Slot, QTimer
    from PySide2.QtUiTools import QUiLoader


@Slot()
def SlotTimeOut():
    print("超时 timout")


if __name__ == '__main__':
    app = QApplication(sys.argv)

    if os.environ["QT_BINDING"] == "PyQt5":
        window = uic.loadUi("mainwindow.ui")
    elif os.environ["QT_BINDING"] == "PySide2":
        uiloader = QUiLoader()
        window = uiloader.load("mainwindow.ui")

    a = 0
    timer1 = QTimer()
    timer1.timeout.connect(SlotTimeOut)
    timer1.start(1000)
    window.show()

    sys.exit(app.exec_())
添加了一个槽函数, PyQt5/PySide2 测试均 OK
#82 Re: Qt/MSVC/MINGW/C++/MFC/GTK+/Delphi/BCB » PyQt5与PySide2:两个Python Qt库之间有什么区别? (转载) » 2020-02-21 22:37:34
import sys, os

#os.environ["QT_BINDING"] = "PyQt5"
os.environ["QT_BINDING"] = "PySide2"

if os.environ["QT_BINDING"] == "PyQt5": ###'PyQt5.Widgets' in sys.modules:
    print("import PyQt5")
    from PyQt5.QtWidgets import QApplication, QLabel, QPushButton, QMainWindow, QVBoxLayout, QDialog
    from PyQt5.QtCore import pyqtSignal as Signal, pyqtSlot as Slot
    from PyQt5 import uic
elif os.environ["QT_BINDING"] == "PySide2":
    print("import PySide2")
    from PySide2.QtWidgets import QApplication, QLabel, QPushButton, QMainWindow, QVBoxLayout, QDialog
    from PySide2.QtCore import Signal, Slot
    from PySide2.QtUiTools import QUiLoader


if __name__ == '__main__':
    app = QApplication(sys.argv)

    if os.environ["QT_BINDING"] == "PyQt5":
        window = uic.loadUi("mainwindow.ui")
    elif os.environ["QT_BINDING"] == "PySide2":
        uiloader = QUiLoader()
        window = uiloader.load("mainwindow.ui")

    window.show()

    sys.exit(app.exec_())
现学现用, 通过设置环境变量 QT_BINDING 来决定import PySide2, 还是 import PyQt5
#83 Re: Qt/MSVC/MINGW/C++/MFC/GTK+/Delphi/BCB » PyQt5与PySide2:两个Python Qt库之间有什么区别? (转载) » 2020-02-21 22:23:31
Supporting both in libraries
You don't need to worry about this if you're writing a standalone app, just use whichever API you prefer.If you're writing a library, widget or other tool you want to be compatible with both PyQt5 and PySide2 you can do so easily by adding both sets of imports.
import sys
if 'PyQt5' in sys.modules:
# PyQt5
from PyQt5 import QtGui, QtWidgets, QtCore
from PyQt5.QtCore import pyqtSignal as Signal, pyqtSlot as Slotelse:
# PySide2
from PySide2 import QtGui, QtWidgets, QtCore
from PySide2.QtCore import Signal, Slot
测试了一下:
import sys

if 'PySide' in sys.modules:
    # PySide2
    print("import PySide2")
    from PySide2.QtWidgets import QApplication, QLabel, QPushButton, QMainWindow, QVBoxLayout, QDialog
    from PySide2.QtCore import Signal, Slot
else:
    # PyQt5
    print("import PyQt5")
    from PyQt5.QtWidgets import QApplication, QLabel, QPushButton, QMainWindow, QVBoxLayout, QDialog
    from PyQt5.QtCore import pyqtSignal as Signal, pyqtSlot as Slot

if __name__ == '__main__':
    app = QApplication(sys.argv)
    mainwindow1 = QDialog()
    label = QLabel("显示测试")
    button = QPushButton("请点击我噢")
    boxlayout1 = QVBoxLayout()
    boxlayout1.addWidget(label)
    boxlayout1.addWidget(button)
    mainwindow1.setLayout(boxlayout1)
    mainwindow1.show()
    mainwindow1.setWindowTitle("测试标题")
    mainwindow1.resize(80, 150)

    sys.exit(app.exec_())
完全没有问题,随心所欲, 喜欢import哪个库都可以了.
#84 Re: Qt/MSVC/MINGW/C++/MFC/GTK+/Delphi/BCB » PyQt5与PySide2:两个Python Qt库之间有什么区别? (转载) » 2020-02-21 22:17:58
UI files
Both packages use slightly different approaches for loading .ui files exported from Qt Creator/Designer. PyQt5 provides the uic submodule which can be used to load UI files directly, to produce an object. This feels pretty Pythonic (if you ignore the camelCase).

import sys
from PyQt5 import QtWidgets, uic

app = QtWidgets.QApplication(sys.argv)

window = uic.loadUi("mainwindow.ui")
window.show()
app.exec()
The equivalent with PySide2 is one line longer, since you need to create a QUILoader object first. Unfortunately the api of these two interfaces is different too (.load vs .loadUI) and take different parameters.

import sys
from PySide2 import QtCore, QtGui, QtWidgets
from PySide2.QtUiTools import QUiLoader

loader = QUiLoader()

app = QtWidgets.QApplication(sys.argv)
window = loader.load("mainwindow.ui", None)
window.show()
app.exec_()
To load a UI onto an object in PyQt5, for example in your QMainWindow.__init__, you can call uic.loadUI passing in self (the target widget) as the second parameter.

import sys
from PyQt5 import QtCore, QtGui, QtWidgets
from PyQt5 import uic


class MainWindow(QtWidgets.QMainWindow):

    def __init__(self, *args, **kwargs):
        super().__init__(*args, **kwargs)
        uic.loadUi("mainwindow.ui", self)


app = QtWidgets.QApplication(sys.argv)
window = MainWindow()
window.show()
app.exec_()
The PySide2 loader does not support this — the second parameter to .load is the parent widget of the widget you're creating. This prevents you adding custom code to the __init__ block of the widget, but you can work around this with a separate function.

import sys
from PySide2 import QtWidgets
from PySide2.QtUiTools import QUiLoader

loader = QUiLoader()

def mainwindow_setup(w):
    w.setTitle("MainWindow Title")

app = QtWidgets.QApplication(sys.argv)

window = loader.load("mainwindow.ui", None)
mainwindow_setup(window)
window.show()
app.exec()
Converting UI files to Python
Both libraries provide identical scripts to generate Python importable modules from Qt Designer .ui files. For PyQt5 the script is named pyuic5 —

pyuic5 mainwindow.ui -o MainWindow.py
You can then import the UI_MainWindow object, subclass using multiple inheritance from the base class you're using (e.g. QMainWIndow) and then call self.setupUI(self) to set the UI up.

import sys
from PyQt5 import QtWidgets
from MainWindow import Ui_MainWindow

class MainWindow(QtWidgets.QMainWindow, Ui_MainWindow):

    def __init__(self, *args, **kwargs):
        super().__init__(*args, **kwargs)
        self.setupUi(self)


app = QtWidgets.QApplication(sys.argv)
window = MainWindow()
window.show()
app.exec()
For PySide2 it is named pyside2-uic —

pyside2-uic mainwindow.ui -o MainWindow.py
The subsequent setup is identical.

import sys
from PySide2 import QtWidgets
from MainWindow import Ui_MainWindow

class MainWindow(QtWidgets.QMainWindow, Ui_MainWindow):

    def __init__(self, *args, **kwargs):
        super().__init__(*args, **kwargs)
        self.setupUi(self)


app = QtWidgets.QApplication(sys.argv)
window = MainWindow()
window.show()
app.exec_()
For more information on using Qt Designer with either PyQt5 or PySide2 see the Qt Creator tutorial.
PyQt5 与 PySide2 加载 .ui 界面文件的差异.
#85 Re: Qt/MSVC/MINGW/C++/MFC/GTK+/Delphi/BCB » PyQt5与PySide2:两个Python Qt库之间有什么区别? (转载) » 2020-02-21 22:06:45
#86 Re: Qt/MSVC/MINGW/C++/MFC/GTK+/Delphi/BCB » PyQt5与PySide2:两个Python Qt库之间有什么区别? (转载) » 2020-02-21 21:49:16
#87 Re: Qt/MSVC/MINGW/C++/MFC/GTK+/Delphi/BCB » PyQt5与PySide2:两个Python Qt库之间有什么区别? (转载) » 2020-02-21 21:48:20
#88 Qt/MSVC/MINGW/C++/MFC/GTK+/Delphi/BCB » PyQt5与PySide2:两个Python Qt库之间有什么区别? (转载) » 2020-02-21 21:46:47
#89 Re: Qt/MSVC/MINGW/C++/MFC/GTK+/Delphi/BCB » 请问Qt如何判断一个点是否在多边形内部呢? » 2020-02-21 17:06:06
太感谢楼上的胸弟了, 根据关键字搜索到, 自己撸了几行测试, 没毛病
from PySide2.QtCore import QPointF, Qt
from PySide2.QtGui import QPolygonF

poly = QPolygonF([QPointF(0.0, 0.0), QPointF(0.0, -100.0), QPointF(100.0, -100.0), QPointF(100.0, 0.0)])
print(poly.containsPoint(QPointF(50, -50.0), Qt.FillRule.WindingFill))
print(poly.containsPoint(QPointF(99, -99.0), Qt.FillRule.WindingFill))
print(poly.containsPoint(QPointF(99, -101.0), Qt.FillRule.WindingFill))
结果正确:
True
True
False#92 Re: Qt/MSVC/MINGW/C++/MFC/GTK+/Delphi/BCB » 发一个 PyQt4/PyQt5/PySide2 都能跑的 Python 信号/槽 演示程序 » 2020-02-20 10:47:36
# from PyQt4.QtGui import QWidget,QLabel,QDateEdit, QLineEdit, QApplication, QPushButton, QVBoxLayout
# from PyQt4.QtCore import pyqtSignal as Signal, pyqtSlot as Slot

# from PyQt5.QtWidgets import QWidget,QLabel,QDateEdit, QLineEdit, QApplication, QPushButton, QVBoxLayout
# from PyQt5.QtCore import pyqtSignal as Signal,pyqtSlot as Slot

# from PySide2.QtWidgets import QWidget,QLabel,QDateEdit, QLineEdit, QApplication, QPushButton, QVBoxLayout
# from PySide2.QtCore import Signal,Slot

from Qt.QtWidgets import QWidget,QLabel,QDateEdit, QLineEdit, QApplication, QPushButton, QVBoxLayout
from Qt.QtCore import Signal,Slot

import sys,os

class TestWidget(QWidget):
    def __init__(self):
        super().__init__()
        self.initUI()
        self.count = 0

    #定义一个型号
    test_signal = Signal(int)

    #信号发送器
    def on_button_clicked(self):
       #self.close()
       self.count += 1
       self.test_signal.emit(self.count)

    # 信号接收器
    @Slot(int)
    def signal_receiver_test(self, value):
        self.editor.setText(str(value))

    def initUI(self):
        self.layout = QVBoxLayout()
        self.btn = QPushButton("信号发送测试(Qt Signal Test)", self)
        self.editor = QLineEdit("", self)
        self.layout.addWidget(self.btn)
        self.layout.addWidget(self.editor)
        self.setLayout(self.layout)
        self.btn.clicked.connect(self.on_button_clicked)
        self.test_signal.connect(self.signal_receiver_test)

if __name__ == '__main__':
    app = QApplication(sys.argv)
    edit = TestWidget()
    edit.show()
    sys.exit(app.exec_())
也兼容 Qt.Py
^_^
#93 Re: Qt/MSVC/MINGW/C++/MFC/GTK+/Delphi/BCB » 发一个 PyQt4/PyQt5/PySide2 都能跑的 Python 信号/槽 演示程序 » 2020-02-20 10:32:37
#94 Qt/MSVC/MINGW/C++/MFC/GTK+/Delphi/BCB » 发一个 PyQt4/PyQt5/PySide2 都能跑的 Python 信号/槽 演示程序 » 2020-02-20 10:26:44
- pythinker
- 回复: 2
from PyQt4.QtGui import QWidget,QLabel,QDateEdit, QLineEdit, QApplication, QPushButton, QVBoxLayout
from PyQt4.QtCore import pyqtSignal as Signal, pyqtSlot as Slot

# from PyQt5.QtWidgets import QWidget,QLabel,QDateEdit, QLineEdit, QApplication, QPushButton, QVBoxLayout
# from PyQt5.QtCore import pyqtSignal as Signal,pyqtSlot as Slot

# from PySide2.QtWidgets import QWidget,QLabel,QDateEdit, QLineEdit, QApplication, QPushButton, QVBoxLayout
# from PySide2.QtCore import Signal,Slot

import sys,os

class TestWidget(QWidget):
    def __init__(self):
        super().__init__()
        self.initUI()
        self.count = 0

    #定义一个型号
    test_signal = Signal(int)

    #信号发送器
    def on_button_clicked(self):
       #self.close()
       self.count += 1
       self.test_signal.emit(self.count)

    # 信号接收器
    @Slot(int)
    def signal_receiver_test(self, value):
        self.editor.setText(str(value))

    def initUI(self):
        self.layout = QVBoxLayout()
        self.btn = QPushButton("信号发送测试(Qt Signal Test)", self)
        self.editor = QLineEdit("", self)
        self.layout.addWidget(self.btn)
        self.layout.addWidget(self.editor)
        self.setLayout(self.layout)
        self.btn.clicked.connect(self.on_button_clicked)
        self.test_signal.connect(self.signal_receiver_test)

if __name__ == '__main__':
    app = QApplication(sys.argv)
    edit = TestWidget()
    edit.show()
    sys.exit(app.exec_())
一行一行敲出来的 ^_^
PyQt5/PySide2信号槽统一的代码参考了: https://www.learnpyqt.com/blog/pyqt5-vs-pyside2/
#96 Re: 华芯微特 » 华芯微特正式复工啦!!! » 2020-02-19 23:05:34
#97 Re: Qt/MSVC/MINGW/C++/MFC/GTK+/Delphi/BCB » python3.7 运行 nodz ---- 免费的基于节点的图形生成器 » 2020-02-19 16:32:47
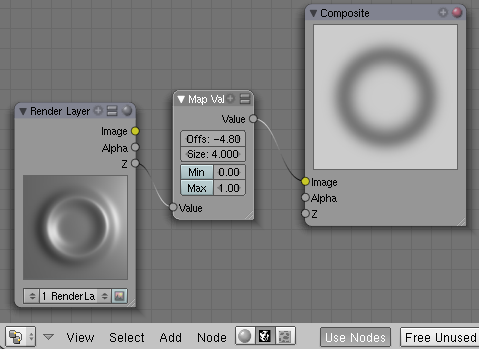
搞定, 只要修改 nodz_demo.py 就可以了:
import os
os.environ["QT_PREFERRED_BINDING"] = "PySide2"

from Qt import QtCore, QtWidgets
import Qt

if Qt.IsPySide2:
    os.environ['QT_QPA_PLATFORM_PLUGIN_PATH'] = os.path.dirname(Qt.__file__) + "\\" \
                                                + os.environ["QT_PREFERRED_BINDING"] + "\\plugins\\"
elif Qt.IsPyQt5:
    os.environ['QT_QPA_PLATFORM_PLUGIN_PATH'] = os.path.dirname(Qt.__file__) + "\\" \
                                                + os.environ["QT_PREFERRED_BINDING"] + "\\Qt\\plugins\\"
import nodz_main
#98 Re: Qt/MSVC/MINGW/C++/MFC/GTK+/Delphi/BCB » python3.7 运行 nodz ---- 免费的基于节点的图形生成器 » 2020-02-19 15:08:41
安装Qt.Py:
D:\>d:\Python\Python37\python.exe -m pip install Qt.py
Collecting Qt.py
  Downloading https://files.pythonhosted.org/packages/e0/72/d777cb02ead5c6ac0b05
af5911bb02abfbf49b6bd20878684442c8a4c051/Qt.py-1.2.4-py2.py3-none-any.whl
Installing collected packages: Qt.py
Successfully installed Qt.py-1.2.4
现场测试OK:
D:\>set QT_PREFERRED_BINDING=PyQt5

D:\>python -c "import Qt;print(Qt.__binding__)"
PyQt5

D:\>set QT_PREFERRED_BINDING=PyQt4

D:\>python -c "import Qt;print(Qt.__binding__)"
PyQt4

D:\>set QT_PREFERRED_BINDING=PySide2

D:\>python -c "import Qt;print(Qt.__binding__)"
PySide2

D:\>set QT_PREFERRED_BINDING=PySide

D:\>python -c "import Qt;print(Qt.__binding__)"
Traceback (most recent call last):
  File "<string>", line 1, in <module>
  File "D:\Python\Python37\lib\site-packages\Qt.py", line 1874, in <module>
    _install()
  File "D:\Python\Python37\lib\site-packages\Qt.py", line 1822, in _install
    raise ImportError("No Qt binding were found.")
ImportError: No Qt binding were found.

D:\>#99 Re: Qt/MSVC/MINGW/C++/MFC/GTK+/Delphi/BCB » python3.7 运行 nodz ---- 免费的基于节点的图形生成器 » 2020-02-19 15:05:55
终于搞明白了, 上面为什么要用 from Qt,
而不是 from PySide2, 或者 from PyQt5, 又或者 from PyQt4,
因为有了这个: https://github.com/mottosso/Qt.py
只要设置 环境变量 QT_PREFERRED_BINDING 即可,
可以通过以下这种命令行设置:
$ set QT_PREFERRED_BINDING=PyQt5  # Windows
$ export QT_PREFERRED_BINDING=PyQt5  # Unix/OSX
或者用代码设置:
import os
os.environ["QT_PREFERRED_BINDING"] = "PySide";
from Qt import QtCore, QtWidgets
参考: https://fredrikaverpil.github.io/2016/07/25/developing-with-qt-py/
#100 Re: Php/Nodejs/Web/HTML5/Javascript/微信开发/Python » Python pygame 俄罗斯方块(tetris)游戏 » 2020-02-19 13:47:07
#102 Re: Qt/MSVC/MINGW/C++/MFC/GTK+/Delphi/BCB » python3.7 运行 nodz ---- 免费的基于节点的图形生成器 » 2020-02-19 11:54:57
#103 Re: Qt/MSVC/MINGW/C++/MFC/GTK+/Delphi/BCB » python3.7 运行 nodz ---- 免费的基于节点的图形生成器 » 2020-02-19 11:52:33


#104 Re: Qt/MSVC/MINGW/C++/MFC/GTK+/Delphi/BCB » python3.7 运行 nodz ---- 免费的基于节点的图形生成器 » 2020-02-19 11:50:19
克隆代码之后, 源码要修改几处, 参考: https://whycan.cn/t_3724.html#p34108
#105 Qt/MSVC/MINGW/C++/MFC/GTK+/Delphi/BCB » python3.7 运行 nodz ---- 免费的基于节点的图形生成器 » 2020-02-19 11:49:38
- pythinker
- 回复: 9
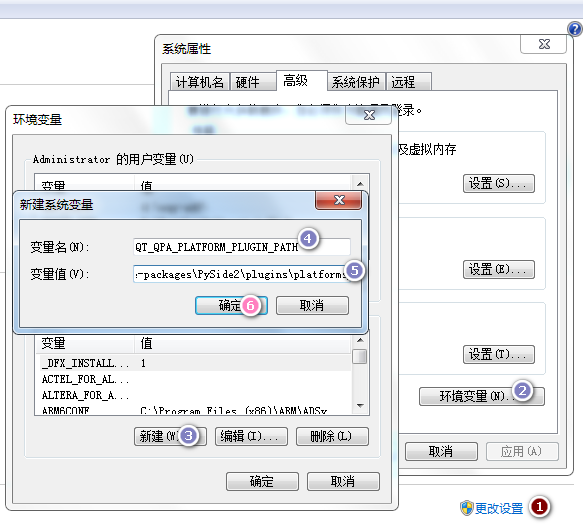
#106 Re: Qt/MSVC/MINGW/C++/MFC/GTK+/Delphi/BCB » python3.7 使用 pip 命令安装 PySide2 Qt5 软件包了, 也可以手动安装. » 2020-02-19 11:18:36
找到解决方案了: https://blog.csdn.net/ouening/article/details/81093697
# This Python file uses the following encoding: utf-8
import sys,os
import PySide2

dirname = os.path.dirname(PySide2.__file__)
plugin_path = os.path.join(dirname, 'plugins', 'platforms')
os.environ['QT_QPA_PLATFORM_PLUGIN_PATH'] = plugin_path

from PySide2.QtWidgets import QApplication, QMainWindow


class MainWindow(QMainWindow):
    def __init__(self):
        QMainWindow.__init__(self)


if __name__ == "__main__":
    app = QApplication([])
    window = MainWindow()
    window.show()
    sys.exit(app.exec_())
#107 Re: Qt/MSVC/MINGW/C++/MFC/GTK+/Delphi/BCB » python3.7 使用 pip 命令安装 PySide2 Qt5 软件包了, 也可以手动安装. » 2020-02-19 11:14:09
# This Python file uses the following encoding: utf-8
import sys,os
import PySide2
from PySide2.QtWidgets import QApplication, QMainWindow


class MainWindow(QMainWindow):
    def __init__(self):
        QMainWindow.__init__(self)


if __name__ == "__main__":
    app = QApplication([])
    window = MainWindow()
    window.show()
    sys.exit(app.exec_())
不知道是不是由于安装了 PyQt5 冲突的缘故, 报如下错误:
qt.qpa.plugin: Could not find the Qt platform plugin "windows" in ""
This application failed to start because no Qt platform plugin could be initialized. Reinstalling the application may fix this problem.#108 Qt/MSVC/MINGW/C++/MFC/GTK+/Delphi/BCB » python3.7 使用 pip 命令安装 PySide2 Qt5 软件包了, 也可以手动安装. » 2020-02-19 11:11:27
- pythinker
- 回复: 2
E:>E:\Python37\python.exe -m pip install PySide2
Collecting PySide2
  Using cached https://files.pythonhosted.org/packages/a0/d3/5e8811ddc6c0e794c26
c87eb9c32e66930a46d6b19e61cbce79e5c5f6865/PySide2-5.14.1-5.14.1-cp35.cp36.cp37.c
p38-none-win_amd64.whl
Requirement already satisfied: shiboken2==5.14.1 in E:\python37\lib\site-
packages (from PySide2) (5.14.1)
Installing collected packages: PySide2
Successfully installed PySide2-5.14.1
也可以手动下载安装: PySide2-5.14.1-5.14.1-cp35.cp36.cp37.cp38-none-win_amd64.whl
#109 Re: Qt/MSVC/MINGW/C++/MFC/GTK+/Delphi/BCB » python3.7 使用 pip 命令安装 PyQt5 软件包了, 也可以手动安装. » 2020-02-19 10:43:40
#!/usr/bin/python3
# -*- coding: utf-8 -*-

"""
ZetCode PyQt5 tutorial

In this example, we receive data from
a QInputDialog dialog.

Aauthor: Jan Bodnar
Website: zetcode.com
Last edited: August 2017
"""

from PyQt5.QtWidgets import (QWidget, QPushButton, QLineEdit,
    QInputDialog, QApplication)
import sys

class Example(QWidget):

    def __init__(self):
        super().__init__()

        self.initUI()


    def initUI(self):

        self.btn = QPushButton('Dialog', self)
        self.btn.move(20, 20)
        self.btn.clicked.connect(self.showDialog)

        self.le = QLineEdit(self)
        self.le.move(130, 22)

        self.setGeometry(300, 300, 290, 150)
        self.setWindowTitle('Input dialog')
        self.show()


    def showDialog(self):

        text, ok = QInputDialog.getText(self, 'Input Dialog',
            'Enter your name:')

        if ok:
            self.le.setText(str(text))


if __name__ == '__main__':

    app = QApplication(sys.argv)
    ex = Example()
    sys.exit(app.exec_())
拷贝几行代码: http://zetcode.com/gui/pyqt5/dialogs/
运行: E:\Python37\python.exe d:\8899\x.py
参考: http://zetcode.com/gui/pyqt5/
试一试, 完全OK
#110 Qt/MSVC/MINGW/C++/MFC/GTK+/Delphi/BCB » python3.7 使用 pip 命令安装 PyQt5 软件包了, 也可以手动安装. » 2020-02-19 10:41:16
- pythinker
- 回复: 2
E:\>E:\Python37\python.exe -m pip uninstall PyQt5
Uninstalling PyQt5-5.10.1:
  Would remove:
    E:\python37\lib\site-packages\pyqt5-5.10.1.dist-info\*
    E:\python37\lib\site-packages\pyqt5\*
    E:\python37\scripts\pylupdate5.exe
    E:\python37\scripts\pyrcc5.exe
    E:\python37\scripts\pyuic5.exe
Proceed (y/n)? y
  Successfully uninstalled PyQt5-5.10.1
旧的 PyQt5 运行就出错, 所以先卸载:
然后安装新的:
E:>E:\Python37\python.exe -m pip install pyqt5
Collecting pyqt5
  Downloading https://files.pythonhosted.org/packages/46/83/7c27aec708a1eb12812a
0b985eb42eebfe3bb87e294cdca1c4af308d2fa9/PyQt5-5.14.1-5.14.1-cp35.cp36.cp37.cp38
-none-win_amd64.whl (53.1MB)
    3% |█                               | 1.7MB 9.3kB/s eta 1:32:11
Operation cancelled by user
发现安装速度太慢, 所以去下载一个手动安装:
http://pypi.doubanio.com/packages/46/83/7c27aec708a1eb12812a0b985eb42eebfe3bb87e294cdca1c4af308d2fa9/PyQt5-5.14.1-5.14.1-cp35.cp36.cp37.cp38-none-win_amd64.whl#md5=81d3c49eb109cf1293025fe01cf66739
一切OK:
E:>E:\Python37\python.exe -m pip install d:\downloads\PyQt5-5.1
4.1-5.14.1-cp35.cp36.cp37.cp38-none-win_amd64.whl
Processing d:\downloads\pyqt5-5.14.1-5.14.1-cp35.cp36.cp37.cp38-none-win_amd64.w
hl
Collecting PyQt5-sip<13,>=12.7 (from PyQt5==5.14.1)
  Downloading https://files.pythonhosted.org/packages/66/a6/3f1609f1a77445a088be
e7490229a4d430c9d0e1afd8ebd185fbc9c6aa57/PyQt5_sip-12.7.1-cp37-cp37m-win_amd64.w
hl (58kB)
    100% |████████████████████████████████| 61kB
 77kB/s
Installing collected packages: PyQt5-sip, PyQt5
Successfully installed PyQt5-5.14.1 PyQt5-sip-12.7.1#111 Re: Qt/MSVC/MINGW/C++/MFC/GTK+/Delphi/BCB » python3.7 使用 pip 命令已经不能安装 PyQt4 软件包了, 记录下载文件手动安装过程. » 2020-02-19 10:22:10
import sys
from PyQt4 import QtGui


class Example(QtGui.QWidget):

    def __init__(self):
        super(Example, self).__init__()

        self.initUI()

    def initUI(self):

        QtGui.QToolTip.setFont(QtGui.QFont('SansSerif', 10))

        self.setToolTip('This is a <b>QWidget</b> widget')

        btn = QtGui.QPushButton('Button', self)
        btn.setToolTip('This is a <b>QPushButton</b> widget')
        btn.resize(btn.sizeHint())
        btn.move(50, 50)

        self.setGeometry(300, 300, 250, 150)
        self.setWindowTitle('Tooltips')
        self.show()

def main():

    app = QtGui.QApplication(sys.argv)
    ex = Example()
    sys.exit(app.exec_())


if __name__ == '__main__':
    main()
#112 Re: 全志 SOC » 准备用F1C00s做个项目,GUI选什么好呢? » 2020-02-19 10:16:23
#113 Re: Qt/MSVC/MINGW/C++/MFC/GTK+/Delphi/BCB » python3.7 使用 pip 命令已经不能安装 PyQt4 软件包了, 记录下载文件手动安装过程. » 2020-02-19 10:12:21
import sys
from PyQt4 import QtGui


def main():

    app = QtGui.QApplication(sys.argv)

    w = QtGui.QWidget()
    w.resize(250, 150)
    w.move(300, 300)
    w.setWindowTitle('Simple')

    label = QtGui.QLabel("Hello World")
    w.addWidget(label)
    w.show()

    sys.exit(app.exec_())


if __name__ == '__main__':
main()#114 Re: Qt/MSVC/MINGW/C++/MFC/GTK+/Delphi/BCB » python3.7 使用 pip 命令已经不能安装 PyQt4 软件包了, 记录下载文件手动安装过程. » 2020-02-19 09:56:23
#115 Re: Qt/MSVC/MINGW/C++/MFC/GTK+/Delphi/BCB » python3.7 使用 pip 命令已经不能安装 PyQt4 软件包了, 记录下载文件手动安装过程. » 2020-02-19 09:43:23
打开 https://www.lfd.uci.edu/~gohlke/pythonlibs/
找到
PyQt4 (discontinued): a set of bindings for the Qt4 application framework.
Requires write access to the site-packages\PyQt4 folder to create qt.conf.
PyQt4‑4.11.4‑cp37‑cp37m‑win_amd64.whl
PyQt4‑4.11.4‑cp37‑cp37m‑win32.whl
PyQt4‑4.11.4‑cp36‑cp36m‑win_amd64.whl
PyQt4‑4.11.4‑cp36‑cp36m‑win32.whl
PyQt4‑4.11.4‑cp35‑cp35m‑win_amd64.whl
PyQt4‑4.11.4‑cp35‑cp35m‑win32.whl
PyQt4‑4.11.4‑cp34‑cp34m‑win_amd64.whl
PyQt4‑4.11.4‑cp34‑cp34m‑win32.whl
PyQt4‑4.11.4‑cp27‑cp27m‑win_amd64.whl
PyQt4‑4.11.4‑cp27‑cp27m‑win32.whl
我下载的是第一个: https://download.lfd.uci.edu/pythonlibs/s2jqpv5t/PyQt4-4.11.4-cp37-cp37m-win_amd64.whl
安装:
E:\Python37>E:\Python37\python.exe -m pip install D:\Downloads\PyQt4-4.11.4-cp37-cp37m-win_amd64.whl
Processing d:\downloads\pyqt4-4.11.4-cp37-cp37m-win_amd64.whl
Installing collected packages: PyQt4
Successfully installed PyQt4-4.11.4#116 Qt/MSVC/MINGW/C++/MFC/GTK+/Delphi/BCB » python3.7 使用 pip 命令已经不能安装 PyQt4 软件包了, 记录下载文件手动安装过程. » 2020-02-19 09:40:34
#117 Re: Qt/MSVC/MINGW/C++/MFC/GTK+/Delphi/BCB » 基于 Qt Graphics View 的俄罗斯方库(Tetris) » 2020-02-18 20:38:19
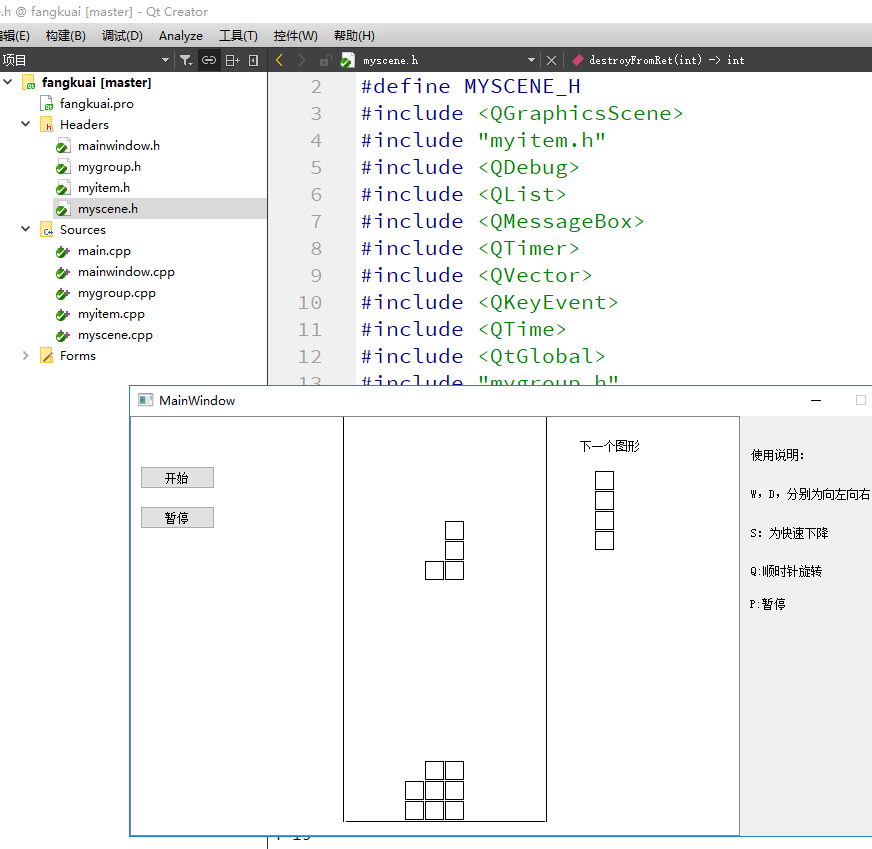
#118 Qt/MSVC/MINGW/C++/MFC/GTK+/Delphi/BCB » 基于 Qt Graphics View 的俄罗斯方库(Tetris) » 2020-02-18 20:37:49
- pythinker
- 回复: 1
#119 Re: Qt/MSVC/MINGW/C++/MFC/GTK+/Delphi/BCB » Windows搭建当前 Qt4 最后一个版本 Qt4.8.7 +mingw 开发环境 » 2020-02-18 20:09:34
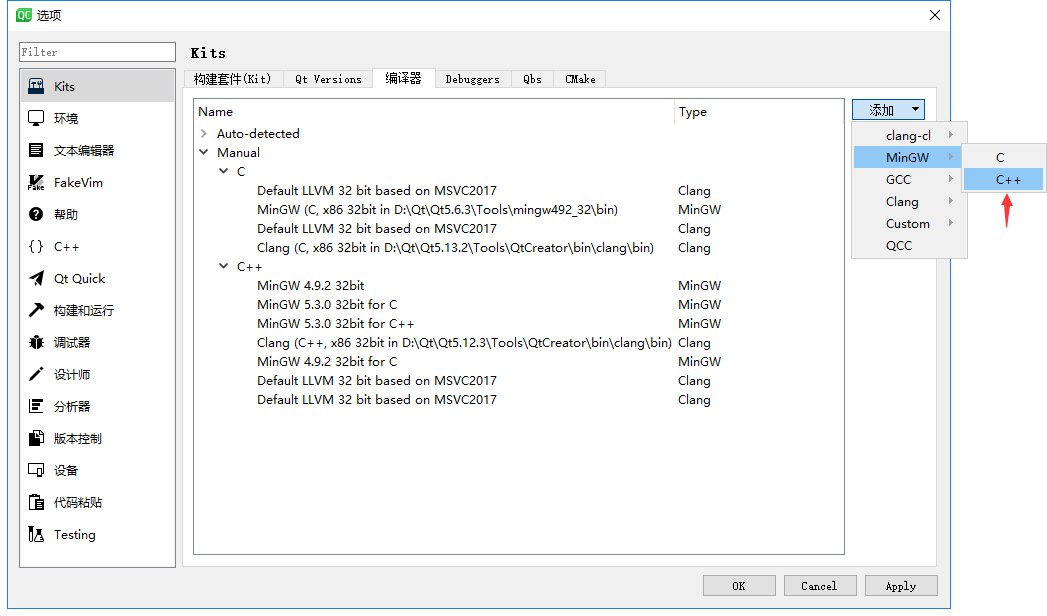
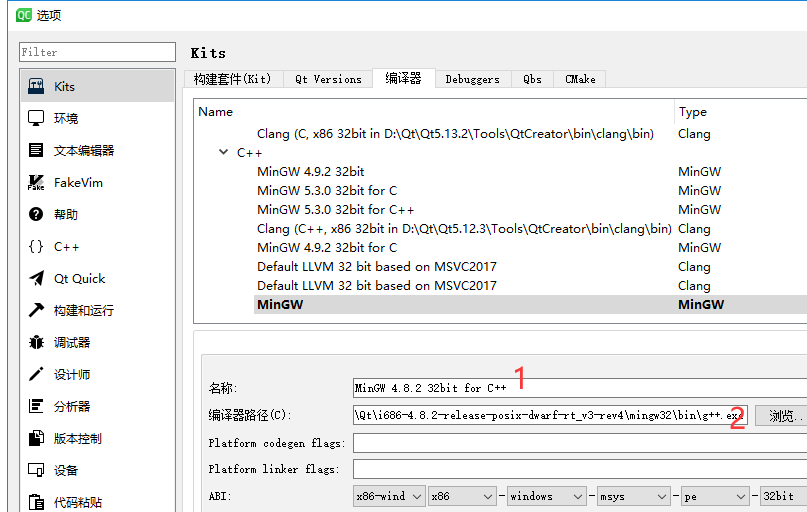
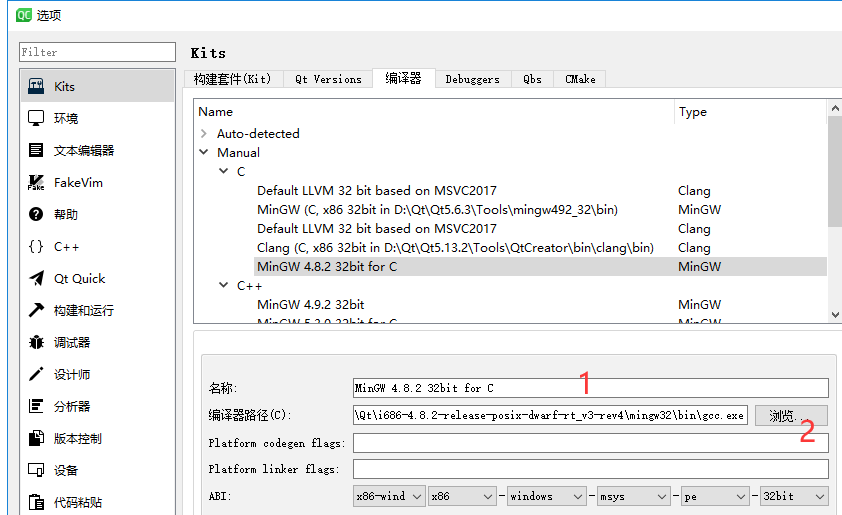
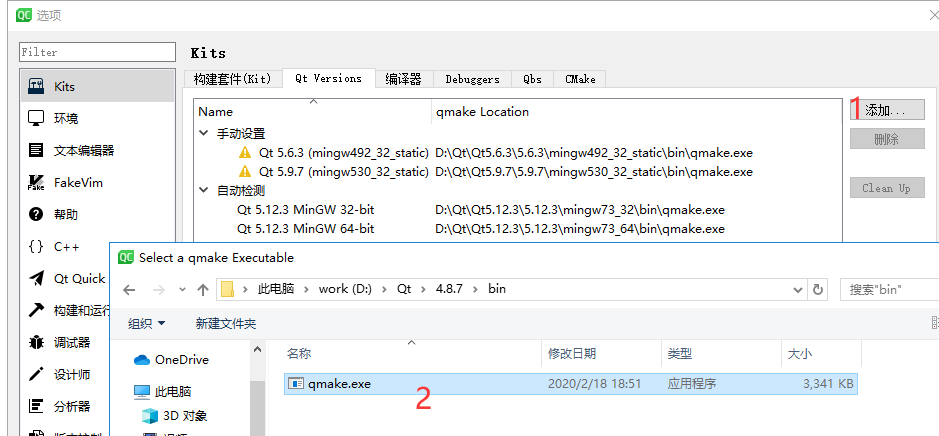
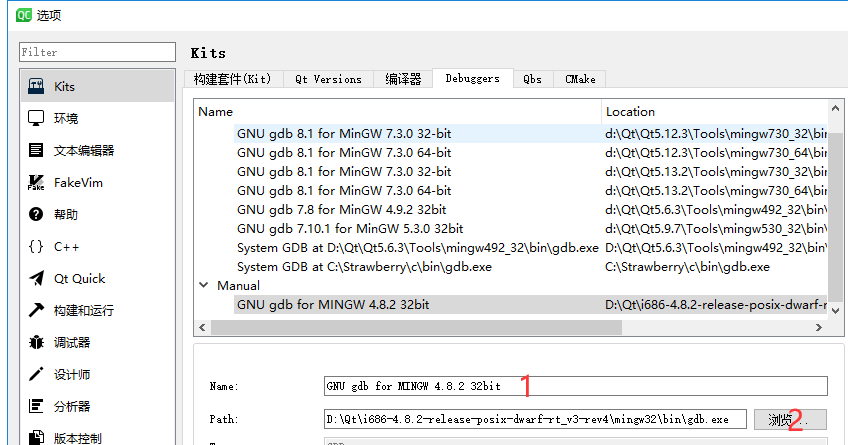
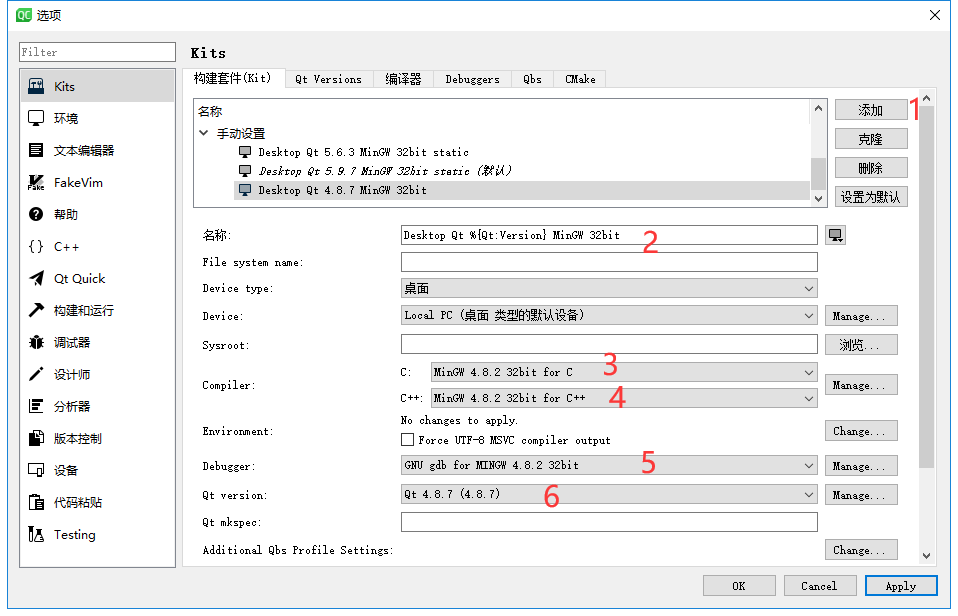
#120 Qt/MSVC/MINGW/C++/MFC/GTK+/Delphi/BCB » Windows搭建当前 Qt4 最后一个版本 Qt4.8.7 +mingw 开发环境 » 2020-02-18 20:06:55
- pythinker
- 回复: 5
1. 下载并解压 mingw4.8.2: i686-4.8.2-release-posix-dwarf-rt_v3-rev4.7z
https://sourceforge.net/projects/mingw-w64/files/Toolchains%20targetting%20Win32/Personal%20Builds/mingw-builds/4.8.2/threads-posix/dwarf/
2. 下载安装 Qt4.8.7 mingw SDK:
https://download.qt.io/archive/qt/4.8/4.8.7/
https://download.qt.io/archive/qt/4.8/4.8.7/qt-opensource-windows-x86-mingw482-4.8.7.exe
3. 添加 c/c++/gcc/gdb/qt sdk 到 qtcreator
#126 Re: Qt/MSVC/MINGW/C++/MFC/GTK+/Delphi/BCB » Qt 的矢量svg编辑器示例 ---- VectorEditor » 2020-02-18 11:32:49
#127 Re: Qt/MSVC/MINGW/C++/MFC/GTK+/Delphi/BCB » Qt 的矢量svg编辑器示例 ---- VectorEditor » 2020-02-18 11:30:28
#128 Re: Qt/MSVC/MINGW/C++/MFC/GTK+/Delphi/BCB » Qt 的矢量svg编辑器示例 ---- VectorEditor » 2020-02-18 11:29:41

#129 Re: 全志 SOC » Allwinner S3 增加 AXP209 PMIC 的一些记录 » 2020-02-18 11:28:58
#130 Re: Qt/MSVC/MINGW/C++/MFC/GTK+/Delphi/BCB » Qt 的矢量svg编辑器示例 ---- VectorEditor » 2020-02-18 11:25:51

#131 Re: Qt/MSVC/MINGW/C++/MFC/GTK+/Delphi/BCB » Qt 的矢量svg编辑器示例 ---- VectorEditor » 2020-02-18 11:24:34

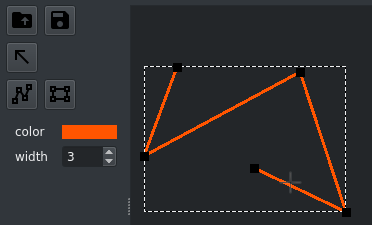
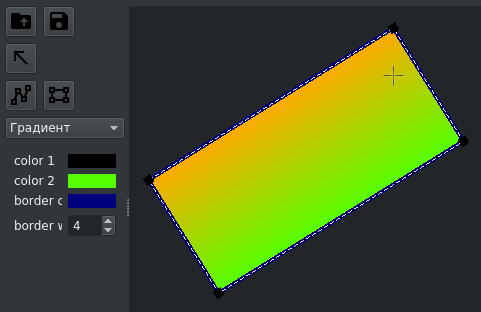
#132 Qt/MSVC/MINGW/C++/MFC/GTK+/Delphi/BCB » Qt 的矢量svg编辑器示例 ---- VectorEditor » 2020-02-18 11:23:15
- pythinker
- 回复: 8
#133 Re: Qt/MSVC/MINGW/C++/MFC/GTK+/Delphi/BCB » 基于Qt节点/端口的数据处理流程编辑器 ---- QNodesEditor » 2020-02-18 10:35:47
#134 Re: Qt/MSVC/MINGW/C++/MFC/GTK+/Delphi/BCB » 基于Qt节点/端口的数据处理流程编辑器 ---- QNodesEditor » 2020-02-18 10:25:04
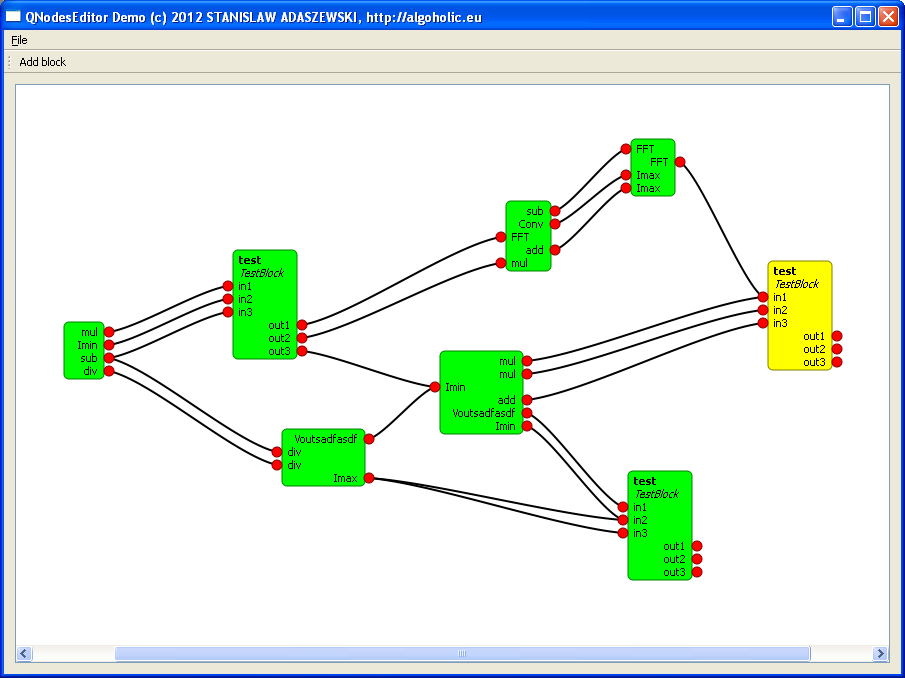
#135 Re: Qt/MSVC/MINGW/C++/MFC/GTK+/Delphi/BCB » 基于Qt节点/端口的数据处理流程编辑器 ---- QNodesEditor » 2020-02-18 10:24:09
这个未测试: QtNodeEditor_v0_1_before_refactoring.7z
这个Qt5能编译通过正常运行: qnodeseditor-qt5.zip
#136 Qt/MSVC/MINGW/C++/MFC/GTK+/Delphi/BCB » 基于Qt节点/端口的数据处理流程编辑器 ---- QNodesEditor » 2020-02-18 10:20:58
#137 Re: Php/Nodejs/Web/HTML5/Javascript/微信开发/Python » 适用于Python的科学图形和GUI库 ---- PyQtGraph » 2020-02-18 09:22:34
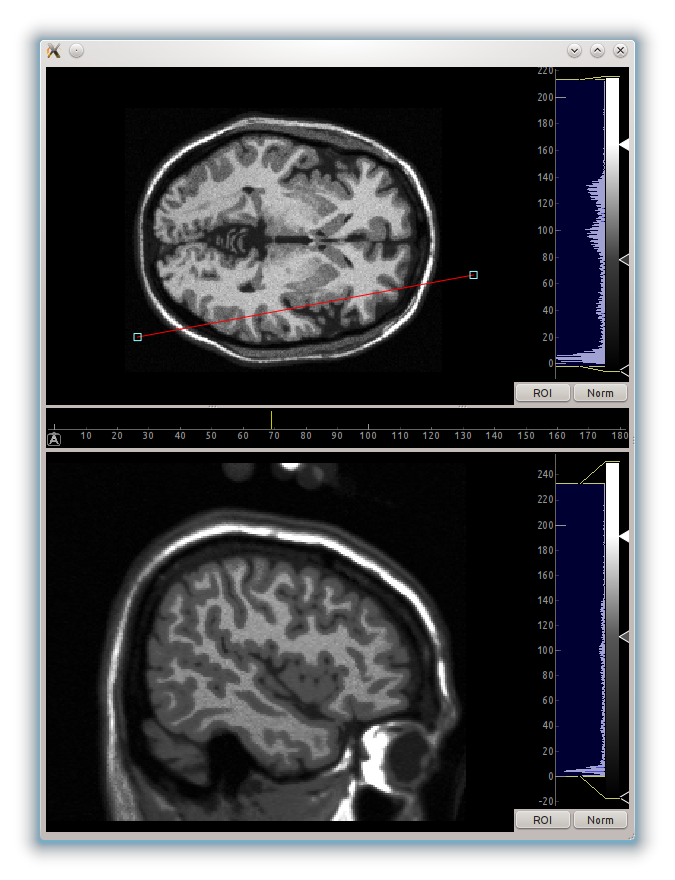
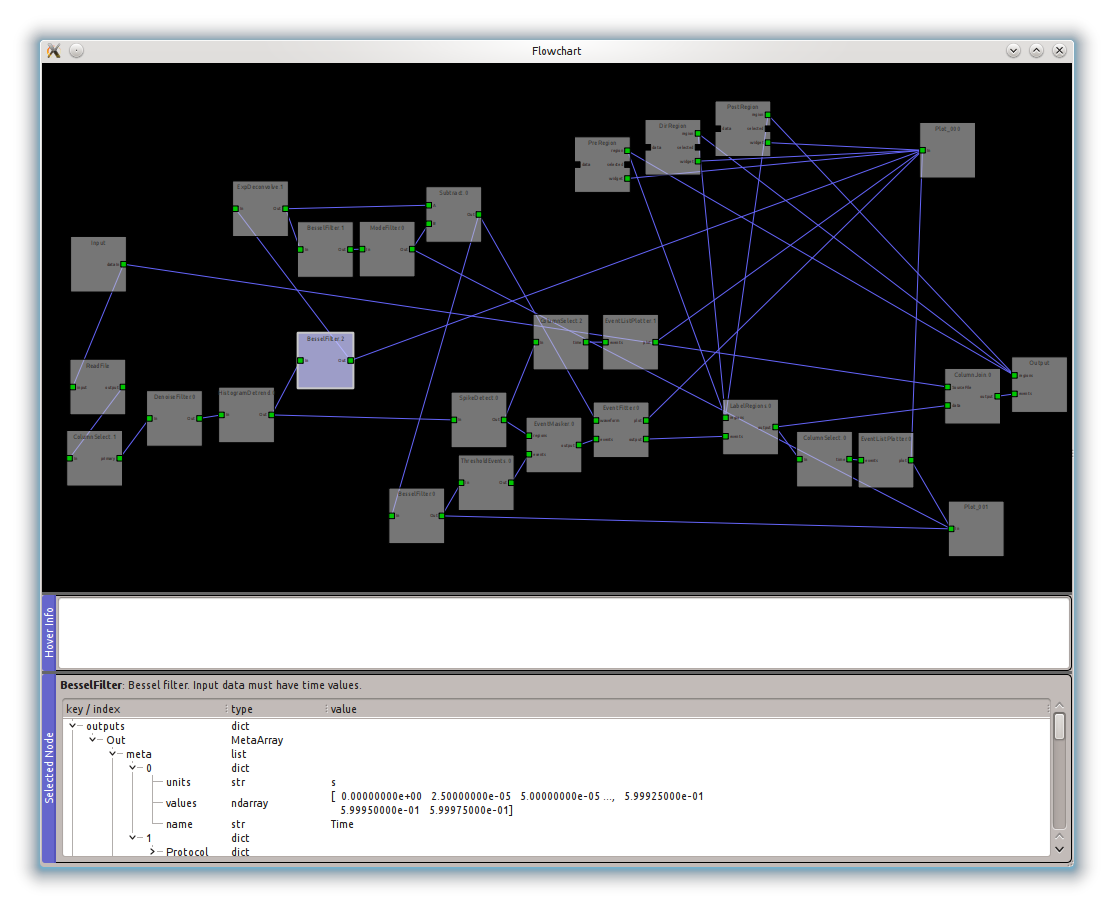
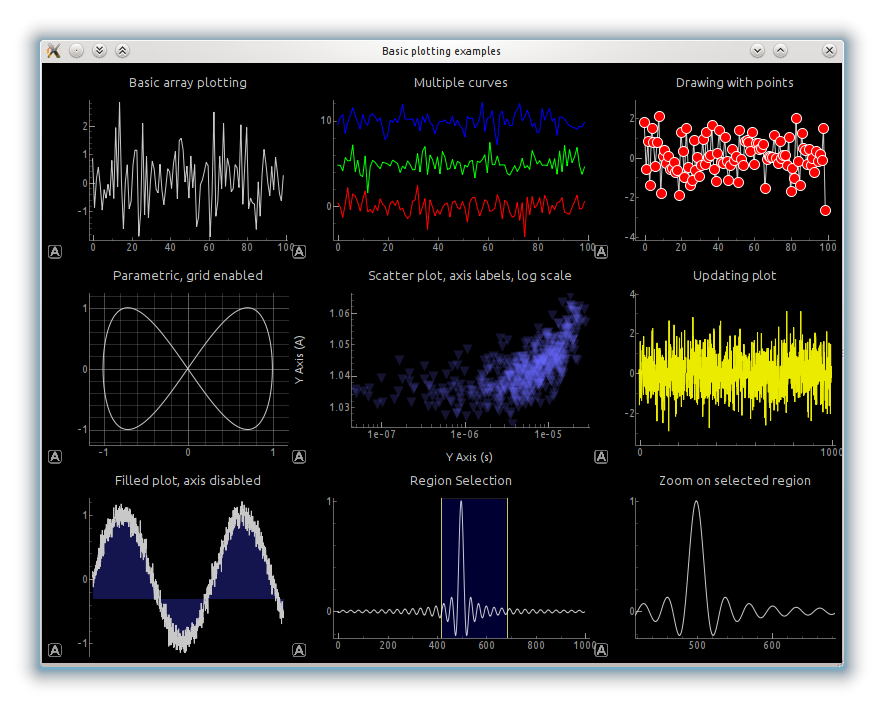
#138 Re: Php/Nodejs/Web/HTML5/Javascript/微信开发/Python » 适用于Python的科学图形和GUI库 ---- PyQtGraph » 2020-02-18 09:21:02
PyQtGraph是基于PyQt4 / PySide和numpy构建的纯Python图形和GUI库。它旨在用于数学/科学/工程应用。尽管完全用python编写,但由于numpy大量使用数字处理和Qt的GraphicsView框架进行快速显示,该库非常快。PyQtGraph是根据MIT开源许可证发行的。
主要特点:
交互式视图框中的基本2D绘图
线图和散点图
数据可以通过鼠标平移/缩放
快速绘制以进行实时数据显示和交互
带有交互式查找表和级别控制的图像显示
显示大多数数据类型(整数或浮点;任何位深度; RGB,RGBA或亮度)
用于以任意角度切片多维图像的功能(对于MRI数据来说很棒)
快速更新视频显示或实时交互
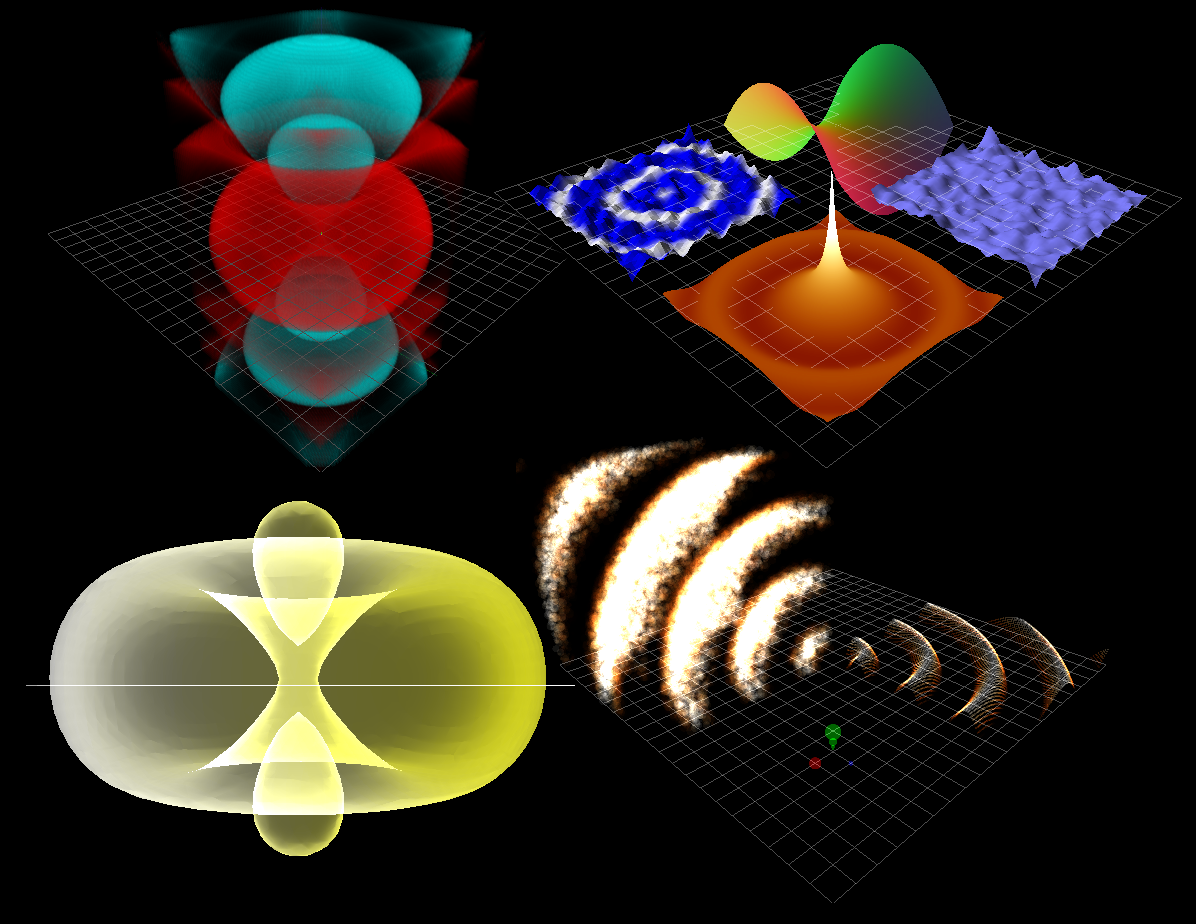
3D图形系统(需要Python-OpenGL绑定)
体数据渲染
3D表面和散点图
等值面生成的网格渲染
交互式视口使用鼠标旋转/缩放
基本的3D场景图,易于编程
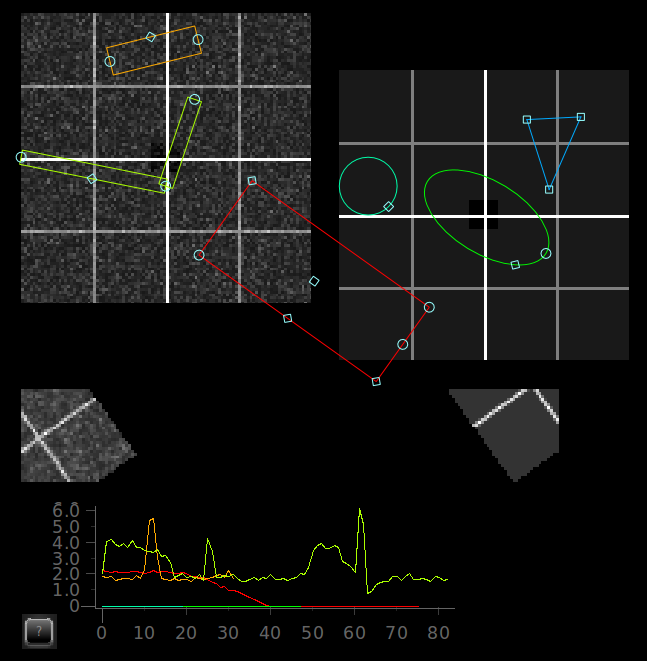
数据选择/标记和关注区域控制
交互式标记图中的垂直/水平位置和区域
用于从图像中选择任意区域并自动切片数据以匹配的小部件
易于生成新图形
2D图形使用Qt的GraphicsView框架,该框架功能强大且成熟。
3D图形使用OpenGL
所有图形都使用场景图来管理项目。新的图形项很容易创建。
对科学/工程应用有用的小部件和模块库
用于交互式原型的流程图小部件。
与LabView相似的接口(通过电线连接的节点)。
用于显示/编辑参数层次结构的参数树小部件
(类似于大多数GUI设计应用程序所使用的小部件)。
具有异常捕获功能的交互式python控制台。
非常适合调试/自省以及高级用户交互。
多进程控制允许远程绘图,跨进程的Qt信号连接以及非常简单的在线并行化。
坞站系统允许用户重新排列GUI组件。
与Qt的扩展坞系统类似,但更加灵活和可编程。
色彩渐变编辑器
具有SI单位显示和对数步进的SpinBox
安装:
PyQtGraph实际上并不需要任何安装脚本。只需要将pyqtgraph文件夹放置在可导入的位置。大多数人将更喜欢将此文件夹简单地放置在较大的项目文件夹中。如果要使pyqtgraph在系统范围内可用,请使用下面列出的方法之一:
Debian,Ubuntu和类似的Linux:
下载页面顶部链接的.deb文件。
其他Linux:
许多人已经为非Debian Linux发行版生成了软件包,包括Arch,Suse和Gentoo。检查您的分发存储库中是否有pyqtgraph软件包。
Windows:
下载并运行页面顶部链接的.exe安装程序文件。
每个人(包括OSX):
下载页面顶部链接的.tar.gz源程序包,解压缩其内容,然后从解压缩的目录中运行“ python setup.py install”(pyqtgraph是纯Python库,因此在此安装过程中不会进行编译)。或者,使用“ pip install pyqtgraph”从pypi安装。
要求:
PyQtGraph已知可以在Linux,Windows和OSX上运行。
但是,它应在支持以下软件包的任何平台上运行:
Python 2.7和3+
PyQt 4.8+或PySide
NumPy
3D图形需要python-opengl绑定
说明文件:
文档在此处托管。
如果您想索取文档的特定部分,请在论坛上提问 。还有很多例子可以浏览。对于示例菜单运行:
python -m pyqtgraph.examples
包装包装:
使用pyqtgraph编写的应用程序可以使用py2exe打包为Windows exe文件,或者使用py2app打包为OSX dmg文件。对于pyqtgraph 0.9.8及更早版本,请阅读这份出色而详尽的 文档,其中介绍了该过程。由基督教加文
对于过去的版本0.9.8,使用py2exe要简单得多; 参见示例/ py2exe。
问题,反馈和错误报告:
将问题,反馈和错误报告发布到pyqtgraph论坛。
或者:使用标签“ pyqtgraph”将问题发布到Stack Overflow(如果未正确标记,我可能永远不会看到它)。
与其他python图形包的比较:
Matplotlib或多或少是python的事实上的标准绘图库。如果您要开始一个新项目并且不需要pyqtgraph专门提供的任何功能,则应从matplotlib开始。它更加成熟,拥有庞大的用户社区,并且可以产生非常好的出版物质量的图形。
您可能要改用pyqtgraph的原因:
速度。如果您要执行需要快速绘图更新,视频或实时交互的操作,则matplotlib并不是最佳选择。(我认为)这是matplotlib的最大弱点。
便携性/易于安装。PyQtGraph是一个纯python软件包,这意味着它几乎可以在numpy和PyQt支持的每个平台上运行,而无需编译。如果您需要应用程序中的可移植性,这可以使您的生活变得更加轻松。
许多其他功能-pyqtgraph不仅仅是绘图库;它努力通过更高级的功能来覆盖科学/工程应用程序开发的许多方面,例如ImageView和ScatterPlotWidget分析工具,基于ROI的数据切片,参数树,流程图,多处理等。
VisPy是一个新的基于OpenGL的2D / 3D可视化库,是PyQtGraph,VisVis,Galry和Glumpy的作者之间合作开发的。它目前处于早期开发阶段,其范围比PyQtGraph狭窄-它将专注于可视化,而无需PyQtGraph提供的GUI工具包功能。从长远来看,我们希望VisPy能够取代Qt作为2D图形的渲染引擎,并完全取代pyqtgraph.opengl 3D系统。 有关VisPy的更多信息,请点击这里。
PyQwt具有一组非常好的功能,并且足够快地进行实时工作。它的主要缺点是它目前尚未维护,并且可能难以在各种平台上工作。希望将来可以找到一个新的维护者,但是在那之前最好避免使用PyQwt(原始的PyQwt维护者目前建议使用pyqtgraph;请检查其邮件列表以获取更新)。像matplotlib一样,PyQwt缺少pyqtgraph的一些更高级的功能。
Chaco是一个非常有趣的项目-精美的图形,良好的速度以及积极开发的项目。但是,与PyQwt一样,Chaco可能很难在多种平台上进行安装,并且缺少pyqtgraph的一些更高级的功能(尽管pyqtgraph当然也缺少Chaco的许多功能)。
GuiQwt是一个有趣的项目,具有许多与pyqtgraph类似的高级功能。它目前基于PyQwt,因此存在一些缺点,尽管将来似乎有计划对此进行更改。
[请注意:我已经有一段时间没有使用这些库了;请让我知道此信息是否过时。]#139 Php/Nodejs/Web/HTML5/Javascript/微信开发/Python » 适用于Python的科学图形和GUI库 ---- PyQtGraph » 2020-02-18 09:18:50
#140 Re: 全志 SOC » 关于荔枝派nano的设备树更新 » 2020-02-10 14:41:37
#141 Re: 全志 SOC » buildroot问题 » 2020-02-10 11:42:10
#142 Re: DIY/综合/Arduino/写字机/3D打印机/智能小车/平衡车/四轴飞行/MQTT/物联网 » 极地杯垫 ------ 饮料杯垫绘图机 » 2020-01-28 13:23:39

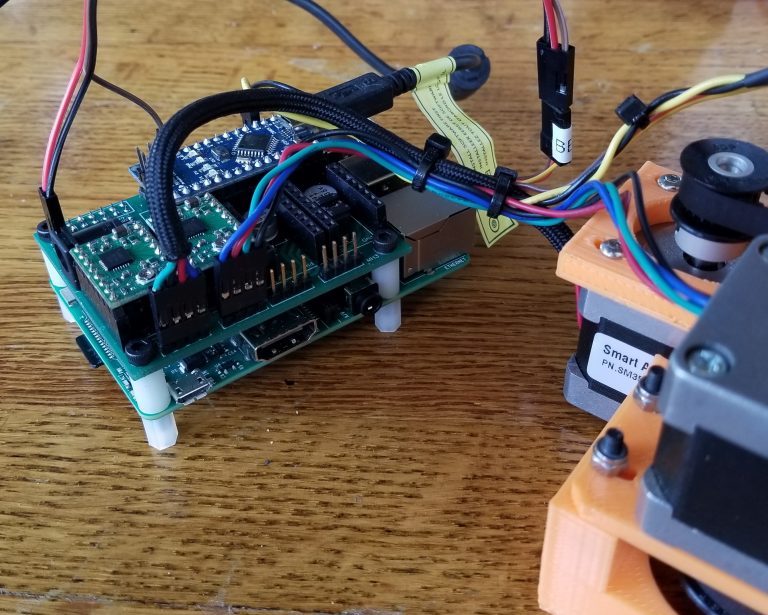
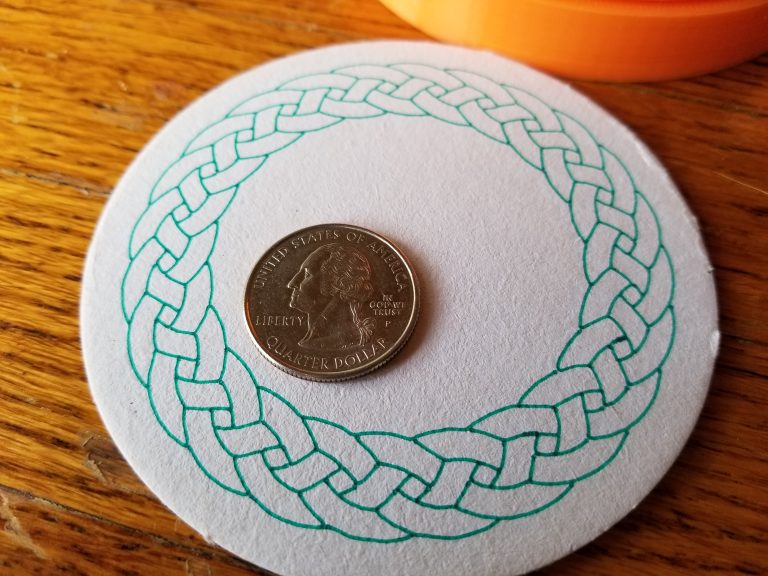
#143 Re: DIY/综合/Arduino/写字机/3D打印机/智能小车/平衡车/四轴飞行/MQTT/物联网 » 极地杯垫 ------ 饮料杯垫绘图机 » 2020-01-28 13:23:04
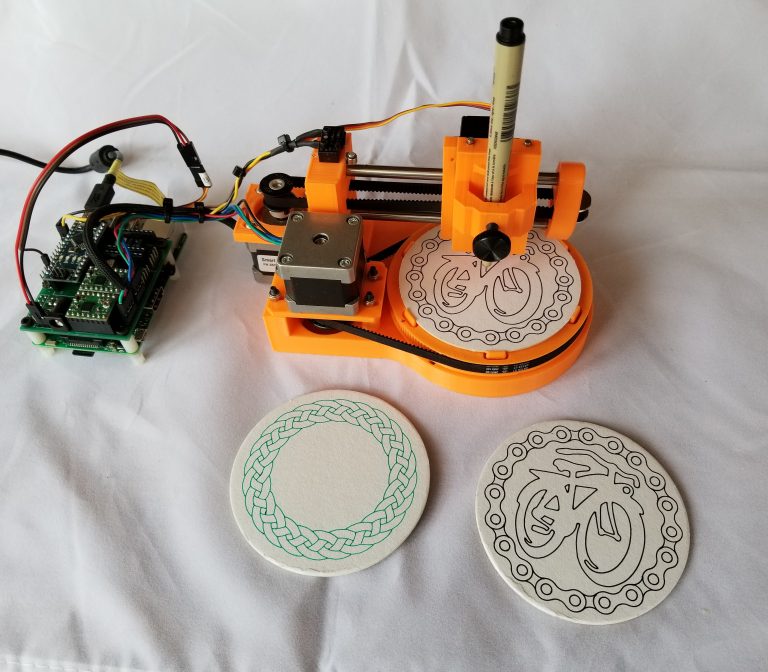
#145 Re: DIY/综合/Arduino/写字机/3D打印机/智能小车/平衡车/四轴飞行/MQTT/物联网 » PyCNC ---- 适用于Raspberry Pi和其他ARM Linux板的Python CNC机器控制器 » 2020-01-28 12:33:01
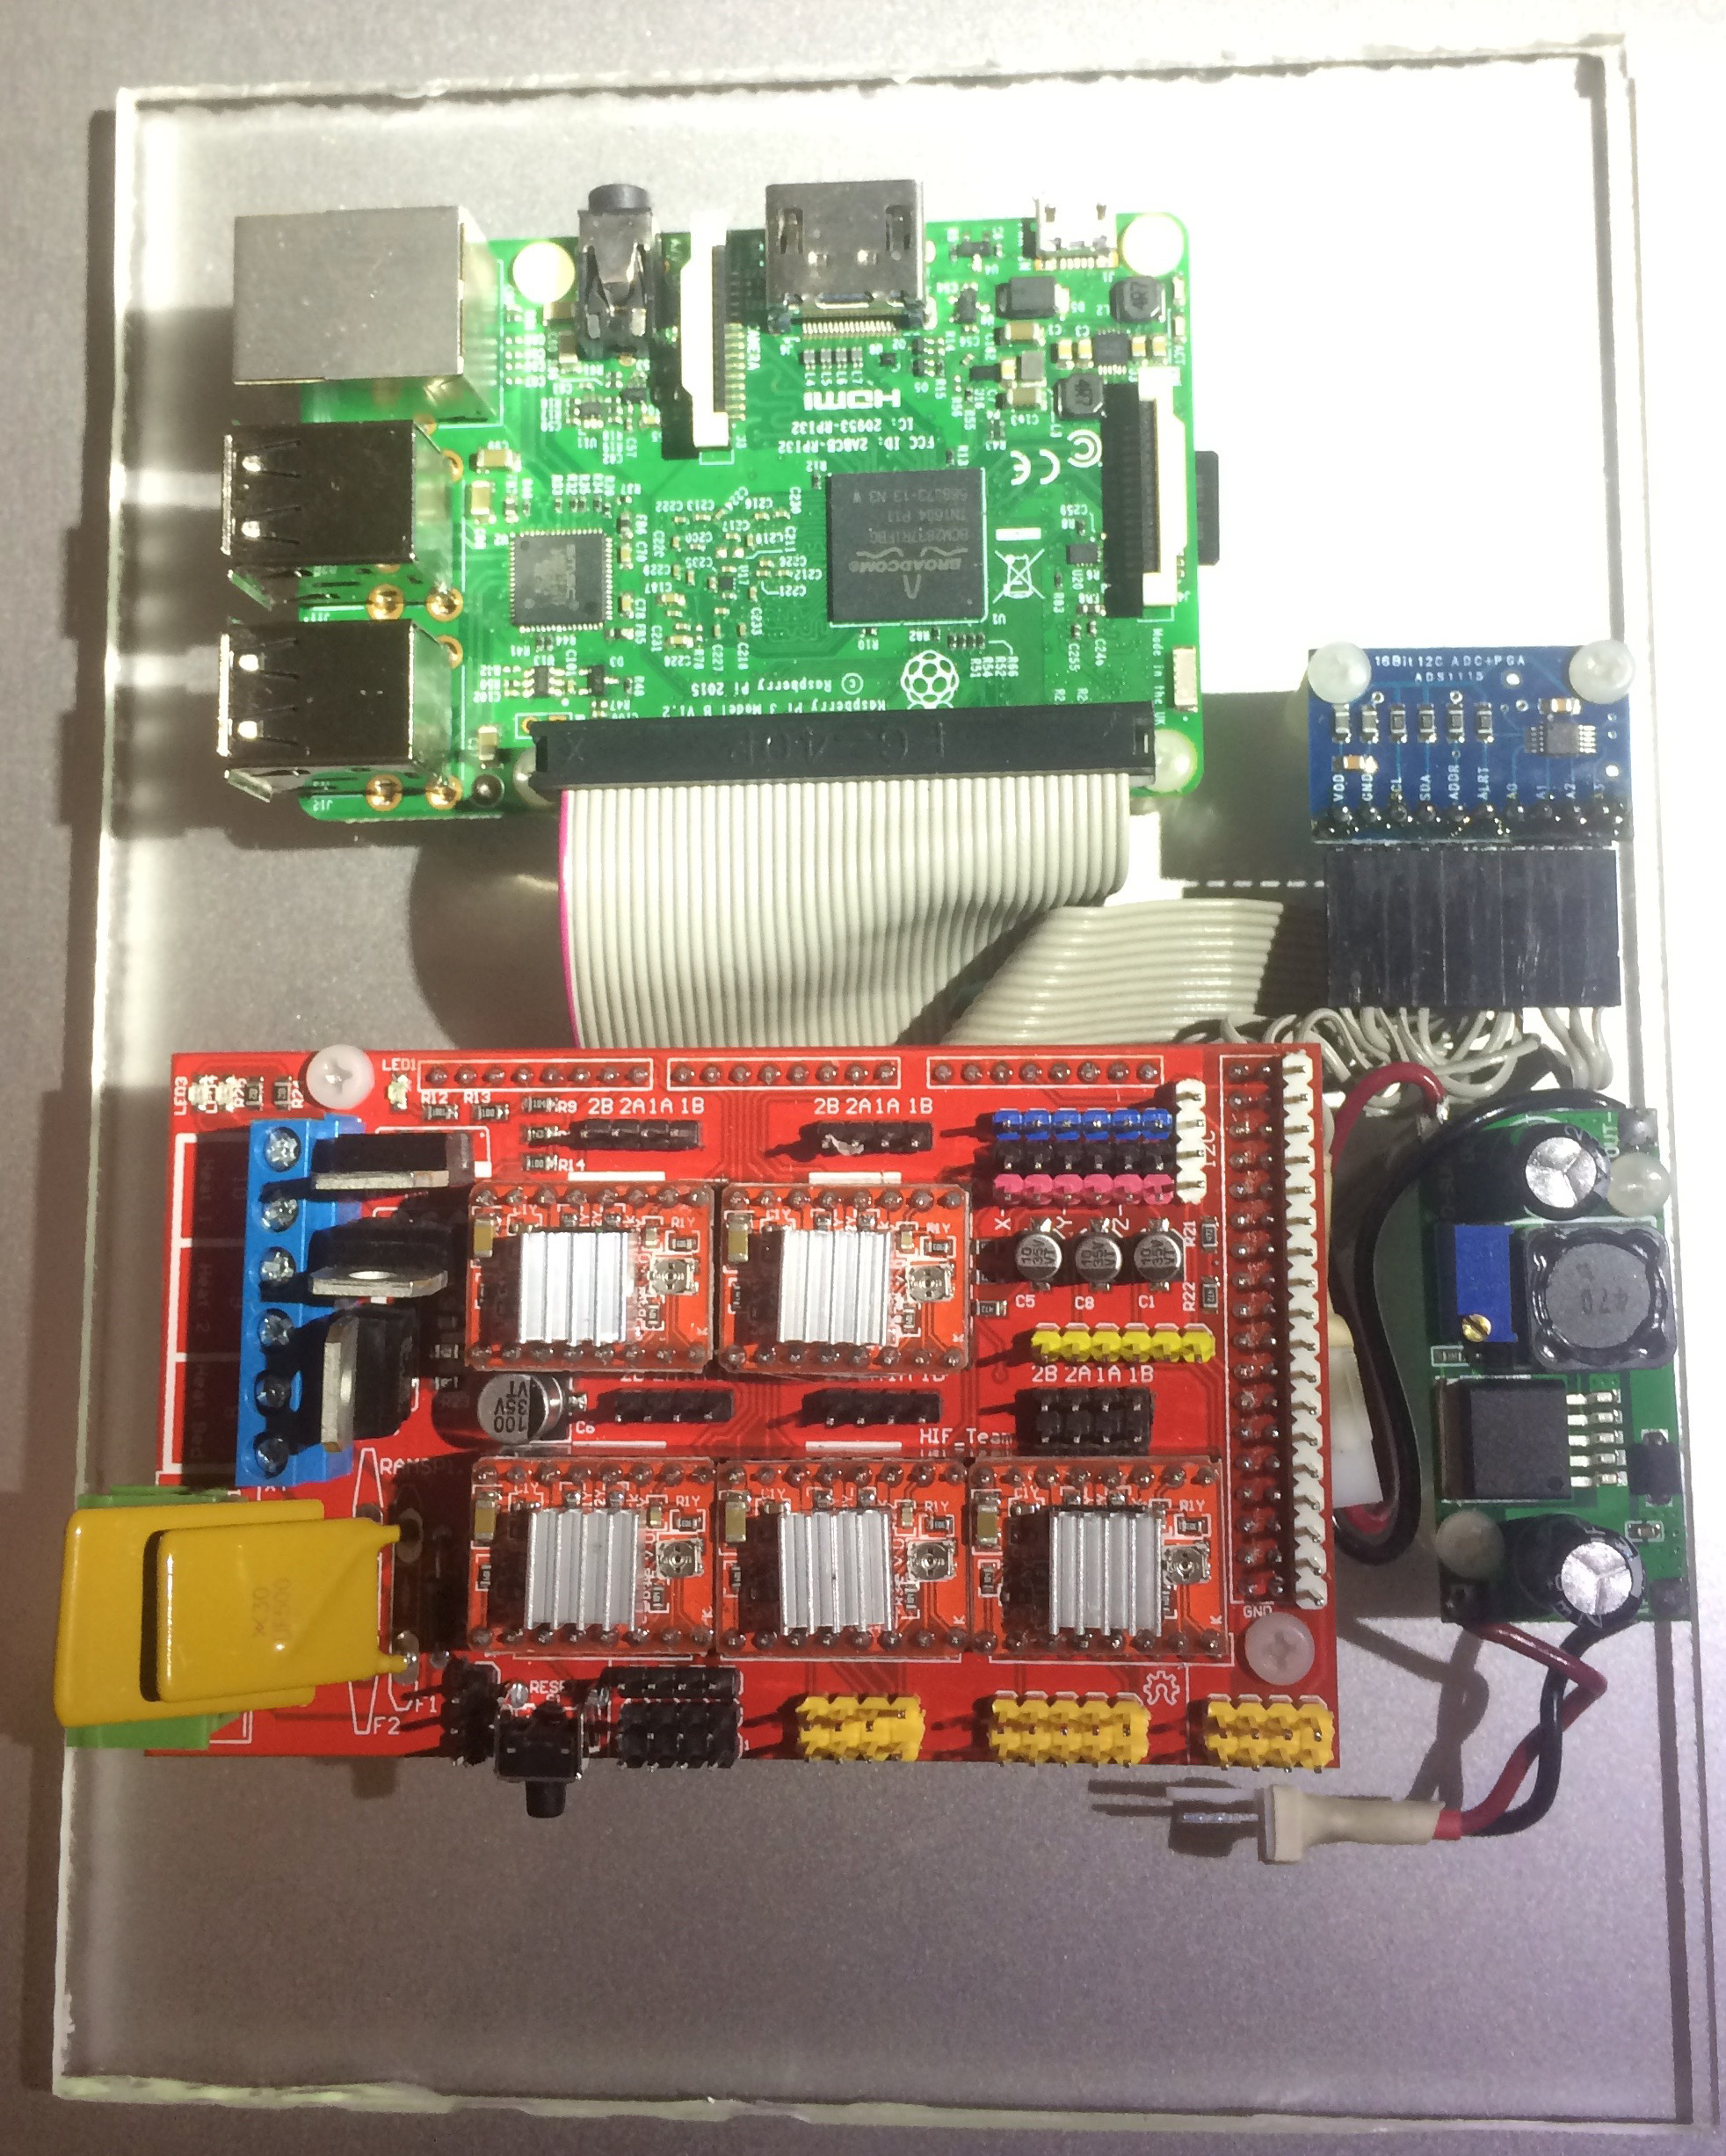

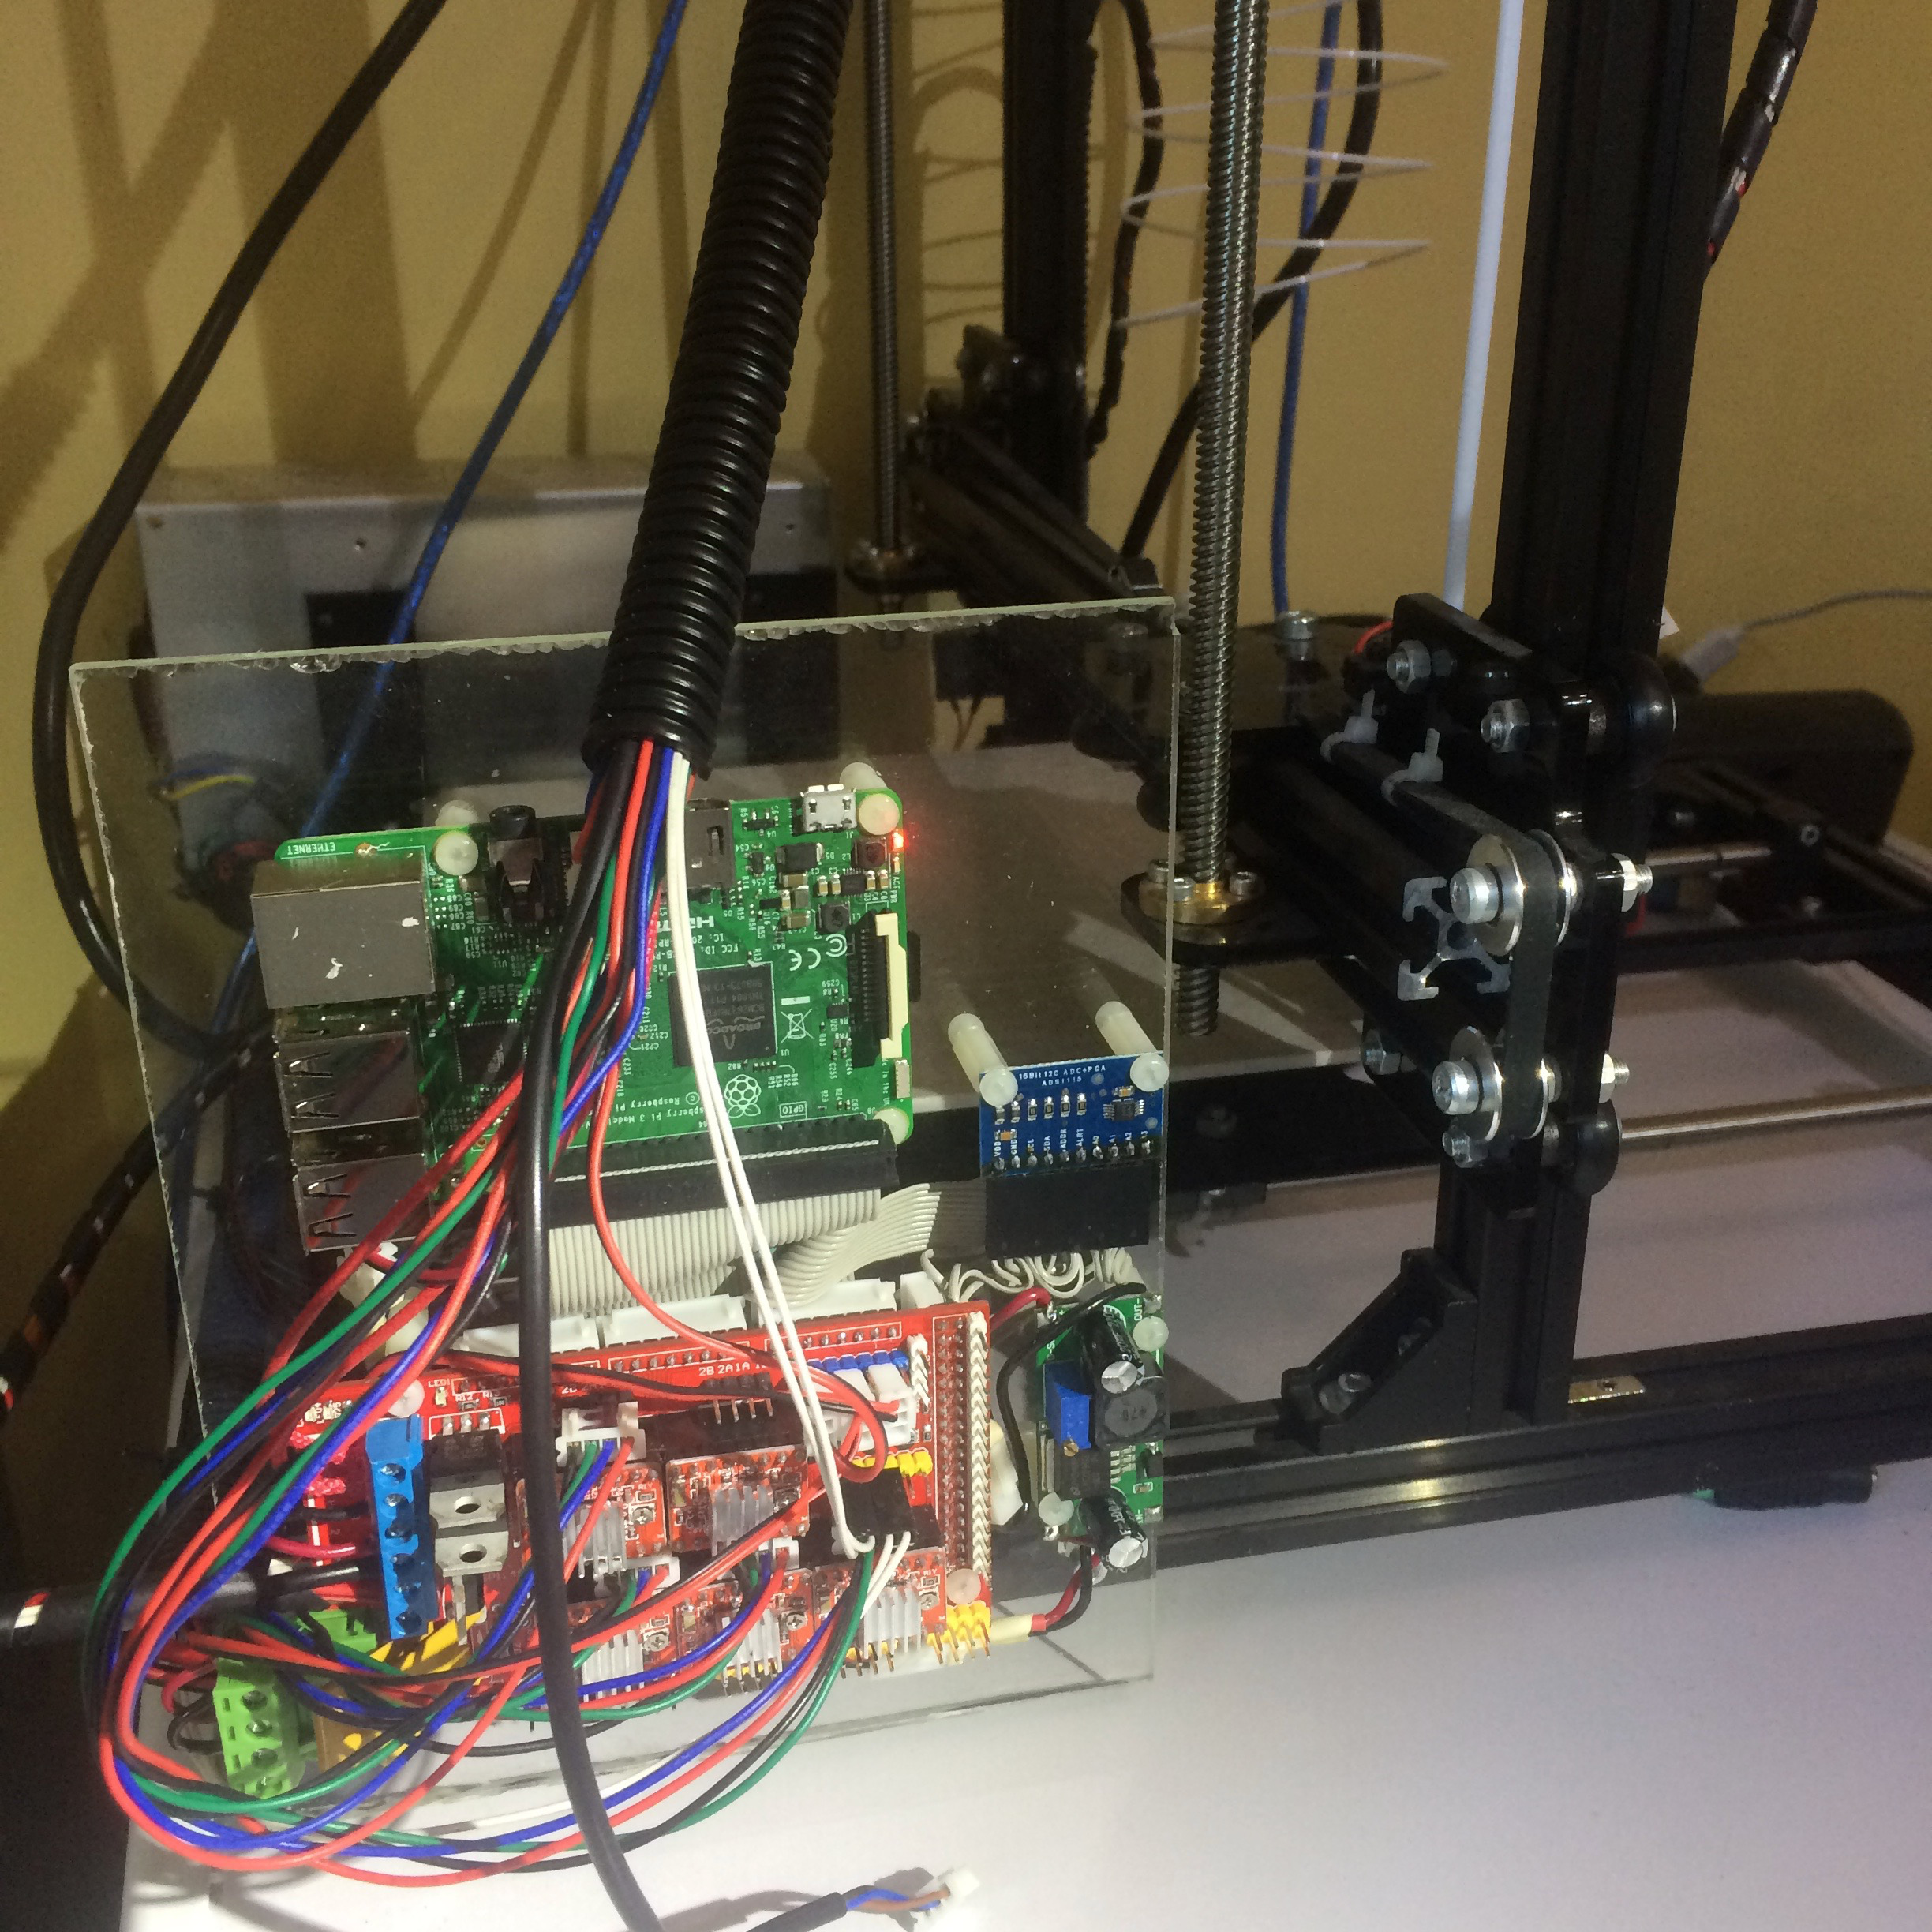
#146 Re: DIY/综合/Arduino/写字机/3D打印机/智能小车/平衡车/四轴飞行/MQTT/物联网 » PyCNC ---- 适用于Raspberry Pi和其他ARM Linux板的Python CNC机器控制器 » 2020-01-28 12:26:09
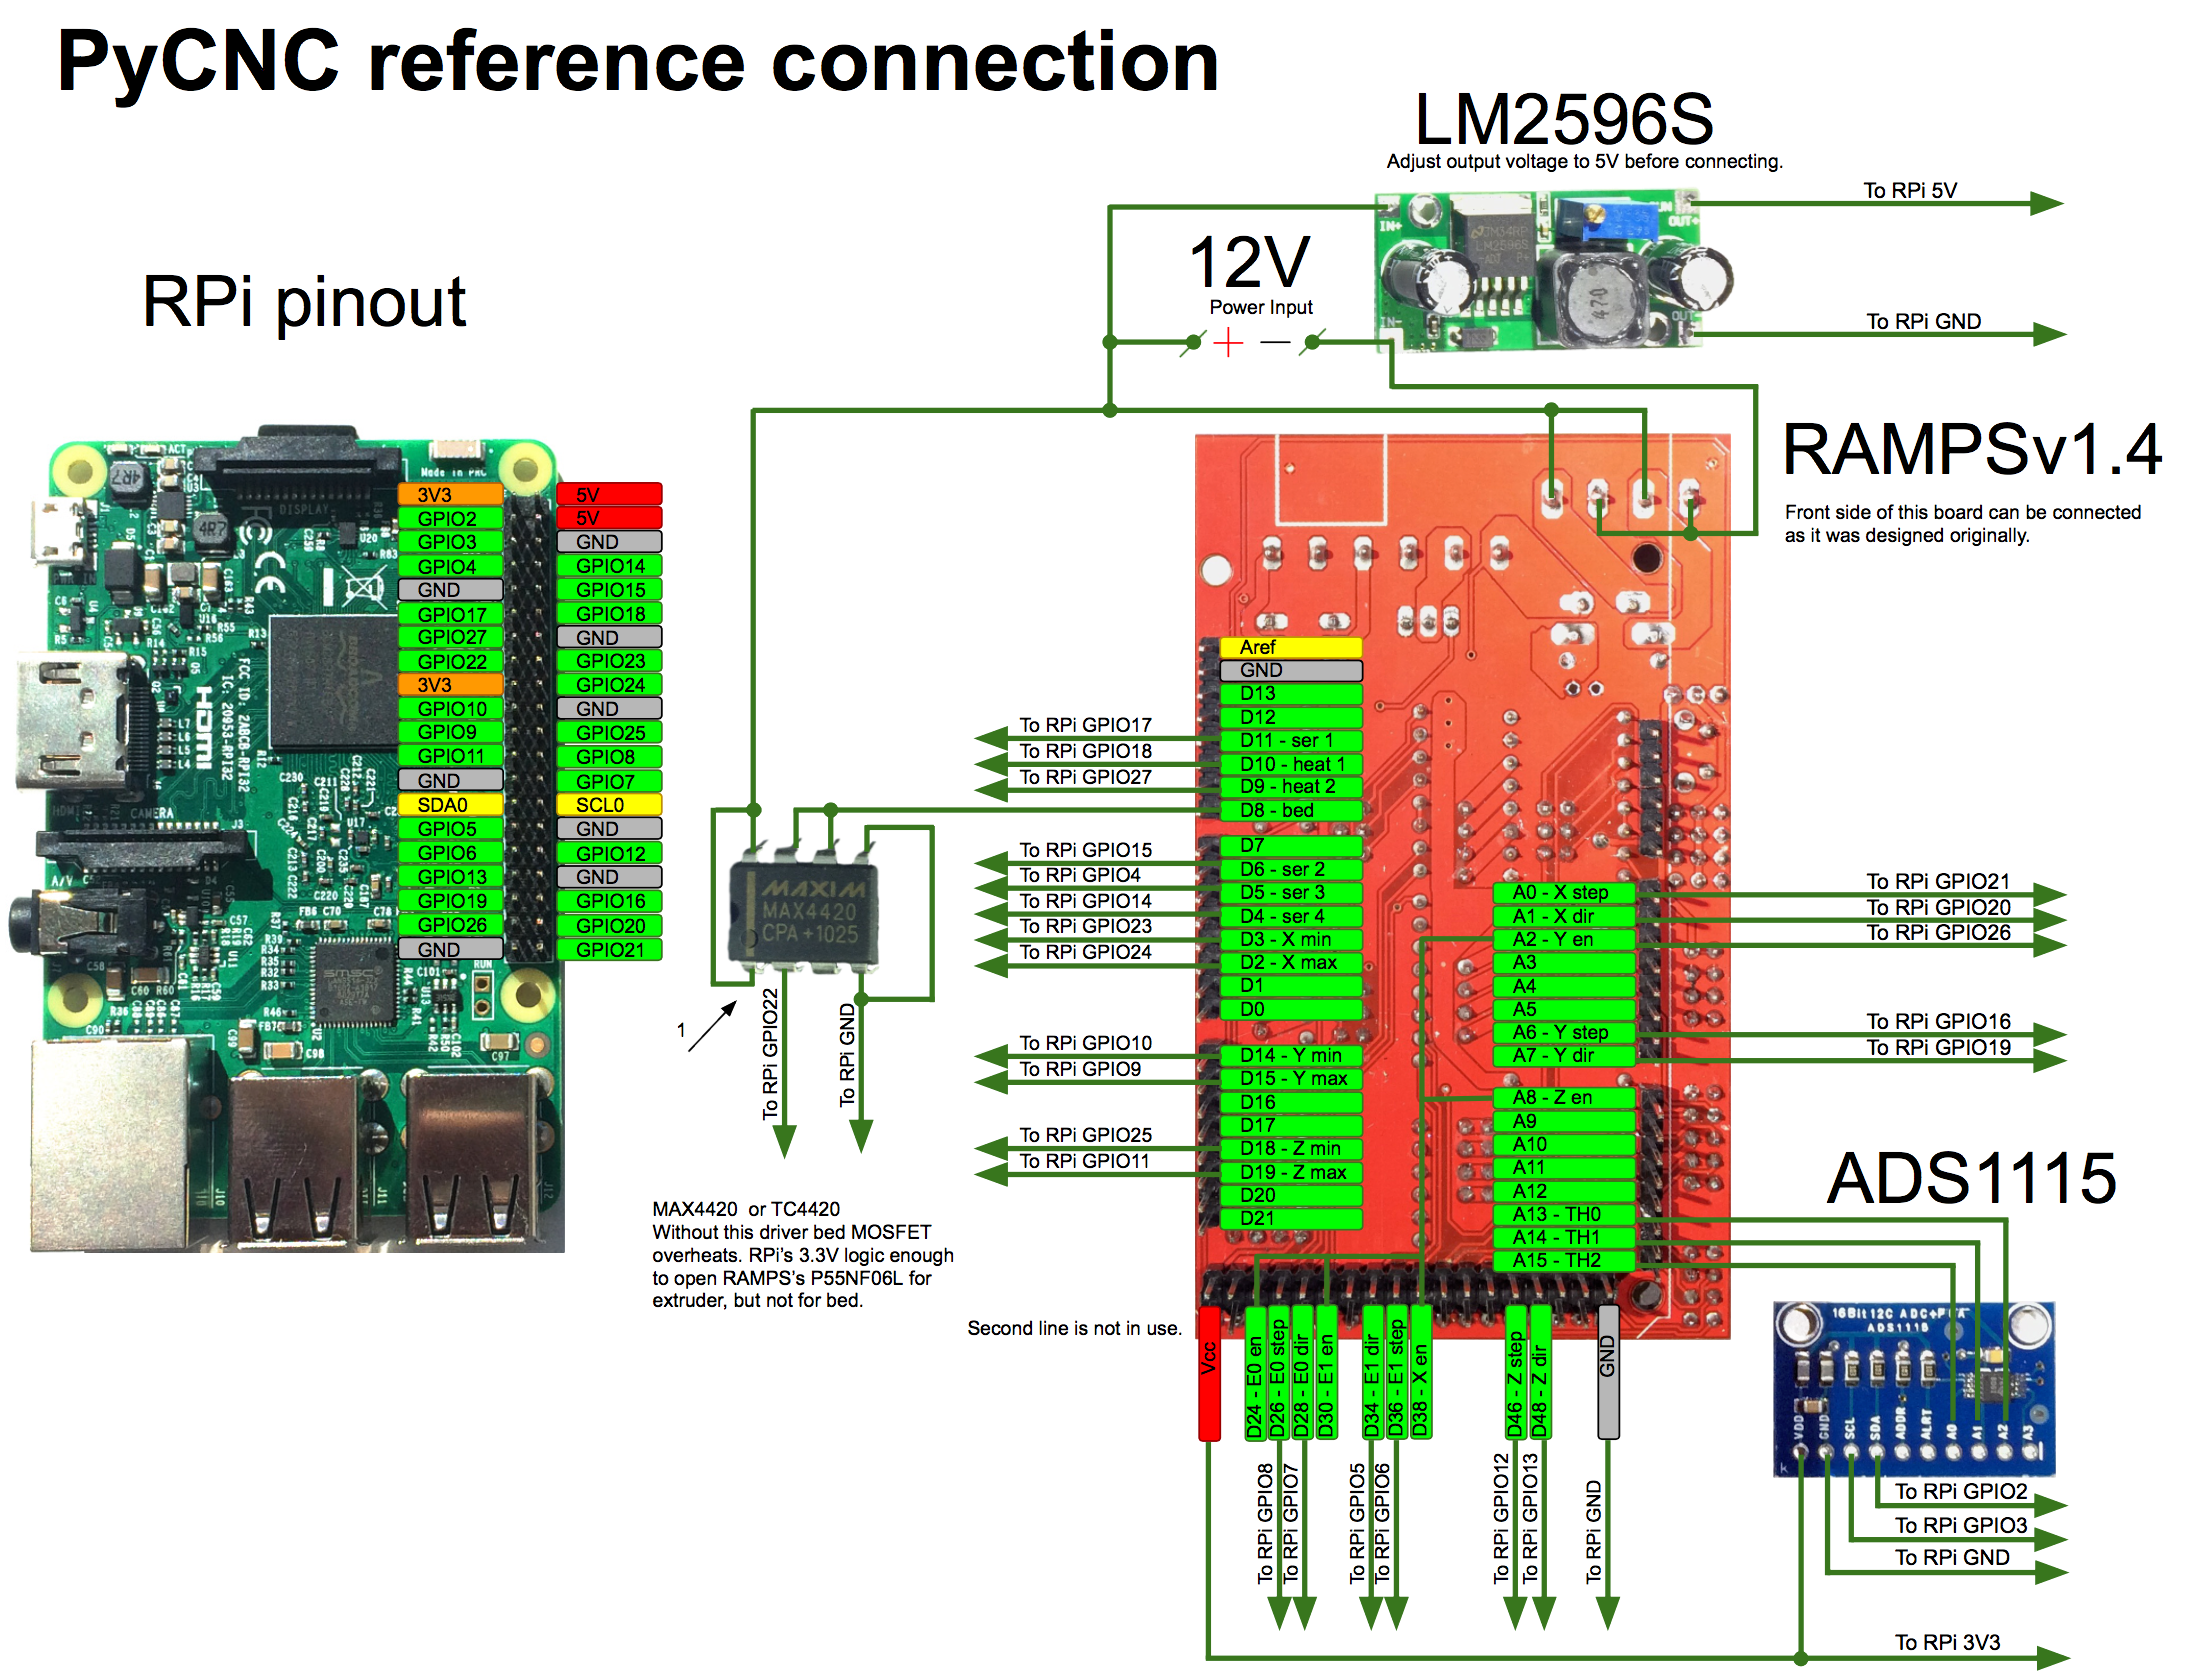
#147 Re: DIY/综合/Arduino/写字机/3D打印机/智能小车/平衡车/四轴飞行/MQTT/物联网 » PyCNC ---- 适用于Raspberry Pi和其他ARM Linux板的Python CNC机器控制器 » 2020-01-28 12:17:53
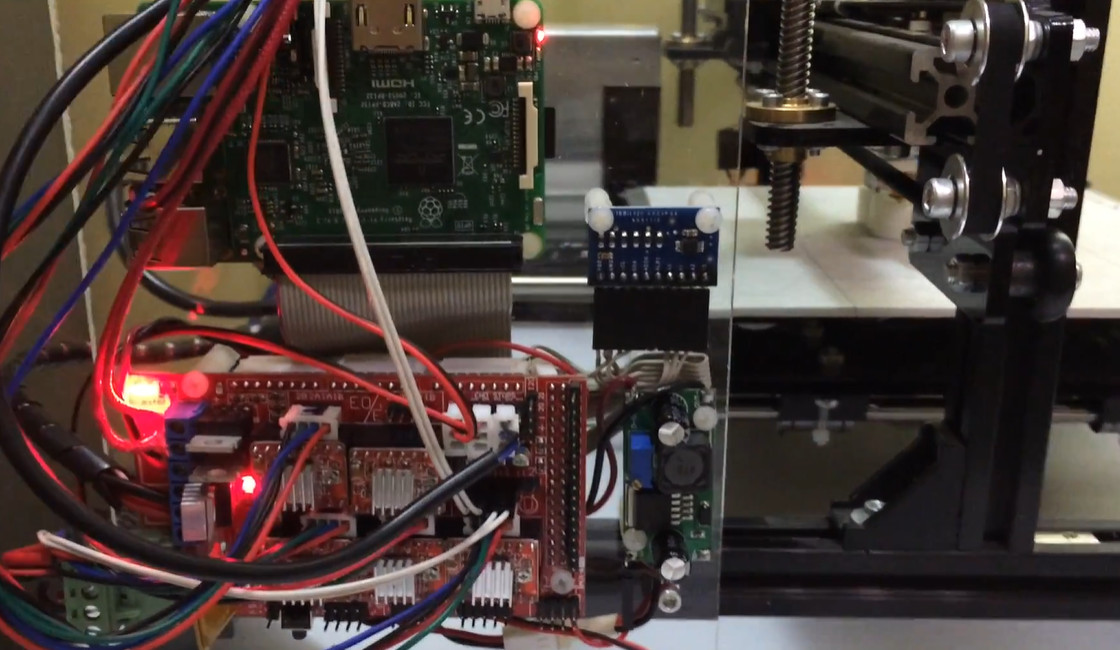
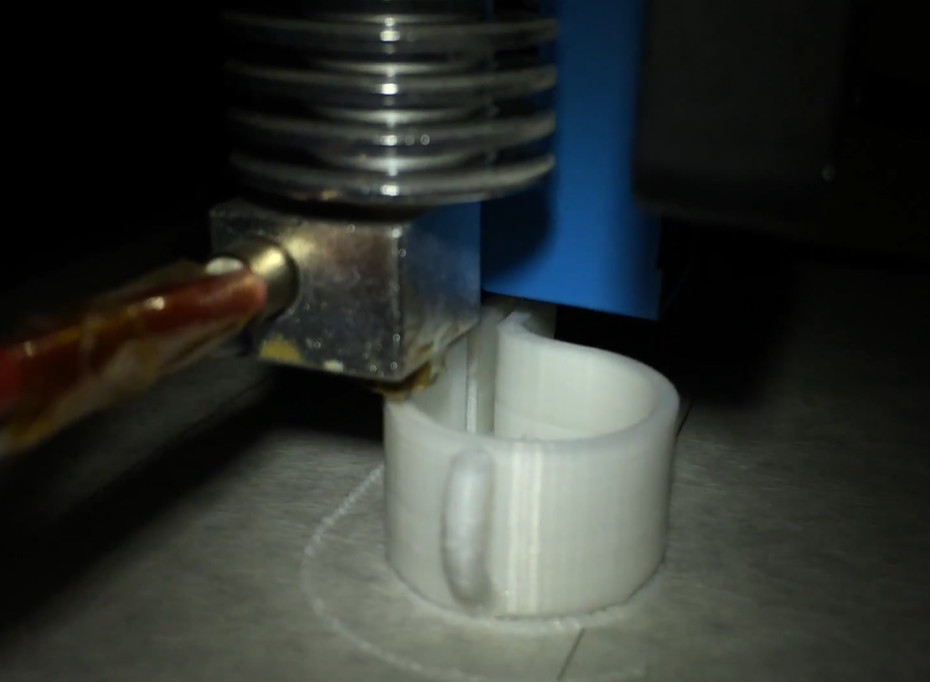

#148 Re: DIY/综合/Arduino/写字机/3D打印机/智能小车/平衡车/四轴飞行/MQTT/物联网 » PyCNC ---- 适用于Raspberry Pi和其他ARM Linux板的Python CNC机器控制器 » 2020-01-28 12:17:22
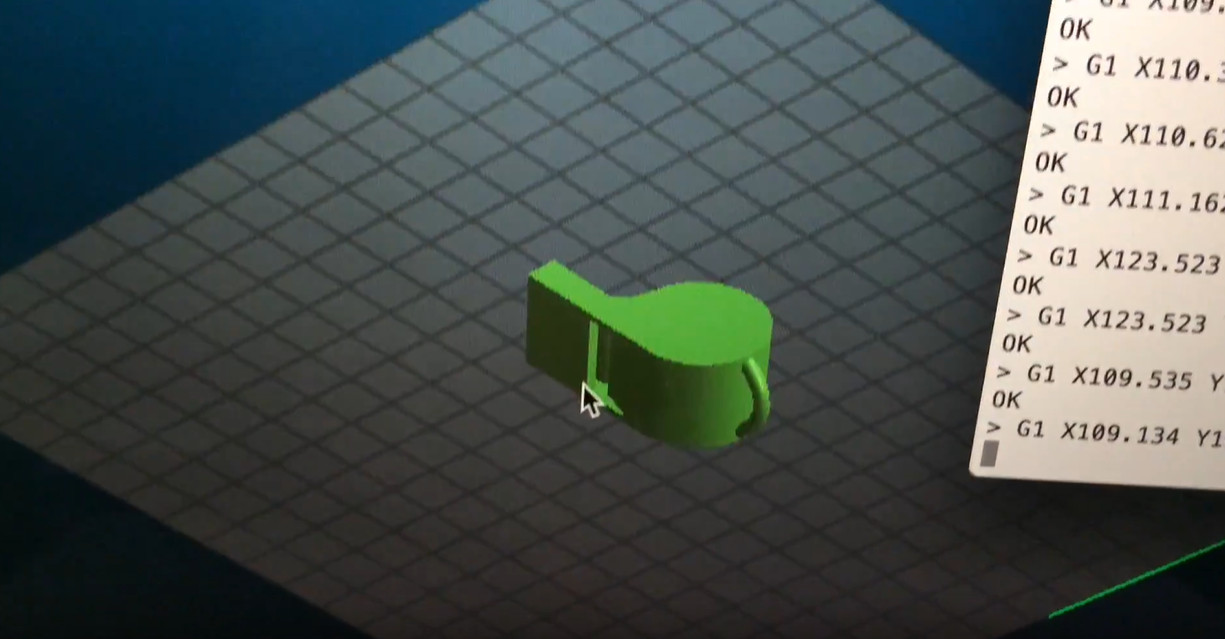
#149 Re: DIY/综合/Arduino/写字机/3D打印机/智能小车/平衡车/四轴飞行/MQTT/物联网 » PyCNC ---- 适用于Raspberry Pi和其他ARM Linux板的Python CNC机器控制器 » 2020-01-28 12:16:49
#150 DIY/综合/Arduino/写字机/3D打印机/智能小车/平衡车/四轴飞行/MQTT/物联网 » PyCNC ---- 适用于Raspberry Pi和其他ARM Linux板的Python CNC机器控制器 » 2020-01-28 12:11:36
#151 Re: Php/Nodejs/Web/HTML5/Javascript/微信开发/Python » Python pygame 俄罗斯方块(tetris)游戏 » 2020-01-28 10:33:32
#152 Re: Php/Nodejs/Web/HTML5/Javascript/微信开发/Python » Python pygame 俄罗斯方块(tetris)游戏 » 2020-01-28 10:28:16
#153 Re: Php/Nodejs/Web/HTML5/Javascript/微信开发/Python » Python pygame 俄罗斯方块(tetris)游戏 » 2020-01-28 10:27:38
#154 Re: Php/Nodejs/Web/HTML5/Javascript/微信开发/Python » Python pygame 俄罗斯方块(tetris)游戏 » 2020-01-28 10:27:00
#155 Re: Php/Nodejs/Web/HTML5/Javascript/微信开发/Python » Python pygame 俄罗斯方块(tetris)游戏 » 2020-01-28 10:20:30
classes.py
#########################################
# File name: Classes.py                 #
# Author: David Gurevich                #
# Course: ICS3U                         #
# Instructor: D. Mavrodin               #
# --------------------------------------#
# Last Modified: 11/12/2017 @ 20:52     #
#########################################
import pygame

BLACK = (0, 0, 0)
RED = (255, 0, 0)
GREEN = (0, 255, 0)
BLUE = (0, 0, 255)
ORANGE = (255, 127, 0)
CYAN = (0, 183, 235)
MAGENTA = (255, 0, 255)
YELLOW = (255, 255, 0)
WHITE = (255, 255, 255)
TRANS_WHITE = (255, 255, 255, 50)
COLOURS = [BLACK, RED, GREEN, BLUE, ORANGE, CYAN, MAGENTA, YELLOW, WHITE]
CLR_names = ['black', 'red', 'green', 'blue', 'orange', 'cyan', 'magenta', 'yellow', 'white']
figures = [None, 'Z', 'S', 'J', 'L', 'I', 'T', 'O', None]


class Block(object):
    """ A square - basic building block
        data:               behaviour:
            col - column        move left/right/up/down
            row - row           drawself.blocks
            clr - colour
    """

    def __init__(self, col=1, row=1, clr=1):
        self.col = col
        self.row = row
        self.clr = clr

    def __str__(self):
        return '(' + str(self.col) + ',' + str(self.row) + ') ' + CLR_names[self.clr]

    def __eq__(self, other):
        if self.col == other.col and self.row == other.row:
            return True

    def draw(self, surface, gridsize=20, shadow=False):
        x = self.col * gridsize
        y = self.row * gridsize
        CLR = COLOURS[self.clr]
        if not shadow:
            pygame.draw.rect(surface, CLR, (x, y, gridsize - 2, gridsize - 2), 0)
            pygame.draw.rect(surface, WHITE, (x, y, gridsize, gridsize), 2)

        else:
            pygame.draw.rect(surface, TRANS_WHITE, (x, y, gridsize, gridsize), 3)

    def move_down(self):
        self.row = self.row + 1

    # --------------------------------------- #


class Cluster(object):
    """ Collection of blocks
        data:
            col - column where the anchor block is located
            row - row where the anchor block is located
            blocksNo - number of blocks
    """

    def __init__(self, col=1, row=1, blocksNo=1):
        self.col = col
        self.row = row
        self.clr = 0
        self.blocks = [Block()] * blocksNo
        self._colOffsets = [0] * blocksNo
        self._rowOffsets = [0] * blocksNo

    def _update(self):
        for i in range(len(self.blocks)):
            blockCOL = self.col + self._colOffsets[i]
            blockROW = self.row + self._rowOffsets[i]
            blockCLR = self.clr
            self.blocks[i] = Block(blockCOL, blockROW, blockCLR)

    def draw(self, surface, gridsize, shadow=False):
        for block in self.blocks:
            block.draw(surface, gridsize, shadow)

    def collides(self, other):
        """ Compare each block from a cluster to all blocks from another cluster.
            Return True only if there is a location conflict.
        """
        for block in self.blocks:
            for obstacle in other.blocks:
                if block == obstacle:
                    return True
        return False

    def append(self, other):
        """ Append all blocks from another cluster to this one.
        """
        for block in other.blocks:
            self.blocks.append(block)


# -------------------------------------- #


class Obstacles(Cluster):
    """ Collection of tetrominoe blocks on the playing field, left from previous shapes.

    """

    def __init__(self, col=0, row=0, blocksNo=0):
        Cluster.__init__(self, col, row, blocksNo)

    def show(self):
        print("\nObstacle: ")
        for block in self.blocks:
            print((block)._colOffsets)

    def findFullRows(self, top, bottom, columns):
        fullRows = []
        rows = []
        for block in self.blocks:
            rows.append(block.row)

        for row in range(top, bottom):
            if rows.count(row) == columns:
                fullRows.append(row)
        return fullRows

    def removeFullRows(self, fullRows):
        for row in fullRows:
            for i in reversed(range(len(self.blocks))):
                if self.blocks[i].row == row:
                    self.blocks.pop(i)
                elif self.blocks[i].row < row:
                    self.blocks[i].move_down()


# ---------------------------------------#
class Shape(Cluster):
    """ A tetrominoe in one of the shapes: Z,S,J,L,I,T,O; consists of 4 x Block() objects
        data:               behaviour:
            col - column        move left/right/up/down
            row - row           draw
            clr - colour        rotate
                * figure/shape is defined by the colour
            rot - rotation
    """

    def __init__(self, col=1, row=1, clr=1, rot=1, shadow=False):
        Cluster.__init__(self, col, row, 4)
        self.clr = clr
        self.shadow = shadow
        self._rot = rot
        self._colOffsets = [-1, 0, 0, 1]
        self._rowOffsets = [-1, -1, 0, 0]
        self._rotate()

    def __str__(self):
        return figures[self.clr] + ' (' + str(self.col) + ',' + str(self.row) + ') ' + CLR_names[self.clr]

    def _rotate(self):
        """ offsets are assigned starting from the farthest (most distant) block in reference to the anchor block """
        if self.clr == 1:
            _colOffsets = [[-1, -1, 0, 0], [-1, 0, 0, 1], [1, 1, 0, 0], [1, 0, 0, -1]]
            _rowOffsets = [[1, 0, 0, -1], [-1, -1, 0, 0], [-1, 0, 0, 1], [1, 1, 0, 0]]
        elif self.clr == 2:
            _colOffsets = [[-1, -1, 0, 0], [1, 0, 0, -1], [1, 1, 0, 0], [-1, 0, 0, 1]]
            _rowOffsets = [[-1, 0, 0, 1], [-1, -1, 0, 0], [1, 0, 0, -1], [1, 1, 0, 0]]
        elif self.clr == 3:
            _colOffsets = [[-1, 0, 0, 0], [-1, -1, 0, 1], [1, 0, 0, 0], [1, 1, 0, -1]]
            _rowOffsets = [[1, 1, 0, -1], [-1, 0, 0, 0], [-1, -1, 0, 1], [1, 0, 0, 0]]
        elif self.clr == 4:
            _colOffsets = [[-1, 0, 0, 0], [1, 1, 0, -1], [1, 0, 0, 0], [-1, -1, 0, 1]]
            _rowOffsets = [[-1, -1, 0, 1], [-1, 0, 0, 0], [1, 1, 0, -1], [1, 0, 0, 0]]
        elif self.clr == 5:
            _colOffsets = [[0, 0, 0, 0], [2, 1, 0, -1], [0, 0, 0, 0], [-2, -1, 0, 1]]
            _rowOffsets = [[-2, -1, 0, 1], [0, 0, 0, 0], [2, 1, 0, -1], [0, 0, 0, 0]]
        elif self.clr == 6:
            _colOffsets = [[0, -1, 0, 0], [-1, 0, 0, 1], [0, 1, 0, 0], [1, 0, 0, -1]]  #
            _rowOffsets = [[1, 0, 0, -1], [0, -1, 0, 0], [-1, 0, 0, 1], [0, 1, 0, 0]]  #
        elif self.clr == 7:
            _colOffsets = [[-1, -1, 0, 0], [-1, -1, 0, 0], [-1, -1, 0, 0], [-1, -1, 0, 0]]
            _rowOffsets = [[0, -1, 0, -1], [0, -1, 0, -1], [0, -1, 0, -1], [0, -1, 0, -1]]
        self._colOffsets = _colOffsets[self._rot]
        self._rowOffsets = _rowOffsets[self._rot]
        self._update()

    def move_left(self):
        self.col = self.col - 1
        self._update()

    def move_right(self):
        self.col = self.col + 1
        self._update()

    def move_down(self):
        self.row = self.row + 1
        self._update()

    def move_up(self):
        self.row = self.row - 1
        self._update()

    def rotateClkwise(self):
        self._rot = (self._rot + 1) % 4

    def rotateCntclkwise(self):
        self._rot = (self._rot - 1) % 4


# --------------------------------------- #


class Floor(Cluster):
    """ Horizontal line of blocks
        data:
            col - column where the anchor block is located
            row - row where the anchor block is located
            blocksNo - number of blocks
    """

    def __init__(self, col=1, row=1, blocksNo=1):
        Cluster.__init__(self, col, row, blocksNo)
        for i in range(blocksNo):
            self._colOffsets[i] = i
        self._update()


# --------------------------------------- #


class Wall(Cluster):
    """ Vertical line of blocks
        data:
            col - column where the anchor block is located
            row - row where the anchor block is located
            blocksNo - number of blocks
    """

    def __init__(self, col=1, row=1, blocksNo=1):
        Cluster.__init__(self, col, row, blocksNo)
        for i in range(blocksNo):
            self._rowOffsets[i] = i
        self._update()
Tetris.py
#########################################
# File name: Tetris.py                  #
# Author: David Gurevich                #
# Course: ICS3U                         #
# Instructor: D. Mavrodin               #
# --------------------------------------#
# Last Modified: 11/12/2017 @ 21:02     #
#########################################

import sys
from random import randint, choice

from Classes import *

pygame.init()

HEIGHT = 600
WIDTH = 575
GRIDSIZE = HEIGHT // 24
screen = pygame.display.set_mode((WIDTH, HEIGHT))
pygame.display.set_caption("Tetris - David Gurevich")

LVL_1, LVL_2, LVL_3, LVL_4, LVL_5, LVL_6, LVL_7, LVL_8, LVL_9 = 45, 20, 10, 7, 5, 4, 3, 2, 1

LEVELS = [LVL_1, LVL_2, LVL_3, LVL_4, LVL_5, LVL_6, LVL_7, LVL_8, LVL_9]

SCORE = 0

# ---------------------------------------#

COLUMNS = 14
ROWS = 24
LEFT = 0
RIGHT = LEFT + COLUMNS
MIDDLE = LEFT + COLUMNS // 2
TOP = 1
FLOOR = TOP + ROWS

# -------------IMAGES and MUSIC--------------------#

pygame.mixer.set_num_channels(6)

# Channel 0: Background Music
# Channel 1: Block Rotation
# Channel 2: Force Hit
# Channel 3: Line Remove
# Channel 4: Slow Hit
# Channel 5: Tetris Remove


# ---- BACKGROUND IMAGES ---- #
tetris_img = pygame.image.load('images/Tetris.jpg')
grid_img = pygame.image.load('images/gridbg.jpg')

intro_screen = pygame.image.load('images/Intro.jpg')
outro_screen = pygame.image.load('images/Outro.jpg')
# --------------------------- #

# ---- SOUND EFFECTS ---- #
block_rotate = pygame.mixer.Sound('Sounds/block-rotate.ogg')
force_hit = pygame.mixer.Sound('Sounds/force-hit.ogg')
line_remove = pygame.mixer.Sound('Sounds/line-remove.ogg')
slow_hit = pygame.mixer.Sound('Sounds/slow-hit.ogg')
tetris_remove = pygame.mixer.Sound('Sounds/tetris-remove.ogg')
# ----------------------- #

# ---- BACKGROUND MUSIC ---- #
kalinka = pygame.mixer.Sound('Music/kalinka.ogg')
katyusha = pygame.mixer.Sound('Music/katyusha.ogg')
korobushka = pygame.mixer.Sound('Music/korobushka.ogg')
smuglianka = pygame.mixer.Sound('Music/smuglianka.ogg')

bg_music = choice([kalinka, katyusha, korobushka, smuglianka])
# -------------------------- #

# ---- BLOCK PREVIEWS ---- #
cube_block = pygame.image.load('Previews/cube-block.png').convert_alpha()
i_block = pygame.image.load('Previews/i-block.png').convert_alpha()
j_block = pygame.image.load('Previews/j-block.png').convert_alpha()
L_block = pygame.image.load('Previews/L-block.png').convert_alpha()
r_s_block = pygame.image.load('Previews/r-s-block.png').convert_alpha()
s_block = pygame.image.load('Previews/s-block.png').convert_alpha()
t_block = pygame.image.load('Previews/t-block.png').convert_alpha()

block_img_lst = [r_s_block, s_block, L_block, j_block, i_block, t_block, cube_block]  # MUST MATCH LIST IN CLASSES.PY
# ------------------------ #

# ---- FAVICON ---- #
favicon = pygame.image.load('images/favicon.png').convert_alpha()
pygame.display.set_icon(favicon)
# ----------------- #

# ---- FONTS ---- #
pygame.font.init()
my_font = pygame.font.SysFont('Arial Black', 21)


# --------------- #

# ------------- FUNCTIONS -------------------- #


def draw_grid():
    """ Draw horisontal and vertical lines on the entire game window.
        Space between the lines is GRIDSIZE.
    """
    for i in range(15):
        pygame.draw.line(screen, BLACK, (i * GRIDSIZE, 0), (i * GRIDSIZE, HEIGHT), 1)

    for i in range(24):
        pygame.draw.line(screen, BLACK, (0, i * GRIDSIZE), (GRIDSIZE * 24, i * GRIDSIZE), 1)


def redraw_screen():
    score_text = my_font.render(str(SCORE), True, WHITE)
    timer_text = my_font.render(str(round(pygame.time.get_ticks() / 1000, 2)), True, WHITE)
    level_text = my_font.render(str(level + 1), True, WHITE)

    screen.blit(grid_img, (0, 0))
    draw_grid()
    screen.blit(tetris_img, (GRIDSIZE * 14, 0))
    shape.draw(screen, GRIDSIZE)
    shadow.draw(screen, GRIDSIZE, True)
    obstacles.draw(screen, GRIDSIZE)

    # BLIT FONTS
    screen.blit(score_text, ((GRIDSIZE * 14) + 90, 460))
    screen.blit(timer_text, ((GRIDSIZE * 14) + 85, 538))
    screen.blit(level_text, ((GRIDSIZE * 14) + 100, 380))

    # BLIT NEXT SHAPE
    screen.blit(block_img_lst[nextShapeNo - 1], ((GRIDSIZE * 14) + 72, 240))

    pygame.display.flip()


def drop(my_shape):
    flow = False
    while not flow:
        my_shape.move_down()
        if my_shape.collides(floor) or my_shape.collides(obstacles):
            my_shape.move_up()
            flow = True

    if not my_shape.shadow:
        pygame.mixer.Channel(2).play(force_hit)


# -------------------------------------------- #

# ------------- MAIN PROGRAM -------------------- #

counter = 0

shapeNo = randint(1, 7)
nextShapeNo = randint(1, 7)

shape = Shape(MIDDLE, TOP, shapeNo)
floor = Floor(LEFT, ROWS, COLUMNS)
leftWall = Wall(LEFT - 1, 0, ROWS)
rightWall = Wall(RIGHT, 0, ROWS)
obstacles = Obstacles(LEFT, FLOOR)
inPlay = False
hasPlayed = False
level = 0

PREV_TETRIS = False

pygame.mixer.Channel(0).play(bg_music, -1)

# ---- INTRO SCREEN ---- #
while not inPlay and not hasPlayed:
    screen.blit(intro_screen, (0, 0))
    pygame.display.flip()

    screen.blit(intro_screen, (0, 0))
    pygame.display.flip()

    for event in pygame.event.get():
        if event.type == pygame.QUIT:
            pygame.quit()
            sys.exit(0)

        if event.type == pygame.KEYDOWN:
            if event.key == pygame.K_SPACE:
                inPlay = True
                hasPlayed = True

# ---------------------- #

while inPlay:

    shadow = Shape(shape.col, shape.row, shape.clr, shape._rot, True)
    drop(shadow)

    if counter % LEVELS[level] == 0:
        shape.move_down()
        if shape.collides(floor) or shape.collides(obstacles):
            shape.move_up()
            obstacles.append(shape)
            pygame.mixer.Channel(5).play(slow_hit)
            fullRows = obstacles.findFullRows(TOP, FLOOR, COLUMNS)

            # --------- CHECK --------- #
            if 4 > len(fullRows) > 0:
                SCORE += 100 * len(fullRows)
                pygame.mixer.Channel(3).play(line_remove)
            elif len(fullRows) >= 4:
                SCORE += 800 + (100 * (len(fullRows) - 4))
                pygame.mixer.Channel(4).play(tetris_remove)
                PREV_TETRIS = True
            elif len(fullRows) >= 4 and PREV_TETRIS:
                SCORE += 1200 + (100 * (len(fullRows) - 4))
                PREV_TETRIS = True
                pygame.mixer.Channel(4).play(tetris_remove)
            # ------------------------ #

            obstacles.removeFullRows(fullRows)
            shapeNo = nextShapeNo
            nextShapeNo = randint(1, 7)
            if not shape.row <= 1:
                shape = Shape(MIDDLE, TOP, shapeNo)
            else:
                inPlay = False

    for event in pygame.event.get():

        if event.type == pygame.QUIT:
            inPlay = False

        if event.type == pygame.KEYDOWN:
            if event.key == pygame.K_UP:
                shape.rotateClkwise()
                shape._rotate()
                if shape.collides(leftWall) or shape.collides(rightWall) or shape.collides(floor) or shape.collides(
                        obstacles):
                    shape.rotateCntclkwise()
                    shape._rotate()
                else:
                    pygame.mixer.Channel(1).play(block_rotate)

            if event.key == pygame.K_LEFT:
                shape.move_left()
                if shape.collides(leftWall):
                    shape.move_right()
                elif shape.collides(obstacles):
                    shape.move_right()

            if event.key == pygame.K_RIGHT:
                shape.move_right()
                if shape.collides(rightWall):
                    shape.move_left()
                elif shape.collides(obstacles):
                    shape.move_left()

            if event.key == pygame.K_DOWN:
                shape.move_down()
                if shape.collides(floor) or shape.collides(obstacles):
                    shape.move_up()
                    obstacles.append(shape)
                    fullRows = obstacles.findFullRows(TOP, FLOOR, COLUMNS)
                    # --------- CHECK --------- #
                    if 4 > len(fullRows) > 0:
                        SCORE += 100 * len(fullRows)
                        pygame.mixer.Channel(3).play(line_remove)
                    elif len(fullRows) >= 4:
                        SCORE += 800 + (100 * (len(fullRows) - 4))
                        pygame.mixer.Channel(4).play(tetris_remove)
                        PREV_TETRIS = True
                    elif len(fullRows) >= 4 and PREV_TETRIS:
                        SCORE += 1200 + (100 * (len(fullRows) - 4))
                        PREV_TETRIS = True
                        pygame.mixer.Channel(4).play(tetris_remove)
                    # ------------------------- #

                    obstacles.removeFullRows(fullRows)
                    shapeNo = nextShapeNo
                    nextShapeNo = randint(1, 7)
                    shape = Shape(MIDDLE, TOP, shapeNo)
                    shape = Shape(MIDDLE, TOP, shapeNo)

            if event.key == pygame.K_SPACE:
                drop(shape)
                obstacles.append(shape)
                shapeNo = nextShapeNo
                nextShapeNo = randint(1, 7)
                shape = Shape(MIDDLE, TOP, shapeNo)
                fullRows = obstacles.findFullRows(TOP, FLOOR, COLUMNS)
                # --------- CHECK --------- #
                if 4 > len(fullRows) > 0:
                    SCORE += 100 * len(fullRows)
                    pygame.mixer.Channel(3).play(line_remove)
                elif len(fullRows) >= 4:
                    SCORE += 800 + (100 * (len(fullRows) - 4))
                    pygame.mixer.Channel(4).play(tetris_remove)
                    PREV_TETRIS = True
                elif len(fullRows) >= 4 and PREV_TETRIS:
                    SCORE += 1200 + (100 * (len(fullRows) - 4))
                    PREV_TETRIS = True
                    pygame.mixer.Channel(4).play(tetris_remove)
                # ------------------------- #
                obstacles.removeFullRows(fullRows)

    if 1000 >= SCORE >= 500:
        level = 1
    elif 1500 >= SCORE > 1000:
        level = 2
    elif 2000 >= SCORE > 1500:
        level = 3
    elif 2250 >= SCORE > 2000:
        level = 4
    elif 2500 >= SCORE > 2250:
        level = 5
    elif 2750 >= SCORE > 2500:
        level = 6
    elif 3000 >= SCORE > 2750:
        level = 7
    elif 3250 >= SCORE > 3000:
        level = 8
    elif SCORE >= 3250:
        level = 9

    PREV_TETRIS = False
    counter += 1
    redraw_screen()

while not inPlay and hasPlayed:
    start_timer = pygame.time.get_ticks()
    screen.blit(outro_screen, (0, 0))
    pygame.display.flip()

    for event in pygame.event.get():
        if event.type == pygame.QUIT:
            pygame.quit()
            sys.exit(0)

        if event.type == pygame.KEYDOWN:
            if event.key == pygame.K_SPACE:
                pygame.quit()
                sys.exit(0)

        if pygame.time.get_ticks() - start_timer >= 2000:
            pygame.quit()
            sys.exit(0)

# ----------------------------------------------- #

pygame.quit()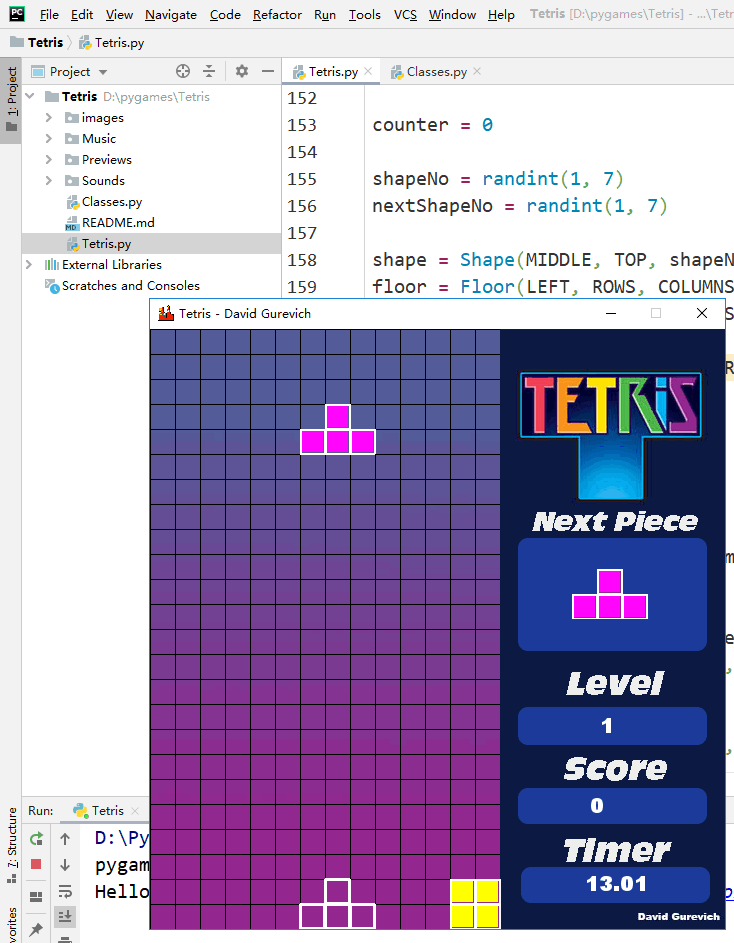
sys.exit("Exited Final")#156 Php/Nodejs/Web/HTML5/Javascript/微信开发/Python » Python pygame 俄罗斯方块(tetris)游戏 » 2020-01-28 10:18:46
- pythinker
- 回复: 7
#157 Re: Php/Nodejs/Web/HTML5/Javascript/微信开发/Python » 试一试python调用cairo 2d库, 看看配合 pygame 能不能做游戏 » 2020-01-26 10:24:25
import pygame
import sys

pygame.init()

screen = pygame.display.set_mode((800, 600))

ball = pygame.image.load("football_new.png")
ball_width  = ball.get_width()
ball_height = ball.get_height()

screen.fill((255, 255, 255))

ball_x = 0
ball_y = 0

#方向 0 向上, 1 向下
direction = 1
响应次数 = 0
while True:
    for event in pygame.event.get():
        if event.type == pygame.QUIT:
            sys.exit()

    if pygame.key.get_pressed()[pygame.K_LEFT]:
        响应次数 += 1
        if 响应次数 >= 5:
            ball_x -= 1
            响应次数 = 0
    elif pygame.key.get_pressed()[pygame.K_RIGHT]:
        响应次数 += 1
        if 响应次数 >= 5:
            ball_x += 1
            响应次数 = 0

    if direction == 1:
        ball_y += 1
    elif direction == 0:
        ball_y -= 1

    if ball_x < 0:
        ball_x = 0

    if ball_x > 800 - ball_width:
        ball_x = 800 - ball_width

    if ball_y < 0:
        ball_y = 0
        direction = 1

    #到最下面
    if ball_y > 600 - ball_height:
        ball_y = 600 - ball_height
        direction = 0

    screen.fill((120, 120, 120))

    screen.blit(ball, (ball_x, ball_y))

    pygame.display.update();
球球可以自动上下跳动.
#158 Re: Php/Nodejs/Web/HTML5/Javascript/微信开发/Python » 试一试python调用cairo 2d库, 看看配合 pygame 能不能做游戏 » 2020-01-26 10:10:04
import pygame
import sys

pygame.init()

screen = pygame.display.set_mode((800, 600))

ball = pygame.image.load("football_new.png")
ball_width  = ball.get_width()
ball_height = ball.get_height()

screen.fill((255, 255, 255))

ball_x = 0
ball_y = 0

while True:
    for event in pygame.event.get():
        if event.type == pygame.QUIT:
            sys.exit()

    if pygame.key.get_pressed()[pygame.K_LEFT]:
        ball_x -= 1
    elif pygame.key.get_pressed()[pygame.K_RIGHT]:
        ball_x += 1
    elif pygame.key.get_pressed()[pygame.K_DOWN]:
        ball_y += 1
    elif pygame.key.get_pressed()[pygame.K_UP]:
        ball_y -= 1

    if ball_x < 0:
        ball_x = 0

    if ball_x > 800 - ball_width:
        ball_x = 800 - ball_width

    if ball_y < 0:
        ball_y = 0

    if ball_y > 600 - ball_height:
        ball_y = 600 - ball_height

    screen.fill((120, 120, 120))

    screen.blit(ball, (ball_x, ball_y))

    pygame.display.update();
把小球的高度和宽度考虑进去了, 现在不会消失在边框附近了.
#159 Re: Php/Nodejs/Web/HTML5/Javascript/微信开发/Python » 试一试python调用cairo 2d库, 看看配合 pygame 能不能做游戏 » 2020-01-25 23:21:29
上面的 上下左右键只能触发一次, 改改可以长按了, 有点游戏的感觉了:
import pygame
import sys

pygame.init()

screen = pygame.display.set_mode((800, 600))

ball = pygame.image.load("ball.png");
screen.fill((255, 255, 255))

ball_x = 0
ball_y = 0

while True:
    for event in pygame.event.get():
        if event.type == pygame.QUIT:
            sys.exit()

    if pygame.key.get_pressed()[pygame.K_LEFT]:
        ball_x -= 1
    elif pygame.key.get_pressed()[pygame.K_RIGHT]:
        ball_x += 1
    elif pygame.key.get_pressed()[pygame.K_DOWN]:
        ball_y += 1
    elif pygame.key.get_pressed()[pygame.K_UP]:
        ball_y -= 1

    if ball_x < 0:
        ball_x = 0

    if ball_x > 800:
        ball_x = 800

    if ball_y < 0:
        ball_y = 0

    if ball_y > 600:
        ball_y = 600

    screen.fill((255, 255, 255))

    screen.blit(ball, (ball_x, ball_y))

pygame.display.update();#160 Re: Php/Nodejs/Web/HTML5/Javascript/微信开发/Python » 试一试python调用cairo 2d库, 看看配合 pygame 能不能做游戏 » 2020-01-25 22:54:09
import pygame
import sys

pygame.init()

screen = pygame.display.set_mode((800, 600))

ball = pygame.image.load("ball.png");
screen.fill((255, 255, 255))

ball_x = 0
ball_y = 0

while True:
    for event in pygame.event.get():
        if event.type == pygame.QUIT:
            sys.exit()
        elif event.type == pygame.KEYDOWN:
            if(event.key == pygame.K_LEFT):
                ball_x -= 10
            elif (event.key == pygame.K_RIGHT):
                ball_x += 10
            elif(event.key == pygame.K_DOWN):
                ball_y += 10
            elif (event.key == pygame.K_UP):
                ball_y -= 10

    screen.fill((255, 255, 255))

    screen.blit(ball, (ball_x, ball_y))

    pygame.display.update();
大年初一无聊, 继续学习pygame , 导入小球 ball.png 文件, 显示到窗口, 按上/下/左/右键可以移动.
#161 Re: Php/Nodejs/Web/HTML5/Javascript/微信开发/Python » Windows thinkphp 开发. composer & wamp & phpstorm » 2020-01-24 15:09:04
#162 Re: Php/Nodejs/Web/HTML5/Javascript/微信开发/Python » Windows thinkphp 开发. composer & wamp & phpstorm » 2020-01-24 15:03:39
#163 Re: Php/Nodejs/Web/HTML5/Javascript/微信开发/Python » Windows thinkphp 开发. composer & wamp & phpstorm » 2020-01-24 14:14:25
#164 Php/Nodejs/Web/HTML5/Javascript/微信开发/Python » Windows thinkphp 开发. composer & wamp & phpstorm » 2020-01-24 13:50:16
- pythinker
- 回复: 5
1. composer 下载安装: https://getcomposer.org/download/
Windows版本直接下载地址: https://getcomposer.org/Composer-Setup.exe
2. wamp 下载地址: wampserver3.2.0_x64.exe
3. phpstorm 下载地址: https://www.tpxhm.com/odetail/203.html
#165 Re: Php/Nodejs/Web/HTML5/Javascript/微信开发/Python » thinkphp 只能用 Composer 才能安装成功吗?我用git装貌似缺文件, 不知道为什么. » 2020-01-23 23:13:32
#166 Re: Php/Nodejs/Web/HTML5/Javascript/微信开发/Python » thinkphp 只能用 Composer 才能安装成功吗?我用git装貌似缺文件, 不知道为什么. » 2020-01-23 23:04:00
sudo apt-get install php7.4 php7.4-common php7.4-mbstring -y

sudo phpenmod -v 7.4 opcache pdo xml calendar ctype dom exif ffi fileinfo ftp gettext iconv json phar posix readline shmop simplexml sockets sysvmsg sysvsem sysvshm tokenizer xmlreader xmlwriter xsl mbstring
终于安装成功了:
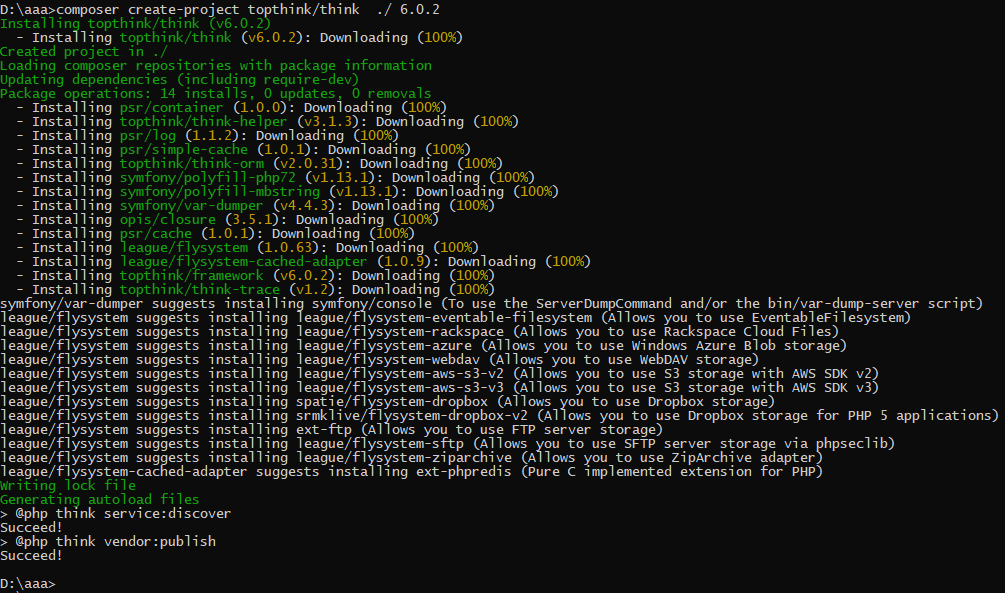
# sudo composer create-project topthink/think  ./ 6.0.2
Do not run Composer as root/super user! See https://getcomposer.org/root for details
Installing topthink/think (v6.0.2)
  - Installing topthink/think (v6.0.2): Loading from cache
Created project in ./
Loading composer repositories with package information
Updating dependencies (including require-dev)
Package operations: 14 installs, 0 updates, 0 removals
  - Installing psr/container (1.0.0): Downloading (100%)
  - Installing topthink/think-helper (v3.1.3): Downloading (100%)
  - Installing psr/log (1.1.2): Downloading (100%)
  - Installing psr/simple-cache (1.0.1): Downloading (100%)
  - Installing topthink/think-orm (v2.0.31): Downloading (100%)
  - Installing symfony/polyfill-php72 (v1.13.1): Downloading (100%)
  - Installing symfony/polyfill-mbstring (v1.13.1): Downloading (100%)
  - Installing symfony/var-dumper (v4.4.3): Downloading (100%)
  - Installing opis/closure (3.5.1): Downloading (100%)
  - Installing psr/cache (1.0.1): Downloading (100%)
  - Installing league/flysystem (1.0.63): Downloading (100%)
  - Installing league/flysystem-cached-adapter (1.0.9): Downloading (100%)
  - Installing topthink/framework (v6.0.2): Downloading (100%)
  - Installing topthink/think-trace (v1.2): Downloading (100%)
symfony/var-dumper suggests installing ext-intl (To show region name in time zone dump)
symfony/var-dumper suggests installing symfony/console (To use the ServerDumpCommand and/or the bin/var-dump-server script)
league/flysystem suggests installing league/flysystem-eventable-filesystem (Allows you to use EventableFilesystem)
league/flysystem suggests installing league/flysystem-rackspace (Allows you to use Rackspace Cloud Files)
league/flysystem suggests installing league/flysystem-azure (Allows you to use Windows Azure Blob storage)
league/flysystem suggests installing league/flysystem-webdav (Allows you to use WebDAV storage)
league/flysystem suggests installing league/flysystem-aws-s3-v2 (Allows you to use S3 storage with AWS SDK v2)
league/flysystem suggests installing league/flysystem-aws-s3-v3 (Allows you to use S3 storage with AWS SDK v3)
league/flysystem suggests installing spatie/flysystem-dropbox (Allows you to use Dropbox storage)
league/flysystem suggests installing srmklive/flysystem-dropbox-v2 (Allows you to use Dropbox storage for PHP 5 applications)
league/flysystem suggests installing league/flysystem-sftp (Allows you to use SFTP server storage via phpseclib)
league/flysystem suggests installing league/flysystem-ziparchive (Allows you to use ZipArchive adapter)
league/flysystem-cached-adapter suggests installing ext-phpredis (Pure C implemented extension for PHP)
Writing lock file
Generating autoload files
> @php think service:discover
Succeed!
> @php think vendor:publish
Succeed!
##167 Re: Php/Nodejs/Web/HTML5/Javascript/微信开发/Python » thinkphp 只能用 Composer 才能安装成功吗?我用git装貌似缺文件, 不知道为什么. » 2020-01-23 22:48:24
#168 Re: Php/Nodejs/Web/HTML5/Javascript/微信开发/Python » thinkphp 只能用 Composer 才能安装成功吗?我用git装貌似缺文件, 不知道为什么. » 2020-01-23 22:29:04
#
# composer create-project topthink/think ./
Do not run Composer as root/super user! See https://getcomposer.org/root for details
Installing topthink/think (v5.1.39)
  - Installing topthink/think (v5.1.39): Loading from cache
Created project in ./
Loading composer repositories with package information
Updating dependencies (including require-dev)
Package operations: 2 installs, 0 updates, 0 removals
  - Installing topthink/think-installer (v2.0.0): Loading from cache
  - Installing topthink/framework (v5.1.39): Loading from cache
Writing lock file
Generating autoload files
#
#
另外这台也是 Ubuntu18.04 的, 但是只能装 v5.1.39 版本.
#169 Re: Php/Nodejs/Web/HTML5/Javascript/微信开发/Python » thinkphp 只能用 Composer 才能安装成功吗?我用git装貌似缺文件, 不知道为什么. » 2020-01-23 22:13:21
$
$ sudo composer create-project topthink/think ./
Do not run Composer as root/super user! See https://getcomposer.org/root for details

Installing topthink/think (v6.0.2)
  - Installing topthink/think (v6.0.2): Downloading (100%)
Created project in ./
Loading composer repositories with package information
Updating dependencies (including require-dev)
Package operations: 14 installs, 0 updates, 0 removals
  - Installing psr/container (1.0.0): Downloading (100%)
  - Installing topthink/think-helper (v3.1.3): Downloading (100%)
  - Installing psr/log (1.1.2): Downloading (100%)
  - Installing psr/simple-cache (1.0.1): Downloading (100%)
  - Installing topthink/think-orm (v2.0.31): Downloading (100%)
  - Installing symfony/polyfill-php72 (v1.13.1): Downloading (100%)
  - Installing symfony/polyfill-mbstring (v1.13.1): Downloading (100%)
  - Installing symfony/var-dumper (v4.4.3): Downloading (100%)
  - Installing opis/closure (3.5.1): Downloading (100%)
  - Installing psr/cache (1.0.1): Downloading (100%)
  - Installing league/flysystem (1.0.63): Downloading (100%)
  - Installing league/flysystem-cached-adapter (1.0.9): Downloading (100%)
  - Installing topthink/framework (v6.0.2): Downloading (100%)
  - Installing topthink/think-trace (v1.2): Downloading (100%)
symfony/var-dumper suggests installing ext-intl (To show region name in time zone dump)
symfony/var-dumper suggests installing symfony/console (To use the ServerDumpCommand and/or the bin/var-dump-server script)
league/flysystem suggests installing league/flysystem-eventable-filesystem (Allows you to use EventableFilesystem)
league/flysystem suggests installing league/flysystem-rackspace (Allows you to use Rackspace Cloud Files)
league/flysystem suggests installing league/flysystem-azure (Allows you to use Windows Azure Blob storage)
league/flysystem suggests installing league/flysystem-webdav (Allows you to use WebDAV storage)
league/flysystem suggests installing league/flysystem-aws-s3-v2 (Allows you to use S3 storage with AWS SDK v2)
league/flysystem suggests installing league/flysystem-aws-s3-v3 (Allows you to use S3 storage with AWS SDK v3)
league/flysystem suggests installing spatie/flysystem-dropbox (Allows you to use Dropbox storage)
league/flysystem suggests installing srmklive/flysystem-dropbox-v2 (Allows you to use Dropbox storage for PHP 5 applications)
league/flysystem suggests installing league/flysystem-sftp (Allows you to use SFTP server storage via phpseclib)
league/flysystem suggests installing league/flysystem-ziparchive (Allows you to use ZipArchive adapter)
league/flysystem-cached-adapter suggests installing ext-phpredis (Pure C implemented extension for PHP)
Writing lock file
Generating autoload files
> @php think service:discover
Succeed!
> @php think vendor:publish
Succeed!
$
$
安装成功.
#170 Php/Nodejs/Web/HTML5/Javascript/微信开发/Python » thinkphp 只能用 Composer 才能安装成功吗?我用git装貌似缺文件, 不知道为什么. » 2020-01-23 20:10:27
- pythinker
- 回复: 7
电脑是 Ubuntu 18.04 LTS
sudo apt-get update
sudo apt-get install curl php7.4-cli -y
curl -sS https://getcomposer.org/installer | sudo php -- --install-dir=/usr/local/bin --filename=composer
composer create-project topthink/think tp
然后用浏览器打开 http://localhost/tp/public/index.php 正常.
#172 Re: Php/Nodejs/Web/HTML5/Javascript/微信开发/Python » Python pygame 推星星(推箱子)游戏 » 2020-01-21 22:39:58
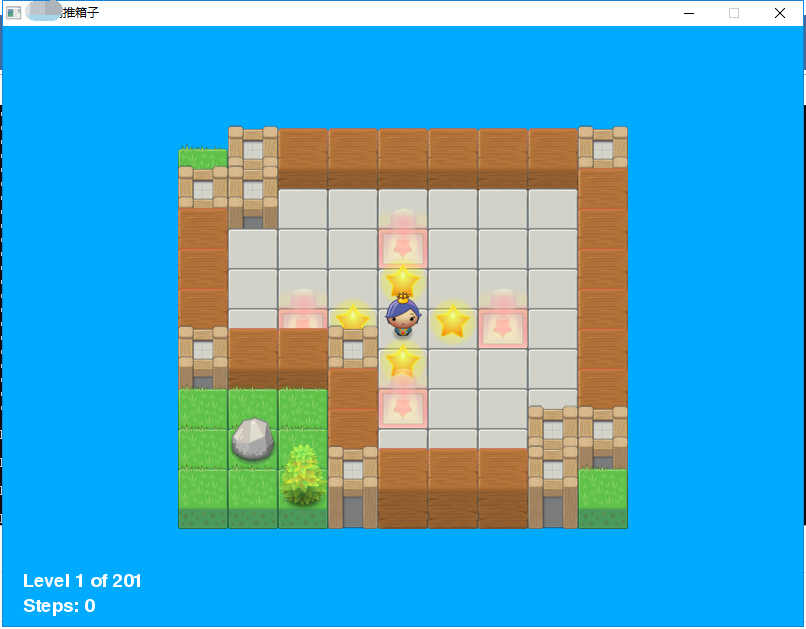
#173 Re: Php/Nodejs/Web/HTML5/Javascript/微信开发/Python » Python pygame 推星星(推箱子)游戏 » 2020-01-21 22:37:28
运行的时候有个错误:
D:\py\starpusher\dist\starpusher>starpusher.exe
pygame 1.9.6
Hello from the pygame community. https://www.pygame.org/contribute.html
Traceback (most recent call last):
  File "starpusher.py", line 598, in <module>
  File "starpusher.py", line 51, in main
  File "site-packages\pygame\pkgdata.py", line 50, in getResource
  File "site-packages\pkg_resources\__init__.py", line 1132, in resource_exists
  File "site-packages\pkg_resources\__init__.py", line 1402, in has_resource
  File "site-packages\pkg_resources\__init__.py", line 1455, in _has
NotImplementedError: Can't perform this operation for unregistered loader type
[8548] Failed to execute script starpusher
需要把 freesansbold.ttf 和 png图片 等资源文件拷贝到 dist\starpusher\ 目录下面才行.
#174 Re: Php/Nodejs/Web/HTML5/Javascript/微信开发/Python » Python pygame 推星星(推箱子)游戏 » 2020-01-21 22:35:00
通过命令 python.exe -m PyInstaller --noconsole starpusher.py 打包游戏:
d:\py\starpusher>python.exe -m PyInstaller --noconsole starpusher.py
123 INFO: PyInstaller: 3.4
123 INFO: Python: 3.7.2
124 INFO: Platform: Windows-10-10.0.17134-SP0
126 INFO: wrote d:\py\starpusher\starpusher.spec
139 INFO: UPX is not available.
141 INFO: Extending PYTHONPATH with paths
['d:\\py\\starpusher', 'd:\\py\\starpusher']
141 INFO: checking Analysis
241 INFO: checking PYZ
295 INFO: checking PKG
297 INFO: Bootloader D:\Python37\lib\site-packages\PyInstaller\bootloader\Windows-64bit\runw.exe
297 INFO: checking EXE
298 INFO: Building because console changed
298 INFO: Building EXE from EXE-00.toc
300 INFO: Appending archive to EXE d:\py\starpusher\build\starpusher\starpusher.exe
318 INFO: Building EXE from EXE-00.toc completed successfully.
321 INFO: checking COLLECT
323 INFO: Building COLLECT COLLECT-00.toc
2081 INFO: Building COLLECT COLLECT-00.toc completed successfully.#175 Re: Php/Nodejs/Web/HTML5/Javascript/微信开发/Python » Python pygame 推星星(推箱子)游戏 » 2020-01-21 22:33:01
# Star Pusher (a Sokoban clone)
# By Al Sweigart al@inventwithpython.com
# http://inventwithpython.com/pygame
# Released under a "Simplified BSD" license

import random, sys, copy, os, pygame
from pygame.locals import *

FPS = 30 # frames per second to update the screen
WINWIDTH = 800 # width of the program's window, in pixels
WINHEIGHT = 600 # height in pixels
HALF_WINWIDTH = int(WINWIDTH / 2)
HALF_WINHEIGHT = int(WINHEIGHT / 2)

# The total width and height of each tile in pixels.
TILEWIDTH = 50
TILEHEIGHT = 85
TILEFLOORHEIGHT = 40

CAM_MOVE_SPEED = 5 # how many pixels per frame the camera moves

# The percentage of outdoor tiles that have additional
# decoration on them, such as a tree or rock.
OUTSIDE_DECORATION_PCT = 20

BRIGHTBLUE = (  0, 170, 255)
WHITE      = (255, 255, 255)
BGCOLOR = BRIGHTBLUE
TEXTCOLOR = WHITE

UP = 'up'
DOWN = 'down'
LEFT = 'left'
RIGHT = 'right'


def main():
    global FPSCLOCK, DISPLAYSURF, IMAGESDICT, TILEMAPPING, OUTSIDEDECOMAPPING, BASICFONT, PLAYERIMAGES, currentImage

    # Pygame initialization and basic set up of the global variables.
    pygame.init()
    FPSCLOCK = pygame.time.Clock()

    # Because the Surface object stored in DISPLAYSURF was returned
    # from the pygame.display.set_mode() function, this is the
    # Surface object that is drawn to the actual computer screen
    # when pygame.display.update() is called.
    DISPLAYSURF = pygame.display.set_mode((WINWIDTH, WINHEIGHT))

    pygame.display.set_caption('Star Pusher')
    BASICFONT = pygame.font.Font('freesansbold.ttf', 18)

    # A global dict value that will contain all the Pygame
    # Surface objects returned by pygame.image.load().
    IMAGESDICT = {'uncovered goal': pygame.image.load('RedSelector.png'),
                  'covered goal': pygame.image.load('Selector.png'),
                  'star': pygame.image.load('Star.png'),
                  'corner': pygame.image.load('Wall_Block_Tall.png'),
                  'wall': pygame.image.load('Wood_Block_Tall.png'),
                  'inside floor': pygame.image.load('Plain_Block.png'),
                  'outside floor': pygame.image.load('Grass_Block.png'),
                  'title': pygame.image.load('star_title.png'),
                  'solved': pygame.image.load('star_solved.png'),
                  'princess': pygame.image.load('princess.png'),
                  'boy': pygame.image.load('boy.png'),
                  'catgirl': pygame.image.load('catgirl.png'),
                  'horngirl': pygame.image.load('horngirl.png'),
                  'pinkgirl': pygame.image.load('pinkgirl.png'),
                  'rock': pygame.image.load('Rock.png'),
                  'short tree': pygame.image.load('Tree_Short.png'),
                  'tall tree': pygame.image.load('Tree_Tall.png'),
                  'ugly tree': pygame.image.load('Tree_Ugly.png')}

    # These dict values are global, and map the character that appears
    # in the level file to the Surface object it represents.
    TILEMAPPING = {'x': IMAGESDICT['corner'],
                   '#': IMAGESDICT['wall'],
                   'o': IMAGESDICT['inside floor'],
                   ' ': IMAGESDICT['outside floor']}
    OUTSIDEDECOMAPPING = {'1': IMAGESDICT['rock'],
                          '2': IMAGESDICT['short tree'],
                          '3': IMAGESDICT['tall tree'],
                          '4': IMAGESDICT['ugly tree']}

    # PLAYERIMAGES is a list of all possible characters the player can be.
    # currentImage is the index of the player's current player image.
    currentImage = 0
    PLAYERIMAGES = [IMAGESDICT['princess'],
                    IMAGESDICT['boy'],
                    IMAGESDICT['catgirl'],
                    IMAGESDICT['horngirl'],
                    IMAGESDICT['pinkgirl']]

    startScreen() # show the title screen until the user presses a key

    # Read in the levels from the text file. See the readLevelsFile() for
    # details on the format of this file and how to make your own levels.
    levels = readLevelsFile('starPusherLevels.txt')
    currentLevelIndex = 0

    # The main game loop. This loop runs a single level, when the user
    # finishes that level, the next/previous level is loaded.
    while True: # main game loop
        # Run the level to actually start playing the game:
        result = runLevel(levels, currentLevelIndex)

        if result in ('solved', 'next'):
            # Go to the next level.
            currentLevelIndex += 1
            if currentLevelIndex >= len(levels):
                # If there are no more levels, go back to the first one.
                currentLevelIndex = 0
        elif result == 'back':
            # Go to the previous level.
            currentLevelIndex -= 1
            if currentLevelIndex < 0:
                # If there are no previous levels, go to the last one.
                currentLevelIndex = len(levels)-1
        elif result == 'reset':
            pass # Do nothing. Loop re-calls runLevel() to reset the level


def runLevel(levels, levelNum):
    global currentImage
    levelObj = levels[levelNum]
    mapObj = decorateMap(levelObj['mapObj'], levelObj['startState']['player'])
    gameStateObj = copy.deepcopy(levelObj['startState'])
    mapNeedsRedraw = True # set to True to call drawMap()
    levelSurf = BASICFONT.render('Level %s of %s' % (levelNum + 1, len(levels)), 1, TEXTCOLOR)
    levelRect = levelSurf.get_rect()
    levelRect.bottomleft = (20, WINHEIGHT - 35)
    mapWidth = len(mapObj) * TILEWIDTH
    mapHeight = (len(mapObj[0]) - 1) * TILEFLOORHEIGHT + TILEHEIGHT
    MAX_CAM_X_PAN = abs(HALF_WINHEIGHT - int(mapHeight / 2)) + TILEWIDTH
    MAX_CAM_Y_PAN = abs(HALF_WINWIDTH - int(mapWidth / 2)) + TILEHEIGHT

    levelIsComplete = False
    # Track how much the camera has moved:
    cameraOffsetX = 0
    cameraOffsetY = 0
    # Track if the keys to move the camera are being held down:
    cameraUp = False
    cameraDown = False
    cameraLeft = False
    cameraRight = False

    while True: # main game loop
        # Reset these variables:
        playerMoveTo = None
        keyPressed = False

        for event in pygame.event.get(): # event handling loop
            if event.type == QUIT:
                # Player clicked the "X" at the corner of the window.
                terminate()

            elif event.type == KEYDOWN:
                # Handle key presses
                keyPressed = True
                if event.key == K_LEFT:
                    playerMoveTo = LEFT
                elif event.key == K_RIGHT:
                    playerMoveTo = RIGHT
                elif event.key == K_UP:
                    playerMoveTo = UP
                elif event.key == K_DOWN:
                    playerMoveTo = DOWN

                # Set the camera move mode.
                elif event.key == K_a:
                    cameraLeft = True
                elif event.key == K_d:
                    cameraRight = True
                elif event.key == K_w:
                    cameraUp = True
                elif event.key == K_s:
                    cameraDown = True

                elif event.key == K_n:
                    return 'next'
                elif event.key == K_b:
                    return 'back'

                elif event.key == K_ESCAPE:
                    terminate() # Esc key quits.
                elif event.key == K_BACKSPACE:
                    return 'reset' # Reset the level.
                elif event.key == K_p:
                    # Change the player image to the next one.
                    currentImage += 1
                    if currentImage >= len(PLAYERIMAGES):
                        # After the last player image, use the first one.
                        currentImage = 0
                    mapNeedsRedraw = True

            elif event.type == KEYUP:
                # Unset the camera move mode.
                if event.key == K_a:
                    cameraLeft = False
                elif event.key == K_d:
                    cameraRight = False
                elif event.key == K_w:
                    cameraUp = False
                elif event.key == K_s:
                    cameraDown = False

        if playerMoveTo != None and not levelIsComplete:
            # If the player pushed a key to move, make the move
            # (if possible) and push any stars that are pushable.
            moved = makeMove(mapObj, gameStateObj, playerMoveTo)

            if moved:
                # increment the step counter.
                gameStateObj['stepCounter'] += 1
                mapNeedsRedraw = True

            if isLevelFinished(levelObj, gameStateObj):
                # level is solved, we should show the "Solved!" image.
                levelIsComplete = True
                keyPressed = False

        DISPLAYSURF.fill(BGCOLOR)

        if mapNeedsRedraw:
            mapSurf = drawMap(mapObj, gameStateObj, levelObj['goals'])
            mapNeedsRedraw = False

        if cameraUp and cameraOffsetY < MAX_CAM_X_PAN:
            cameraOffsetY += CAM_MOVE_SPEED
        elif cameraDown and cameraOffsetY > -MAX_CAM_X_PAN:
            cameraOffsetY -= CAM_MOVE_SPEED
        if cameraLeft and cameraOffsetX < MAX_CAM_Y_PAN:
            cameraOffsetX += CAM_MOVE_SPEED
        elif cameraRight and cameraOffsetX > -MAX_CAM_Y_PAN:
            cameraOffsetX -= CAM_MOVE_SPEED

        # Adjust mapSurf's Rect object based on the camera offset.
        mapSurfRect = mapSurf.get_rect()
        mapSurfRect.center = (HALF_WINWIDTH + cameraOffsetX, HALF_WINHEIGHT + cameraOffsetY)

        # Draw mapSurf to the DISPLAYSURF Surface object.
        DISPLAYSURF.blit(mapSurf, mapSurfRect)

        DISPLAYSURF.blit(levelSurf, levelRect)
        stepSurf = BASICFONT.render('Steps: %s' % (gameStateObj['stepCounter']), 1, TEXTCOLOR)
        stepRect = stepSurf.get_rect()
        stepRect.bottomleft = (20, WINHEIGHT - 10)
        DISPLAYSURF.blit(stepSurf, stepRect)

        if levelIsComplete:
            # is solved, show the "Solved!" image until the player
            # has pressed a key.
            solvedRect = IMAGESDICT['solved'].get_rect()
            solvedRect.center = (HALF_WINWIDTH, HALF_WINHEIGHT)
            DISPLAYSURF.blit(IMAGESDICT['solved'], solvedRect)

            if keyPressed:
                return 'solved'

        pygame.display.update() # draw DISPLAYSURF to the screen.
        FPSCLOCK.tick()


def isWall(mapObj, x, y):
    """Returns True if the (x, y) position on
    the map is a wall, otherwise return False."""
    if x < 0 or x >= len(mapObj) or y < 0 or y >= len(mapObj[x]):
        return False # x and y aren't actually on the map.
    elif mapObj[x][y] in ('#', 'x'):
        return True # wall is blocking
    return False


def decorateMap(mapObj, startxy):
    """Makes a copy of the given map object and modifies it.
    Here is what is done to it:
        * Walls that are corners are turned into corner pieces.
        * The outside/inside floor tile distinction is made.
        * Tree/rock decorations are randomly added to the outside tiles.

    Returns the decorated map object."""

    startx, starty = startxy # Syntactic sugar

    # Copy the map object so we don't modify the original passed
    mapObjCopy = copy.deepcopy(mapObj)

    # Remove the non-wall characters from the map data
    for x in range(len(mapObjCopy)):
        for y in range(len(mapObjCopy[0])):
            if mapObjCopy[x][y] in ('$', '.', '@', '+', '*'):
                mapObjCopy[x][y] = ' '

    # Flood fill to determine inside/outside floor tiles.
    floodFill(mapObjCopy, startx, starty, ' ', 'o')

    # Convert the adjoined walls into corner tiles.
    for x in range(len(mapObjCopy)):
        for y in range(len(mapObjCopy[0])):

            if mapObjCopy[x][y] == '#':
                if (isWall(mapObjCopy, x, y-1) and isWall(mapObjCopy, x+1, y)) or \
                   (isWall(mapObjCopy, x+1, y) and isWall(mapObjCopy, x, y+1)) or \
                   (isWall(mapObjCopy, x, y+1) and isWall(mapObjCopy, x-1, y)) or \
                   (isWall(mapObjCopy, x-1, y) and isWall(mapObjCopy, x, y-1)):
                    mapObjCopy[x][y] = 'x'

            elif mapObjCopy[x][y] == ' ' and random.randint(0, 99) < OUTSIDE_DECORATION_PCT:
                mapObjCopy[x][y] = random.choice(list(OUTSIDEDECOMAPPING.keys()))

    return mapObjCopy


def isBlocked(mapObj, gameStateObj, x, y):
    """Returns True if the (x, y) position on the map is
    blocked by a wall or star, otherwise return False."""

    if isWall(mapObj, x, y):
        return True

    elif x < 0 or x >= len(mapObj) or y < 0 or y >= len(mapObj[x]):
        return True # x and y aren't actually on the map.

    elif (x, y) in gameStateObj['stars']:
        return True # a star is blocking

    return False


def makeMove(mapObj, gameStateObj, playerMoveTo):
    """Given a map and game state object, see if it is possible for the
    player to make the given move. If it is, then change the player's
    position (and the position of any pushed star). If not, do nothing.

    Returns True if the player moved, otherwise False."""

    # Make sure the player can move in the direction they want.
    playerx, playery = gameStateObj['player']

    # This variable is "syntactic sugar". Typing "stars" is more
    # readable than typing "gameStateObj['stars']" in our code.
    stars = gameStateObj['stars']

    # The code for handling each of the directions is so similar aside
    # from adding or subtracting 1 to the x/y coordinates. We can
    # simplify it by using the xOffset and yOffset variables.
    if playerMoveTo == UP:
        xOffset = 0
        yOffset = -1
    elif playerMoveTo == RIGHT:
        xOffset = 1
        yOffset = 0
    elif playerMoveTo == DOWN:
        xOffset = 0
        yOffset = 1
    elif playerMoveTo == LEFT:
        xOffset = -1
        yOffset = 0

    # See if the player can move in that direction.
    if isWall(mapObj, playerx + xOffset, playery + yOffset):
        return False
    else:
        if (playerx + xOffset, playery + yOffset) in stars:
            # There is a star in the way, see if the player can push it.
            if not isBlocked(mapObj, gameStateObj, playerx + (xOffset*2), playery + (yOffset*2)):
                # Move the star.
                ind = stars.index((playerx + xOffset, playery + yOffset))
                stars[ind] = (stars[ind][0] + xOffset, stars[ind][1] + yOffset)
            else:
                return False
        # Move the player upwards.
        gameStateObj['player'] = (playerx + xOffset, playery + yOffset)
        return True


def startScreen():
    """Display the start screen (which has the title and instructions)
    until the player presses a key. Returns None."""

    # Position the title image.
    titleRect = IMAGESDICT['title'].get_rect()
    topCoord = 50 # topCoord tracks where to position the top of the text
    titleRect.top = topCoord
    titleRect.centerx = HALF_WINWIDTH
    topCoord += titleRect.height

    # Unfortunately, Pygame's font & text system only shows one line at
    # a time, so we can't use strings with \n newline characters in them.
    # So we will use a list with each line in it.
    instructionText = ['Push the stars over the marks.',
                       'Arrow keys to move, WASD for camera control, P to change character.',
                       'Backspace to reset level, Esc to quit.',
                       'N for next level, B to go back a level.']

    # Start with drawing a blank color to the entire window:
    DISPLAYSURF.fill(BGCOLOR)

    # Draw the title image to the window:
    DISPLAYSURF.blit(IMAGESDICT['title'], titleRect)

    # Position and draw the text.
    for i in range(len(instructionText)):
        instSurf = BASICFONT.render(instructionText[i], 1, TEXTCOLOR)
        instRect = instSurf.get_rect()
        topCoord += 10 # 10 pixels will go in between each line of text.
        instRect.top = topCoord
        instRect.centerx = HALF_WINWIDTH
        topCoord += instRect.height # Adjust for the height of the line.
        DISPLAYSURF.blit(instSurf, instRect)

    while True: # Main loop for the start screen.
        for event in pygame.event.get():
            if event.type == QUIT:
                terminate()
            elif event.type == KEYDOWN:
                if event.key == K_ESCAPE:
                    terminate()
                return # user has pressed a key, so return.

        # Display the DISPLAYSURF contents to the actual screen.
        pygame.display.update()
        FPSCLOCK.tick()


def readLevelsFile(filename):
    assert os.path.exists(filename), 'Cannot find the level file: %s' % (filename)
    mapFile = open(filename, 'r')
    # Each level must end with a blank line
    content = mapFile.readlines() + ['\r\n']
    mapFile.close()

    levels = [] # Will contain a list of level objects.
    levelNum = 0
    mapTextLines = [] # contains the lines for a single level's map.
    mapObj = [] # the map object made from the data in mapTextLines
    for lineNum in range(len(content)):
        # Process each line that was in the level file.
        line = content[lineNum].rstrip('\r\n')

        if ';' in line:
            # Ignore the ; lines, they're comments in the level file.
            line = line[:line.find(';')]

        if line != '':
            # This line is part of the map.
            mapTextLines.append(line)
        elif line == '' and len(mapTextLines) > 0:
            # A blank line indicates the end of a level's map in the file.
            # Convert the text in mapTextLines into a level object.

            # Find the longest row in the map.
            maxWidth = -1
            for i in range(len(mapTextLines)):
                if len(mapTextLines[i]) > maxWidth:
                    maxWidth = len(mapTextLines[i])
            # Add spaces to the ends of the shorter rows. This
            # ensures the map will be rectangular.
            for i in range(len(mapTextLines)):
                mapTextLines[i] += ' ' * (maxWidth - len(mapTextLines[i]))

            # Convert mapTextLines to a map object.
            for x in range(len(mapTextLines[0])):
                mapObj.append([])
            for y in range(len(mapTextLines)):
                for x in range(maxWidth):
                    mapObj[x].append(mapTextLines[y][x])

            # Loop through the spaces in the map and find the @, ., and $
            # characters for the starting game state.
            startx = None # The x and y for the player's starting position
            starty = None
            goals = [] # list of (x, y) tuples for each goal.
            stars = [] # list of (x, y) for each star's starting position.
            for x in range(maxWidth):
                for y in range(len(mapObj[x])):
                    if mapObj[x][y] in ('@', '+'):
                        # '@' is player, '+' is player & goal
                        startx = x
                        starty = y
                    if mapObj[x][y] in ('.', '+', '*'):
                        # '.' is goal, '*' is star & goal
                        goals.append((x, y))
                    if mapObj[x][y] in ('$', '*'):
                        # '$' is star
                        stars.append((x, y))

            # Basic level design sanity checks:
            assert startx != None and starty != None, 'Level %s (around line %s) in %s is missing a "@" or "+" to mark the start point.' % (levelNum+1, lineNum, filename)
            assert len(goals) > 0, 'Level %s (around line %s) in %s must have at least one goal.' % (levelNum+1, lineNum, filename)
            assert len(stars) >= len(goals), 'Level %s (around line %s) in %s is impossible to solve. It has %s goals but only %s stars.' % (levelNum+1, lineNum, filename, len(goals), len(stars))

            # Create level object and starting game state object.
            gameStateObj = {'player': (startx, starty),
                            'stepCounter': 0,
                            'stars': stars}
            levelObj = {'width': maxWidth,
                        'height': len(mapObj),
                        'mapObj': mapObj,
                        'goals': goals,
                        'startState': gameStateObj}

            levels.append(levelObj)

            # Reset the variables for reading the next map.
            mapTextLines = []
            mapObj = []
            gameStateObj = {}
            levelNum += 1
    return levels


def floodFill(mapObj, x, y, oldCharacter, newCharacter):
    """Changes any values matching oldCharacter on the map object to
    newCharacter at the (x, y) position, and does the same for the
    positions to the left, right, down, and up of (x, y), recursively."""

    # In this game, the flood fill algorithm creates the inside/outside
    # floor distinction. This is a "recursive" function.
    # For more info on the Flood Fill algorithm, see:
    #   http://en.wikipedia.org/wiki/Flood_fill
    if mapObj[x][y] == oldCharacter:
        mapObj[x][y] = newCharacter

    if x < len(mapObj) - 1 and mapObj[x+1][y] == oldCharacter:
        floodFill(mapObj, x+1, y, oldCharacter, newCharacter) # call right
    if x > 0 and mapObj[x-1][y] == oldCharacter:
        floodFill(mapObj, x-1, y, oldCharacter, newCharacter) # call left
    if y < len(mapObj[x]) - 1 and mapObj[x][y+1] == oldCharacter:
        floodFill(mapObj, x, y+1, oldCharacter, newCharacter) # call down
    if y > 0 and mapObj[x][y-1] == oldCharacter:
        floodFill(mapObj, x, y-1, oldCharacter, newCharacter) # call up


def drawMap(mapObj, gameStateObj, goals):
    """Draws the map to a Surface object, including the player and
    stars. This function does not call pygame.display.update(), nor
    does it draw the "Level" and "Steps" text in the corner."""

    # mapSurf will be the single Surface object that the tiles are drawn
    # on, so that it is easy to position the entire map on the DISPLAYSURF
    # Surface object. First, the width and height must be calculated.
    mapSurfWidth = len(mapObj) * TILEWIDTH
    mapSurfHeight = (len(mapObj[0]) - 1) * TILEFLOORHEIGHT + TILEHEIGHT
    mapSurf = pygame.Surface((mapSurfWidth, mapSurfHeight))
    mapSurf.fill(BGCOLOR) # start with a blank color on the surface.

    # Draw the tile sprites onto this surface.
    for x in range(len(mapObj)):
        for y in range(len(mapObj[x])):
            spaceRect = pygame.Rect((x * TILEWIDTH, y * TILEFLOORHEIGHT, TILEWIDTH, TILEHEIGHT))
            if mapObj[x][y] in TILEMAPPING:
                baseTile = TILEMAPPING[mapObj[x][y]]
            elif mapObj[x][y] in OUTSIDEDECOMAPPING:
                baseTile = TILEMAPPING[' ']

            # First draw the base ground/wall tile.
            mapSurf.blit(baseTile, spaceRect)

            if mapObj[x][y] in OUTSIDEDECOMAPPING:
                # Draw any tree/rock decorations that are on this tile.
                mapSurf.blit(OUTSIDEDECOMAPPING[mapObj[x][y]], spaceRect)
            elif (x, y) in gameStateObj['stars']:
                if (x, y) in goals:
                    # A goal AND star are on this space, draw goal first.
                    mapSurf.blit(IMAGESDICT['covered goal'], spaceRect)
                # Then draw the star sprite.
                mapSurf.blit(IMAGESDICT['star'], spaceRect)
            elif (x, y) in goals:
                # Draw a goal without a star on it.
                mapSurf.blit(IMAGESDICT['uncovered goal'], spaceRect)

            # Last draw the player on the board.
            if (x, y) == gameStateObj['player']:
                # Note: The value "currentImage" refers
                # to a key in "PLAYERIMAGES" which has the
                # specific player image we want to show.
                mapSurf.blit(PLAYERIMAGES[currentImage], spaceRect)

    return mapSurf


def isLevelFinished(levelObj, gameStateObj):
    """Returns True if all the goals have stars in them."""
    for goal in levelObj['goals']:
        if goal not in gameStateObj['stars']:
            # Found a space with a goal but no star on it.
            return False
    return True


def terminate():
    pygame.quit()
    sys.exit()


if __name__ == '__main__':
main()#176 Php/Nodejs/Web/HTML5/Javascript/微信开发/Python » Python pygame 推星星(推箱子)游戏 » 2020-01-21 22:32:14
- pythinker
- 回复: 10
#177 Re: Php/Nodejs/Web/HTML5/Javascript/微信开发/Python » 试一试python调用cairo 2d库, 看看配合 pygame 能不能做游戏 » 2020-01-19 22:00:20
https://github.com/pygobject/pycairo/tree/master/examples
https://raw.githubusercontent.com/pygobject/pycairo/master/examples/pygame-demo.py
#!/usr/bin/env python
"""demonstrate pycairo and pygame"""

from __future__ import print_function

import math
import sys

import cairo
import pygame


def draw(surface):
    x, y, radius = (250, 250, 200)
    ctx = cairo.Context(surface)
    ctx.set_line_width(15)
    ctx.arc(x, y, radius, 0, 2.0 * math.pi)
    ctx.set_source_rgb(0.8, 0.8, 0.8)
    ctx.fill_preserve()
    ctx.set_source_rgb(1, 1, 1)
    ctx.stroke()


def input(events):
    for event in events:
        if event.type == pygame.QUIT:
            sys.exit(0)
        else:
            print(event)


def main():
    width, height = 512, 512
    surface = cairo.ImageSurface(cairo.FORMAT_ARGB32, width, height)

    pygame.init()
    pygame.display.set_mode((width, height))
    screen = pygame.display.get_surface()

    draw(surface)

    # Create PyGame surface from Cairo Surface
    buf = surface.get_data()
    image = pygame.image.frombuffer(buf, (width, height), "ARGB")
    # Tranfer to Screen
    screen.blit(image, (0, 0))
    pygame.display.flip()

    while True:
        input(pygame.event.get())


if __name__ == "__main__":
main()#178 Php/Nodejs/Web/HTML5/Javascript/微信开发/Python » 试一试python调用cairo 2d库, 看看配合 pygame 能不能做游戏 » 2020-01-19 19:02:34
- pythinker
- 回复: 5
python3 安装 pycairo:
python3 -m pip install pycairo
演示程序: https://pycairo.readthedocs.io/en/latest/
import cairo

with cairo.SVGSurface("example.svg", 200, 200) as surface:
    context = cairo.Context(surface)
    x, y, x1, y1 = 0.1, 0.5, 0.4, 0.9
    x2, y2, x3, y3 = 0.6, 0.1, 0.9, 0.5
    context.scale(200, 200)
    context.set_line_width(0.04)
    context.move_to(x, y)
    context.curve_to(x1, y1, x2, y2, x3, y3)
    context.stroke()
    context.set_source_rgba(1, 0.2, 0.2, 0.6)
    context.set_line_width(0.02)
    context.move_to(x, y)
    context.line_to(x1, y1)
    context.move_to(x2, y2)
    context.line_to(x3, y3)
    context.stroke()
#179 Re: DIY/综合/Arduino/写字机/3D打印机/智能小车/平衡车/四轴飞行/MQTT/物联网 » 围观 SIPEED 简易注塑机, 在办公室就能轻轻松松生产外壳 » 2019-10-13 10:08:43
#181 Re: VMWare/Linux/Ubuntu/Fedora/CentOS/U-BOOT » U盘安装Ubuntu发行版,携带一个U盘就可以到处办(xian)公(摆) » 2019-10-10 18:50:29
#182 Re: 全志 SOC » 发现淘宝有卖F1C100S源码的 » 2019-10-10 18:48:41
#183 Re: Php/Nodejs/Web/HTML5/Javascript/微信开发/Python » Ubuntu18.04 python3 pygame 使用入门 » 2019-10-09 22:20:51
#!/usr/bin/python3

# Tetromino (a Tetris clone)
# By Al Sweigart al@inventwithpython.com
# http://inventwithpython.com/pygame
# Released under a "Simplified BSD" license

import random, time, pygame, sys
from pygame.locals import *

FPS = 25
WINDOWWIDTH = 640
WINDOWHEIGHT = 480
BOXSIZE = 20
BOARDWIDTH = 10
BOARDHEIGHT = 20
BLANK = '.'

MOVESIDEWAYSFREQ = 0.15
MOVEDOWNFREQ = 0.1

XMARGIN = int((WINDOWWIDTH - BOARDWIDTH * BOXSIZE) / 2)
TOPMARGIN = WINDOWHEIGHT - (BOARDHEIGHT * BOXSIZE) - 5

#               R    G    B
WHITE       = (255, 255, 255)
GRAY        = (185, 185, 185)
BLACK       = (  0,   0,   0)
RED         = (155,   0,   0)
LIGHTRED    = (175,  20,  20)
GREEN       = (  0, 155,   0)
LIGHTGREEN  = ( 20, 175,  20)
BLUE        = (  0,   0, 155)
LIGHTBLUE   = ( 20,  20, 175)
YELLOW      = (155, 155,   0)
LIGHTYELLOW = (175, 175,  20)

BORDERCOLOR = BLUE
BGCOLOR = BLACK
TEXTCOLOR = WHITE
TEXTSHADOWCOLOR = GRAY
COLORS      = (     BLUE,      GREEN,      RED,      YELLOW)
LIGHTCOLORS = (LIGHTBLUE, LIGHTGREEN, LIGHTRED, LIGHTYELLOW)
assert len(COLORS) == len(LIGHTCOLORS) # each color must have light color

TEMPLATEWIDTH = 5
TEMPLATEHEIGHT = 5

S_SHAPE_TEMPLATE = [['.....',
                     '.....',
                     '..OO.',
                     '.OO..',
                     '.....'],
                    ['.....',
                     '..O..',
                     '..OO.',
                     '...O.',
                     '.....']]

Z_SHAPE_TEMPLATE = [['.....',
                     '.....',
                     '.OO..',
                     '..OO.',
                     '.....'],
                    ['.....',
                     '..O..',
                     '.OO..',
                     '.O...',
                     '.....']]

I_SHAPE_TEMPLATE = [['..O..',
                     '..O..',
                     '..O..',
                     '..O..',
                     '.....'],
                    ['.....',
                     '.....',
                     'OOOO.',
                     '.....',
                     '.....']]

O_SHAPE_TEMPLATE = [['.....',
                     '.....',
                     '.OO..',
                     '.OO..',
                     '.....']]

J_SHAPE_TEMPLATE = [['.....',
                     '.O...',
                     '.OOO.',
                     '.....',
                     '.....'],
                    ['.....',
                     '..OO.',
                     '..O..',
                     '..O..',
                     '.....'],
                    ['.....',
                     '.....',
                     '.OOO.',
                     '...O.',
                     '.....'],
                    ['.....',
                     '..O..',
                     '..O..',
                     '.OO..',
                     '.....']]

L_SHAPE_TEMPLATE = [['.....',
                     '...O.',
                     '.OOO.',
                     '.....',
                     '.....'],
                    ['.....',
                     '..O..',
                     '..O..',
                     '..OO.',
                     '.....'],
                    ['.....',
                     '.....',
                     '.OOO.',
                     '.O...',
                     '.....'],
                    ['.....',
                     '.OO..',
                     '..O..',
                     '..O..',
                     '.....']]

T_SHAPE_TEMPLATE = [['.....',
                     '..O..',
                     '.OOO.',
                     '.....',
                     '.....'],
                    ['.....',
                     '..O..',
                     '..OO.',
                     '..O..',
                     '.....'],
                    ['.....',
                     '.....',
                     '.OOO.',
                     '..O..',
                     '.....'],
                    ['.....',
                     '..O..',
                     '.OO..',
                     '..O..',
                     '.....']]

PIECES = {'S': S_SHAPE_TEMPLATE,
          'Z': Z_SHAPE_TEMPLATE,
          'J': J_SHAPE_TEMPLATE,
          'L': L_SHAPE_TEMPLATE,
          'I': I_SHAPE_TEMPLATE,
          'O': O_SHAPE_TEMPLATE,
          'T': T_SHAPE_TEMPLATE}


def main():
    global FPSCLOCK, DISPLAYSURF, BASICFONT, BIGFONT
    pygame.init()
    FPSCLOCK = pygame.time.Clock()
    DISPLAYSURF = pygame.display.set_mode((WINDOWWIDTH, WINDOWHEIGHT))
    BASICFONT = pygame.font.Font('freesansbold.ttf', 18)
    BIGFONT = pygame.font.Font('freesansbold.ttf', 100)
    pygame.display.set_caption('Tetromino')

    showTextScreen('Tetromino')
    while True: # game loop
        #if random.randint(0, 1) == 0:
            #pygame.mixer.music.load('tetrisb.mid')
        #else:
            #pygame.mixer.music.load('tetrisc.mid')
        #pygame.mixer.music.play(-1, 0.0)
        runGame()
        #pygame.mixer.music.stop()
        showTextScreen('Game Over')


def runGame():
    # setup variables for the start of the game
    board = getBlankBoard()
    lastMoveDownTime = time.time()
    lastMoveSidewaysTime = time.time()
    lastFallTime = time.time()
    movingDown = False # note: there is no movingUp variable
    movingLeft = False
    movingRight = False
    score = 0
    level, fallFreq = calculateLevelAndFallFreq(score)

    fallingPiece = getNewPiece()
    nextPiece = getNewPiece()

    while True: # game loop
        if fallingPiece == None:
            # No falling piece in play, so start a new piece at the top
            fallingPiece = nextPiece
            nextPiece = getNewPiece()
            lastFallTime = time.time() # reset lastFallTime

            if not isValidPosition(board, fallingPiece):
                return # can't fit a new piece on the board, so game over

        checkForQuit()
        for event in pygame.event.get(): # event handling loop
            if event.type == KEYUP:
                if (event.key == K_p):
                    # Pausing the game
                    DISPLAYSURF.fill(BGCOLOR)
                    pygame.mixer.music.stop()
                    showTextScreen('Paused') # pause until a key press
                    pygame.mixer.music.play(-1, 0.0)
                    lastFallTime = time.time()
                    lastMoveDownTime = time.time()
                    lastMoveSidewaysTime = time.time()
                elif (event.key == K_LEFT or event.key == K_a):
                    movingLeft = False
                elif (event.key == K_RIGHT or event.key == K_d):
                    movingRight = False
                elif (event.key == K_DOWN or event.key == K_s):
                    movingDown = False

            elif event.type == KEYDOWN:
                # moving the piece sideways
                if (event.key == K_LEFT or event.key == K_a) and isValidPosition(board, fallingPiece, adjX=-1):
                    fallingPiece['x'] -= 1
                    movingLeft = True
                    movingRight = False
                    lastMoveSidewaysTime = time.time()

                elif (event.key == K_RIGHT or event.key == K_d) and isValidPosition(board, fallingPiece, adjX=1):
                    fallingPiece['x'] += 1
                    movingRight = True
                    movingLeft = False
                    lastMoveSidewaysTime = time.time()

                # rotating the piece (if there is room to rotate)
                elif (event.key == K_UP or event.key == K_w):
                    fallingPiece['rotation'] = (fallingPiece['rotation'] + 1) % len(PIECES[fallingPiece['shape']])
                    if not isValidPosition(board, fallingPiece):
                        fallingPiece['rotation'] = (fallingPiece['rotation'] - 1) % len(PIECES[fallingPiece['shape']])
                elif (event.key == K_q): # rotate the other direction
                    fallingPiece['rotation'] = (fallingPiece['rotation'] - 1) % len(PIECES[fallingPiece['shape']])
                    if not isValidPosition(board, fallingPiece):
                        fallingPiece['rotation'] = (fallingPiece['rotation'] + 1) % len(PIECES[fallingPiece['shape']])

                # making the piece fall faster with the down key
                elif (event.key == K_DOWN or event.key == K_s):
                    movingDown = True
                    if isValidPosition(board, fallingPiece, adjY=1):
                        fallingPiece['y'] += 1
                    lastMoveDownTime = time.time()

                # move the current piece all the way down
                elif event.key == K_SPACE:
                    movingDown = False
                    movingLeft = False
                    movingRight = False
                    for i in range(1, BOARDHEIGHT):
                        if not isValidPosition(board, fallingPiece, adjY=i):
                            break
                    fallingPiece['y'] += i - 1

        # handle moving the piece because of user input
        if (movingLeft or movingRight) and time.time() - lastMoveSidewaysTime > MOVESIDEWAYSFREQ:
            if movingLeft and isValidPosition(board, fallingPiece, adjX=-1):
                fallingPiece['x'] -= 1
            elif movingRight and isValidPosition(board, fallingPiece, adjX=1):
                fallingPiece['x'] += 1
            lastMoveSidewaysTime = time.time()

        if movingDown and time.time() - lastMoveDownTime > MOVEDOWNFREQ and isValidPosition(board, fallingPiece, adjY=1):
            fallingPiece['y'] += 1
            lastMoveDownTime = time.time()

        # let the piece fall if it is time to fall
        if time.time() - lastFallTime > fallFreq:
            # see if the piece has landed
            if not isValidPosition(board, fallingPiece, adjY=1):
                # falling piece has landed, set it on the board
                addToBoard(board, fallingPiece)
                score += removeCompleteLines(board)
                level, fallFreq = calculateLevelAndFallFreq(score)
                fallingPiece = None
            else:
                # piece did not land, just move the piece down
                fallingPiece['y'] += 1
                lastFallTime = time.time()

        # drawing everything on the screen
        DISPLAYSURF.fill(BGCOLOR)
        drawBoard(board)
        drawStatus(score, level)
        drawNextPiece(nextPiece)
        if fallingPiece != None:
            drawPiece(fallingPiece)

        pygame.display.update()
        FPSCLOCK.tick(FPS)


def makeTextObjs(text, font, color):
    surf = font.render(text, True, color)
    return surf, surf.get_rect()


def terminate():
    pygame.quit()
    sys.exit()


def checkForKeyPress():
    # Go through event queue looking for a KEYUP event.
    # Grab KEYDOWN events to remove them from the event queue.
    checkForQuit()

    for event in pygame.event.get([KEYDOWN, KEYUP]):
        if event.type == KEYDOWN:
            continue
        return event.key
    return None


def showTextScreen(text):
    # This function displays large text in the
    # center of the screen until a key is pressed.
    # Draw the text drop shadow
    titleSurf, titleRect = makeTextObjs(text, BIGFONT, TEXTSHADOWCOLOR)
    titleRect.center = (int(WINDOWWIDTH / 2), int(WINDOWHEIGHT / 2))
    DISPLAYSURF.blit(titleSurf, titleRect)

    # Draw the text
    titleSurf, titleRect = makeTextObjs(text, BIGFONT, TEXTCOLOR)
    titleRect.center = (int(WINDOWWIDTH / 2) - 3, int(WINDOWHEIGHT / 2) - 3)
    DISPLAYSURF.blit(titleSurf, titleRect)

    # Draw the additional "Press a key to play." text.
    pressKeySurf, pressKeyRect = makeTextObjs('Press a key to play.', BASICFONT, TEXTCOLOR)
    pressKeyRect.center = (int(WINDOWWIDTH / 2), int(WINDOWHEIGHT / 2) + 100)
    DISPLAYSURF.blit(pressKeySurf, pressKeyRect)

    while checkForKeyPress() == None:
        pygame.display.update()
        FPSCLOCK.tick()


def checkForQuit():
    for event in pygame.event.get(QUIT): # get all the QUIT events
        terminate() # terminate if any QUIT events are present
    for event in pygame.event.get(KEYUP): # get all the KEYUP events
        if event.key == K_ESCAPE:
            terminate() # terminate if the KEYUP event was for the Esc key
        pygame.event.post(event) # put the other KEYUP event objects back


def calculateLevelAndFallFreq(score):
    # Based on the score, return the level the player is on and
    # how many seconds pass until a falling piece falls one space.
    level = int(score / 10) + 1
    fallFreq = 0.27 - (level * 0.02)
    return level, fallFreq

def getNewPiece():
    # return a random new piece in a random rotation and color
    shape = random.choice(list(PIECES.keys()))
    newPiece = {'shape': shape,
                'rotation': random.randint(0, len(PIECES[shape]) - 1),
                'x': int(BOARDWIDTH / 2) - int(TEMPLATEWIDTH / 2),
                'y': -2, # start it above the board (i.e. less than 0)
                'color': random.randint(0, len(COLORS)-1)}
    return newPiece


def addToBoard(board, piece):
    # fill in the board based on piece's location, shape, and rotation
    for x in range(TEMPLATEWIDTH):
        for y in range(TEMPLATEHEIGHT):
            if PIECES[piece['shape']][piece['rotation']][y][x] != BLANK:
                board[x + piece['x']][y + piece['y']] = piece['color']


def getBlankBoard():
    # create and return a new blank board data structure
    board = []
    for i in range(BOARDWIDTH):
        board.append([BLANK] * BOARDHEIGHT)
    return board


def isOnBoard(x, y):
    return x >= 0 and x < BOARDWIDTH and y < BOARDHEIGHT


def isValidPosition(board, piece, adjX=0, adjY=0):
    # Return True if the piece is within the board and not colliding
    for x in range(TEMPLATEWIDTH):
        for y in range(TEMPLATEHEIGHT):
            isAboveBoard = y + piece['y'] + adjY < 0
            if isAboveBoard or PIECES[piece['shape']][piece['rotation']][y][x] == BLANK:
                continue
            if not isOnBoard(x + piece['x'] + adjX, y + piece['y'] + adjY):
                return False
            if board[x + piece['x'] + adjX][y + piece['y'] + adjY] != BLANK:
                return False
    return True

def isCompleteLine(board, y):
    # Return True if the line filled with boxes with no gaps.
    for x in range(BOARDWIDTH):
        if board[x][y] == BLANK:
            return False
    return True


def removeCompleteLines(board):
    # Remove any completed lines on the board, move everything above them down, and return the number of complete lines.
    numLinesRemoved = 0
    y = BOARDHEIGHT - 1 # start y at the bottom of the board
    while y >= 0:
        if isCompleteLine(board, y):
            # Remove the line and pull boxes down by one line.
            for pullDownY in range(y, 0, -1):
                for x in range(BOARDWIDTH):
                    board[x][pullDownY] = board[x][pullDownY-1]
            # Set very top line to blank.
            for x in range(BOARDWIDTH):
                board[x][0] = BLANK
            numLinesRemoved += 1
            # Note on the next iteration of the loop, y is the same.
            # This is so that if the line that was pulled down is also
            # complete, it will be removed.
        else:
            y -= 1 # move on to check next row up
    return numLinesRemoved


def convertToPixelCoords(boxx, boxy):
    # Convert the given xy coordinates of the board to xy
    # coordinates of the location on the screen.
    return (XMARGIN + (boxx * BOXSIZE)), (TOPMARGIN + (boxy * BOXSIZE))


def drawBox(boxx, boxy, color, pixelx=None, pixely=None):
    # draw a single box (each tetromino piece has four boxes)
    # at xy coordinates on the board. Or, if pixelx & pixely
    # are specified, draw to the pixel coordinates stored in
    # pixelx & pixely (this is used for the "Next" piece).
    if color == BLANK:
        return
    if pixelx == None and pixely == None:
        pixelx, pixely = convertToPixelCoords(boxx, boxy)
    pygame.draw.rect(DISPLAYSURF, COLORS[color], (pixelx + 1, pixely + 1, BOXSIZE - 1, BOXSIZE - 1))
    pygame.draw.rect(DISPLAYSURF, LIGHTCOLORS[color], (pixelx + 1, pixely + 1, BOXSIZE - 4, BOXSIZE - 4))


def drawBoard(board):
    # draw the border around the board
    pygame.draw.rect(DISPLAYSURF, BORDERCOLOR, (XMARGIN - 3, TOPMARGIN - 7, (BOARDWIDTH * BOXSIZE) + 8, (BOARDHEIGHT * BOXSIZE) + 8), 5)

    # fill the background of the board
    pygame.draw.rect(DISPLAYSURF, BGCOLOR, (XMARGIN, TOPMARGIN, BOXSIZE * BOARDWIDTH, BOXSIZE * BOARDHEIGHT))
    # draw the individual boxes on the board
    for x in range(BOARDWIDTH):
        for y in range(BOARDHEIGHT):
            drawBox(x, y, board[x][y])


def drawStatus(score, level):
    # draw the score text
    scoreSurf = BASICFONT.render('Score: %s' % score, True, TEXTCOLOR)
    scoreRect = scoreSurf.get_rect()
    scoreRect.topleft = (WINDOWWIDTH - 150, 20)
    DISPLAYSURF.blit(scoreSurf, scoreRect)

    # draw the level text
    levelSurf = BASICFONT.render('Level: %s' % level, True, TEXTCOLOR)
    levelRect = levelSurf.get_rect()
    levelRect.topleft = (WINDOWWIDTH - 150, 50)
    DISPLAYSURF.blit(levelSurf, levelRect)


def drawPiece(piece, pixelx=None, pixely=None):
    shapeToDraw = PIECES[piece['shape']][piece['rotation']]
    if pixelx == None and pixely == None:
        # if pixelx & pixely hasn't been specified, use the location stored in the piece data structure
        pixelx, pixely = convertToPixelCoords(piece['x'], piece['y'])

    # draw each of the boxes that make up the piece
    for x in range(TEMPLATEWIDTH):
        for y in range(TEMPLATEHEIGHT):
            if shapeToDraw[y][x] != BLANK:
                drawBox(None, None, piece['color'], pixelx + (x * BOXSIZE), pixely + (y * BOXSIZE))


def drawNextPiece(piece):
    # draw the "next" text
    nextSurf = BASICFONT.render('Next:', True, TEXTCOLOR)
    nextRect = nextSurf.get_rect()
    nextRect.topleft = (WINDOWWIDTH - 120, 80)
    DISPLAYSURF.blit(nextSurf, nextRect)
    # draw the "next" piece
    drawPiece(piece, pixelx=WINDOWWIDTH-120, pixely=100)


if __name__ == '__main__':
main()#184 Re: Php/Nodejs/Web/HTML5/Javascript/微信开发/Python » Ubuntu18.04 python3 pygame 使用入门 » 2019-10-09 22:01:32
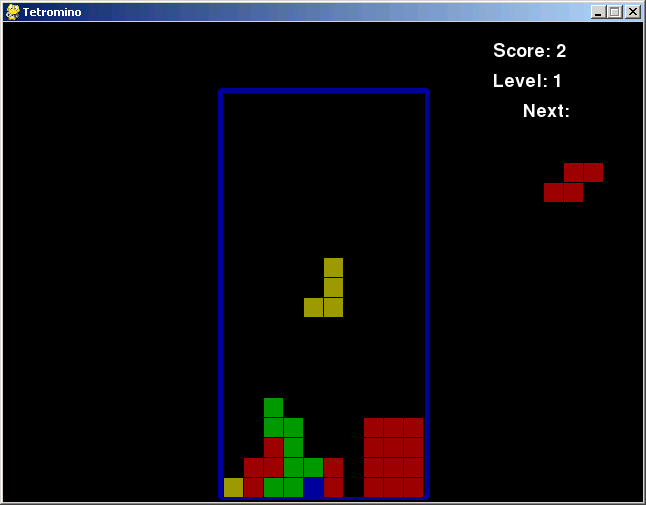
#185 Re: Php/Nodejs/Web/HTML5/Javascript/微信开发/Python » Ubuntu18.04 python3 pygame 使用入门 » 2019-10-09 21:34:25
#186 Php/Nodejs/Web/HTML5/Javascript/微信开发/Python » Ubuntu18.04 python3 pygame 使用入门 » 2019-10-09 21:29:42
- pythinker
- 回复: 3
0. 安装 python3: sudo apt-get install python3 python3-pip
1. 安装 pygame 库: python3 -m pip install pygame
2. pygame 入门指南: https://www.edureka.co/blog/pygame-tutorial
3. 一个小程序, test.py:
#!/usr/bin/python3
import pygame

def main():
    pygame.init()
    screen = pygame.display.set_mode((640, 480))
    clock = pygame.time.Clock()

    radius = 15
    x = 0
    y = 0
    mode = 'blue'
    points = []

    while True:

        pressed = pygame.key.get_pressed()

        alt_held = pressed[pygame.K_LALT] or pressed[pygame.K_RALT]
        ctrl_held = pressed[pygame.K_LCTRL] or pressed[pygame.K_RCTRL]

        for event in pygame.event.get():

            # determin if X was clicked, or Ctrl+W or Alt+F4 was used
            if event.type == pygame.QUIT:
                return
            if event.type == pygame.KEYDOWN:
                if event.key == pygame.K_w and ctrl_held:
                    return
                if event.key == pygame.K_F4 and alt_held:
                    return
                if event.key == pygame.K_ESCAPE:
                    return

                # determine if a letter key was pressed
                if event.key == pygame.K_r:
                    mode = 'red'
                elif event.key == pygame.K_g:
                    mode = 'green'
                elif event.key == pygame.K_b:
                    mode = 'blue'

            if event.type == pygame.MOUSEBUTTONDOWN:
                if event.button == 1: # left click grows radius
                    radius = min(200, radius + 1)
                elif event.button == 3: # right click shrinks radius
                    radius = max(1, radius - 1)

            if event.type == pygame.MOUSEMOTION:
                # if mouse moved, add point to list
                position = event.pos
                points = points + [position]
                points = points[-256:]

        screen.fill((0, 0, 0))

        # draw all points
        i = 0
        while i < len(points) - 1:
            drawLineBetween(screen, i, points[i], points[i + 1], radius, mode)
            i += 1

        pygame.display.flip()

        clock.tick(60)

def drawLineBetween(screen, index, start, end, width, color_mode):
    c1 = max(0, min(255, 2 * index - 256))
    c2 = max(0, min(255, 2 * index))

    if color_mode == 'blue':
        color = (c1, c1, c2)
    elif color_mode == 'red':
        color = (c2, c1, c1)
    elif color_mode == 'green':
        color = (c1, c2, c1)

    dx = start[0] - end[0]
    dy = start[1] - end[1]
    iterations = max(abs(dx), abs(dy))

    for i in range(iterations):
        progress = 1.0 * i / iterations
        aprogress = 1 - progress
        x = int(aprogress * start[0] + progress * end[0])
        y = int(aprogress * start[1] + progress * end[1])
        pygame.draw.circle(screen, color, (x, y), width)

main()#187 Re: Php/Nodejs/Web/HTML5/Javascript/微信开发/Python » Ubuntu18.04 python 解释器下import 乌龟库turtle出错 » 2019-10-09 21:25:59
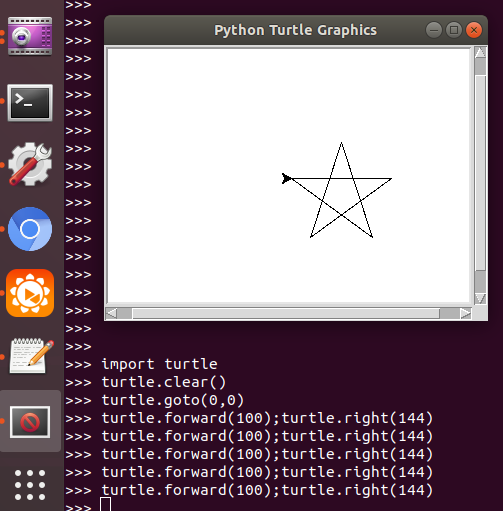
#188 Re: Php/Nodejs/Web/HTML5/Javascript/微信开发/Python » Ubuntu18.04 python 解释器下import 乌龟库turtle出错 » 2019-10-06 08:27:53
$ sudo apt-get install python3-tk
正在读取软件包列表... 完成
正在分析软件包的依赖关系树
正在读取状态信息... 完成
下列软件包是自动安装的并且现在不需要了:
  fonts-liberation2 fonts-opensymbol gir1.2-geocodeglib-1.0 gir1.2-gst-plugins-base-1.0 gir1.2-gstreamer-1.0 gir1.2-gudev-1.0
  gir1.2-udisks-2.0 grilo-plugins-0.3-base gstreamer1.0-gtk3 libboost-date-time1.65.1 libboost-filesystem1.65.1 libboost-iostreams1.65.1
  libboost-locale1.65.1 libcdr-0.1-1 libclucene-contribs1v5 libclucene-core1v5 libcmis-0.5-5v5 libcolamd2 libdazzle-1.0-0 libe-book-0.1-1
  libedataserverui-1.2-2 libeot0 libepubgen-0.1-1 libetonyek-0.1-1 libevent-2.1-6 libexiv2-14 libfreerdp-client2-2 libfreerdp2-2 libgc1c2
  libgee-0.8-2 libgexiv2-2 libgom-1.0-0 libgpgmepp6 libgpod-common libgpod4 liblangtag-common liblangtag1 liblirc-client0 liblua5.3-0
  libmediaart-2.0-0 libmspub-0.1-1 libodfgen-0.1-1 libqqwing2v5 libraw16 librevenge-0.0-0 libsgutils2-2 libssh-4 libsuitesparseconfig5
  libvncclient1 libwinpr2-2 libxapian30 libxmlsec1 libxmlsec1-nss lp-solve media-player-info python3-mako python3-markupsafe syslinux
  syslinux-common syslinux-legacy usb-creator-common
使用'sudo apt autoremove'来卸载它(它们)。
将会同时安装下列软件:
  blt libtcl8.6 libtk8.6 tk8.6-blt2.5
建议安装:
  blt-demo tcl8.6 tk8.6 tix python3-tk-dbg
下列【新】软件包将被安装:
  blt libtcl8.6 libtk8.6 python3-tk tk8.6-blt2.5
升级了 0 个软件包,新安装了 5 个软件包,要卸载 0 个软件包,有 3 个软件包未被升级。
需要下载 2,252 kB 的归档。
解压缩后会消耗 9,233 kB 的额外空间。
您希望继续执行吗? [Y/n] y
获取:1 http://mirrors.aliyun.com/ubuntu bionic/main amd64 libtcl8.6 amd64 8.6.8+dfsg-3 [881 kB]
获取:2 http://mirrors.aliyun.com/ubuntu bionic/main amd64 libtk8.6 amd64 8.6.8-4 [693 kB]
获取:3 http://mirrors.aliyun.com/ubuntu bionic/main amd64 tk8.6-blt2.5 amd64 2.5.3+dfsg-4 [572 kB]
获取:4 http://mirrors.aliyun.com/ubuntu bionic/main amd64 blt amd64 2.5.3+dfsg-4 [4,944 B]
获取:5 http://mirrors.aliyun.com/ubuntu bionic-updates/main amd64 python3-tk amd64 3.6.8-1~18.04 [101 kB]
已下载 2,252 kB,耗时 1秒 (1,551 kB/s)
正在选中未选择的软件包 libtcl8.6:amd64。
(正在读取数据库 ... 系统当前共安装有 156569 个文件和目录。)
正准备解包 .../libtcl8.6_8.6.8+dfsg-3_amd64.deb  ...
正在解包 libtcl8.6:amd64 (8.6.8+dfsg-3) ...
正在选中未选择的软件包 libtk8.6:amd64。
正准备解包 .../libtk8.6_8.6.8-4_amd64.deb  ...
正在解包 libtk8.6:amd64 (8.6.8-4) ...
正在选中未选择的软件包 tk8.6-blt2.5。
正准备解包 .../tk8.6-blt2.5_2.5.3+dfsg-4_amd64.deb  ...
正在解包 tk8.6-blt2.5 (2.5.3+dfsg-4) ...
正在选中未选择的软件包 blt。
正准备解包 .../blt_2.5.3+dfsg-4_amd64.deb  ...
正在解包 blt (2.5.3+dfsg-4) ...
正在选中未选择的软件包 python3-tk:amd64。
正准备解包 .../python3-tk_3.6.8-1~18.04_amd64.deb  ...
正在解包 python3-tk:amd64 (3.6.8-1~18.04) ...
正在设置 libtcl8.6:amd64 (8.6.8+dfsg-3) ...
正在设置 libtk8.6:amd64 (8.6.8-4) ...
正在设置 tk8.6-blt2.5 (2.5.3+dfsg-4) ...
正在设置 blt (2.5.3+dfsg-4) ...
正在设置 python3-tk:amd64 (3.6.8-1~18.04) ...
正在处理用于 libc-bin (2.27-3ubuntu1) 的触发器 ...
搞定了, 原来是姿势用错了, 正确的是: sudo apt-get install python3-tk
#189 Re: Php/Nodejs/Web/HTML5/Javascript/微信开发/Python » Ubuntu18.04 python 解释器下import 乌龟库turtle出错 » 2019-10-06 07:56:23
sudo apt install python3-pip
$ sudo pip3 install tkinter
The directory '/home/whycan/.cache/pip/http' or its parent directory is not owned by the current user and the cache has been disabled. Please check the permissions and owner of that directory. If executing pip with sudo, you may want sudo's -H flag.
The directory '/home/whycan/.cache/pip' or its parent directory is not owned by the current user and caching wheels has been disabled. check the permissions and owner of that directory. If executing pip with sudo, you may want sudo's -H flag.
Collecting tkinter
Exception:
Traceback (most recent call last):
  File "/usr/lib/python3/dist-packages/pip/basecommand.py", line 215, in main
    status = self.run(options, args)
  File "/usr/lib/python3/dist-packages/pip/commands/install.py", line 342, in run
    requirement_set.prepare_files(finder)
  File "/usr/lib/python3/dist-packages/pip/req/req_set.py", line 380, in prepare_files
    ignore_dependencies=self.ignore_dependencies))
  File "/usr/lib/python3/dist-packages/pip/req/req_set.py", line 554, in _prepare_file
    require_hashes
  File "/usr/lib/python3/dist-packages/pip/req/req_install.py", line 278, in populate_link
    self.link = finder.find_requirement(self, upgrade)
  File "/usr/lib/python3/dist-packages/pip/index.py", line 465, in find_requirement
    all_candidates = self.find_all_candidates(req.name)
  File "/usr/lib/python3/dist-packages/pip/index.py", line 423, in find_all_candidates
    for page in self._get_pages(url_locations, project_name):
  File "/usr/lib/python3/dist-packages/pip/index.py", line 568, in _get_pages
    page = self._get_page(location)
  File "/usr/lib/python3/dist-packages/pip/index.py", line 683, in _get_page
    return HTMLPage.get_page(link, session=self.session)
  File "/usr/lib/python3/dist-packages/pip/index.py", line 795, in get_page
    resp.raise_for_status()
  File "/usr/share/python-wheels/requests-2.18.4-py2.py3-none-any.whl/requests/models.py", line 935, in raise_for_status
    raise HTTPError(http_error_msg, response=self)
requests.exceptions.HTTPError: 404 Client Error: Not Found for url: https://pypi.org/simple/tkinter/
装不了 tkinter
#190 Php/Nodejs/Web/HTML5/Javascript/微信开发/Python » Ubuntu18.04 python 解释器下import 乌龟库turtle出错 » 2019-10-06 07:52:33
- pythinker
- 回复: 3
$ python3
Python 3.6.8 (default, Aug 20 2019, 17:12:48)
[GCC 8.3.0] on linux
Type "help", "copyright", "credits" or "license" for more information.
>>> import turtle
Traceback (most recent call last):
File "<stdin>", line 1, in <module>
File "/usr/lib/python3.6/turtle.py", line 107, in <module>
import tkinter as TK
ModuleNotFoundError: No module named 'tkinter'
>>> quit()
#191 Re: DIY/综合/Arduino/写字机/3D打印机/智能小车/平衡车/四轴飞行/MQTT/物联网 » 捡了个便宜的高级ZYNQ XC7Z010 开发板玩玩 » 2019-08-16 13:48:29
#192 Re: 全志 SOC » 请问下,这个文件是哪里来的? 在 sdk 什么位置 » 2019-08-16 11:48:49
#193 Re: Php/Nodejs/Web/HTML5/Javascript/微信开发/Python » Ubuntu 18.04 安装 pyfb (操作 framebuffer) 步奏 » 2019-08-16 10:59:57
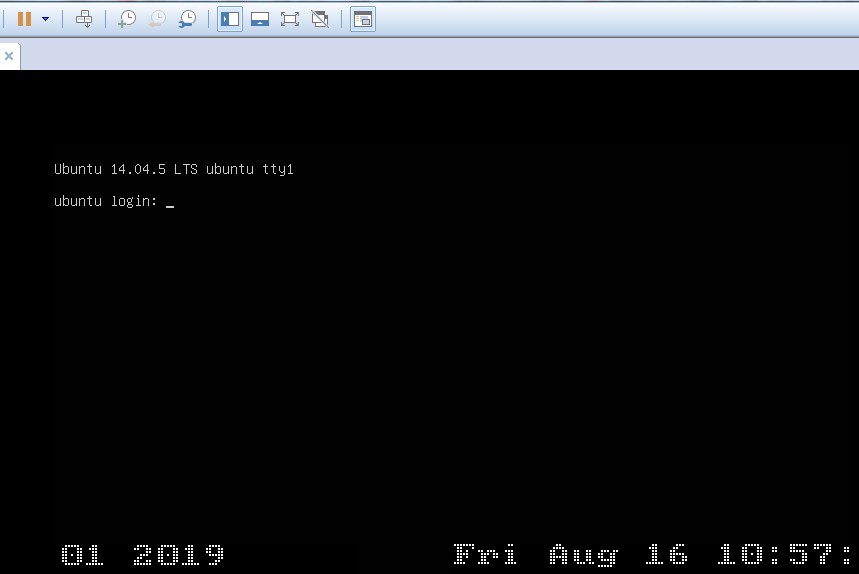
#194 Re: 技术人生/软件使用技巧/破解经验/技术吐槽/灌水 » 199元/台 低价转让3台拥有啪啪啪手感的纯手工,全景天窗, 3.2寸OLED STM32 计算器 » 2019-08-16 10:45:09
#195 Php/Nodejs/Web/HTML5/Javascript/微信开发/Python » Ubuntu 18.04 安装 pyfb (操作 framebuffer) 步奏 » 2019-08-16 10:41:37
- pythinker
- 回复: 1
1. 打开 fbpy 官方网站 https://pypi.org/project/fbpy/
wget https://files.pythonhosted.org/packages/46/13/e931f1b15facd0e0d7a6913915e9f79f22ed9927326a841a01b5d164c3ac/fbpy-0.1.tar.gz
tar xvf fbpy-0.1.tar.gz
cd fbpy-0.1
2. 安装环境:
sudo apt-get install python-pip -y
sudo apt-get install python-numpy -y
sudo apt-get install libjack-dev -y
pip install Cython
pip install numpy
3. 修改代码 fbpy/utils/fbutils.c
插入:
#define png_infopp_NULL (png_infopp)NULL
#define int_p_NULL (int*)NULL
https://stackoverflow.com/questions/2442335/libpng-boostgil-png-infopp-null-not-found
4. 执行编译,安装:
sudo python setup.py install
#196 Re: 全志 SOC » 笔记-编译LittlevGL GUI demo支持tslib » 2019-04-02 11:26:25
#197 Re: DIY/综合/Arduino/写字机/3D打印机/智能小车/平衡车/四轴飞行/MQTT/物联网 » 请教各位, 二维码usb扫描枪如何自己开发软件捕获输入数据? » 2019-04-02 11:24:31
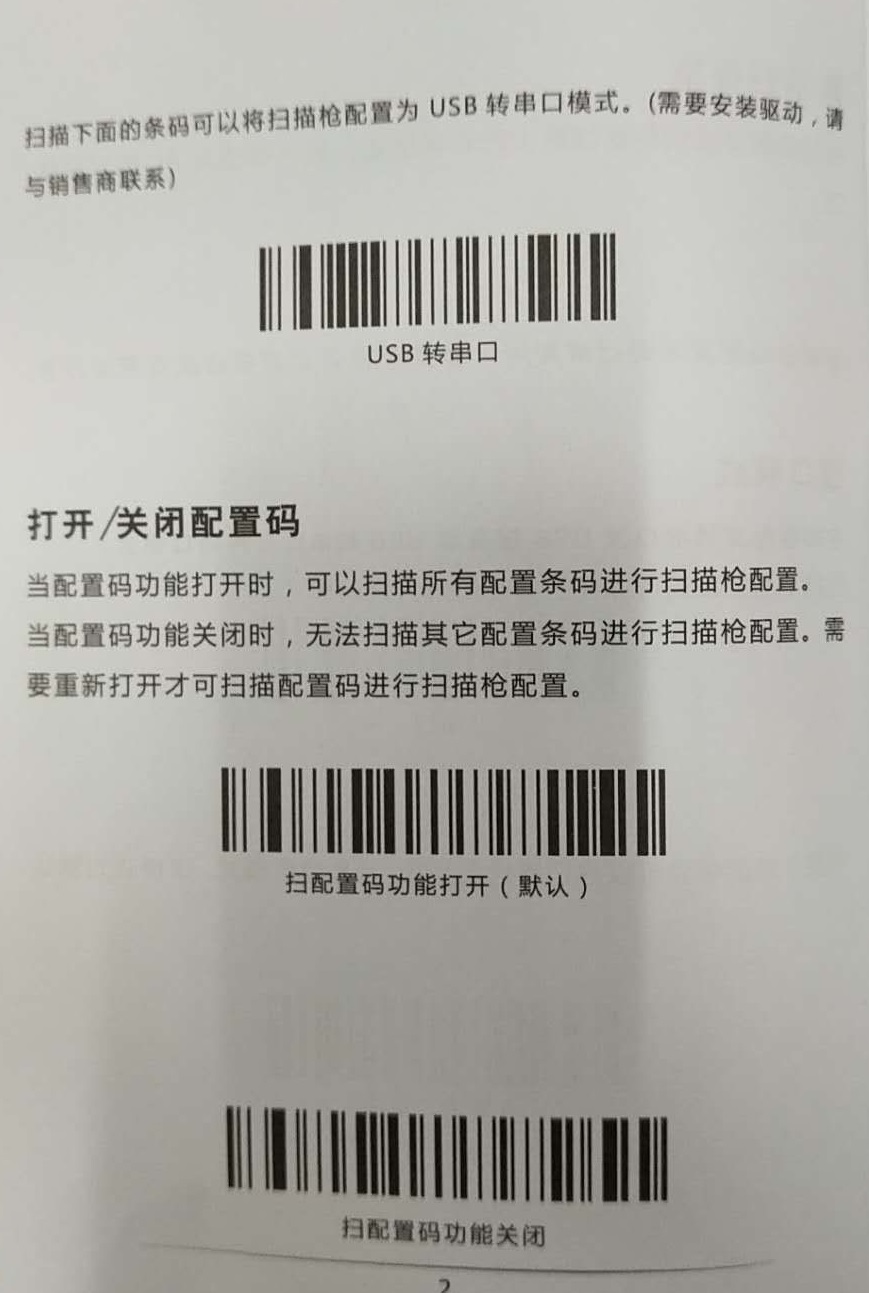


#198 Re: DIY/综合/Arduino/写字机/3D打印机/智能小车/平衡车/四轴飞行/MQTT/物联网 » 请教各位, 二维码usb扫描枪如何自己开发软件捕获输入数据? » 2019-03-28 13:52:19
#199 Re: DIY/综合/Arduino/写字机/3D打印机/智能小车/平衡车/四轴飞行/MQTT/物联网 » 请教各位, 二维码usb扫描枪如何自己开发软件捕获输入数据? » 2019-03-28 09:51:38
pythinker 说:微凉VeiLiang 说:扫描枪是什么牌子的,扫描枪一般是usb-hid输入的,可以通过配置成usb虚拟串口。这样可以通过串口获取。还有一些可以配置成hid-pos的,这样可以从hid-pos获取数据,也不会有内容输入到其他编辑框了。如果实在要用默认的hid键盘输入,那么可以考虑下检测下键盘的输入速度,一般扫描枪输入速度都很快的,找到临界点区分开普通键盘和扫描枪。
你是说 USB HID 和 USB 虚拟机串口兼容的吗?
不兼容,应该是可以通过扫码来切换的。不过虚拟串口在win10之前可能要安装驱动
还有这种骚操作, 我去看看说明说, 再不行问下卖家, 多谢!
#200 Re: DIY/综合/Arduino/写字机/3D打印机/智能小车/平衡车/四轴飞行/MQTT/物联网 » 请教各位, 二维码usb扫描枪如何自己开发软件捕获输入数据? » 2019-03-28 09:39:27
- 首页
- » 搜索
- » pythinker 发表的帖子