- 首页
- » 搜索
- » 拉轰的脚踏车 发表的帖子
#1 Re: 全志 SOC » V3s 执行 iperf3 满负荷测试两小时挂了 » 2023-12-12 16:53:18
您的Linux内核出现了Oops,这是一种严重错误,表明有某些东西引起了内核崩溃。具体原因可能包括硬件问题、驱动程序错误或者内核本身的bug等。
在提供的日志信息中可以看到,错误发生在deactivate_slab+0xbc/0x488,这是内存管理相关的函数。可能的原因包括内存不足、内存损坏,或者可能是某个设备驱动试图访问一个不应该访问的内存区域。
要解决这个问题,你可能需要:
① 检查硬件,尤其是RAM,是否有问题。可以使用诸如memtest86+之类的工具进行内存测试。
② 更新系统和内核到最新版本,如果可能的话。可能存在的内核bug在新版本中可能已经被修复。
③ 检查并更新设备驱动。如果问题与特定的硬件设备或驱动有关,那么更新或重新安装驱动可能有助于解决问题。
④ 如果以上步骤都无效,您可能需要深入跟踪和调试内核以找到确切问题,这可能需要相当熟练的Linux和编程知识。
另外,注意您在运行哪些程序或加载哪些模块时出现了这个错误,这可能会帮助您确定问题的来源。在这个例子中,iperf3进程正在运行当错误发生,可能需要检查与其相关的网络设备或驱动。
#3 Re: 全志 SOC » v3s mcp2515 can能挂载不能收发数据 » 2022-10-19 18:34:32
[    1.107058] libphy: Fixed MDIO Bus: probed
[    1.111186] CAN device driver interface
[    2.136630] mcp251x spi0.1: MCP251x didn't enter in conf mode after reset
[    2.143501] mcp251x spi0.1: Probe failed, err=16
[    2.148280] mcp251x: probe of spi0.1 failed with error -16
V3s + MCP2515 这是什么问题呢?
#4 Re: 全志 SOC » 请问全志V3s使用荔枝派最新的 linux 4.13-y 分支,如何支持声卡? » 2022-10-19 17:53:04
V3s linux 5.4 没办法录音
#
# tinymix set 11 1
#
# tinymix contents
Number of controls: 13
ctl     type    num     name                                    value
0       INT     1       DAC Playback Volume                     63 (range 0->63)
1       INT     1       Headphone Playback Volume               63 (range 0->63)
2       BOOL    2       Headphone Playback Switch               On, On
3       INT     1       Mic1 Playback Volume                    3 (range 0->7)
4       INT     1       Mic1 Boost Volume                       7 (range 0->7)
5       INT     1       ADC Gain Capture Volume                 7 (range 0->7)
6       BOOL    2       DAC Playback Switch                     On, On
7       BOOL    2       DAC Reversed Playback Switch            On, On
8       BOOL    2       Mic1 Playback Switch                    On, On
9       BOOL    2       Mixer Capture Switch                    On, On
10      BOOL    2       Mixer Reversed Capture Switch           On, On
11      BOOL    2       Mic1 Capture Switch                     On, On
12      ENUM    2       Headphone Source Playback Route         , DACMixer, , DACMixer
#
# tinycap /opt/x.wav  -t 2
Capturing sample: 2 ch, 48000 hz, 16 bit
Error capturing sample
Captured 4294967295 frames#5 Re: 全志 SOC » 全志V3S做音频网络对讲,存在回声和噪音,求救啊 » 2022-10-17 09:40:04
#6 Re: 全志 SOC » 开源 V3x模块化开发板 » 2022-05-20 15:10:39
#9 Re: 全志 SOC » 螃蟹wifi AP模式压测工具/Bug复现工具源代码 » 2022-01-28 20:49:11
#10 Re: 全志 SOC » 求助大佬 st7735都有fb0了还不能正常工作啊 » 2022-01-28 20:46:45
#11 Re: 全志 SOC » F1C200 linux LVGL双缓冲支持 » 2022-01-27 14:57:26
恩,加个-d就是一个后台的daemon程序
https://www.kernel.org/doc/html/v4.12/input/uinput.html
uinput 是一个内核模块,可以模拟用户空间的输入设备。通过写入 /dev/uinput(或 /dev/input/uinput)设备,进程可以创建具有特定功能的虚拟输入设备。一旦创建了这个虚拟设备,进程就可以通过它发送事件,这些事件将被传递给用户空间和内核消费者。
这玩意真神奇!
#12 Re: 全志 SOC » V3S和F133关系如何? » 2021-11-06 23:21:09
#15 Re: 全志 SOC » debian10自动添加了屏幕终端? » 2021-10-04 15:48:07
#16 技术人生/软件使用技巧/破解经验/技术吐槽/灌水 » 我有160G MP3/MP4 固件 (灌水) » 2021-10-04 15:46:38
- 拉轰的脚踏车
- 回复: 0
https://forum.gsmhosting.com/vbb/6708795-post16.html
我们到底生产了多少电子产(la)品(ji)啊
#17 Re: VMWare/Linux/Ubuntu/Fedora/CentOS/U-BOOT » 记录一下常用易忘的Linux日常操作 » 2021-10-02 21:10:00
Use set -e
Every script you write should include set -e at the top. This tells bash that it should exit the script if any statement returns a non-true return value. The benefit of using -e is that it prevents errors snowballing into serious issues when they could have been caught earlier. Again, for readability you may want to use set -o errexit.
Using -e gives you error checking for free. If you forget to check something, bash will do it or you. Unfortunately it means you can't check $? as bash will never get to the checking code if it isn't zero. There are other constructs you could use:
command
if [ "$?"-ne 0]; then echo "command failed"; exit 1; fi could be replaced with
command || { echo "command failed"; exit 1; } or
if ! command; then echo "command failed"; exit 1; fi What if you have a command that returns non-zero or you are not interested in its return value? You can use command || true, or if you have a longer section of code, you can turn off the error checking, but I recommend you use this sparingly.
set +e
command1
command2
set -e #20 Re: 全志 SOC » [F1C100S / F1C200S] Bare metal / RTOS hardware H264 effort » 2021-09-19 22:28:56
最近在仔细研究SUNIV家族(F1C100S)在裸机/RTOS上实现H264硬件解码的可行性。我会尽量在这里保留一些参考资料,并开始分享资源。
我对全志车手的理解如下。
VE
负责低级操作。主要由一个由VE引擎中断驱动的状态机组成,它使用两个定时器和一个任务列表。
我认为这个内核可以运行裸机(至少对于 PoC 而言),它没有什么特别之处。要与 RTOS 一起使用,只需实现互斥体包装器。我用直接函数替换了 ioctl。几个小时后,我能够将这部分集成到裸机 MDK 项目中,只需稍加努力,它应该可以正常工作。
这个核心是3个文件,cedar_ve_sl.c cedar_ve.h和list.h(linux双向链表实现)。
我使用了这些源代码:https : //github.com/mirkerson/c600/tree/master/linux-3.10/drivers/media/cedar-ve
CedarX
负责所有数据处理,由各种块、FB、VB、vdecoder + plugins、OMX 组成。
由于大量异步操作,这自然取决于互斥锁,但是,可能可以使用调度程序或其他技巧在裸机中运行它。
经过几个小时的工作,项目编译没有错误。必须修改各种东西。RTOS 依赖包在 osal.c 中。pixelformat.c 已经扩展了需要 ARMCC 6 的 inline asm,所以请注意 MDK 编译器版本。
我使用了这些来源:https : //github.com/allwinner-zh/media-codec/tree/master/sunxi-cedarx/SOURCE
allwinner 的一篇关于 LibVE 架构的论文和其他一些文档
https://github.com/linux-sunxi/cedarx-libs/blob/master/doc/Libve%20User%20Guide-2011.7.6.pdf
这里是MELIS 的 CEDAR 模块的非编译版本:
https : //github.com/caochunjie45/test/tree/master/eMod/mod_cedar
遗憾的是,这仍然依赖于其他编译库,因此它不包含编写所需的所有源代码h264 驱动程序,但它仍然很有帮助。
当然,如果我们能找到一个旧 MELIS 的完整来源,或者只是 H264 驱动程序的来源(也许一些前 Alwinner 员工可以帮助提供一个旧的 H264 PoC?或一个旧驱动程序?)可以随时自己尝试,总是很有趣。
稍加清理后,我将添加 MDK 项目
google自动翻译
#21 Re: 全志 SOC » V3S 的蓝牙缺少选项 » 2021-09-14 16:30:26
#22 Re: 全志 SOC » V3S 的蓝牙缺少选项 » 2021-09-14 15:58:57
#23 Re: 全志 SOC » 全志F133A 与 F133B 的差别 » 2021-09-08 12:08:11
#25 全志 SOC » 【横行江湖二十年,想出脑血栓也想不通的问题】H500s(A33) 通过GM7123接VGA显示器,蓝色部分有条纹,其它颜色正常。交换寄存器 » 2021-08-25 23:21:15
- 拉轰的脚踏车
- 回复: 2
原帖: https://bbs.aw-ol.com/topic/343/h500s-a33-gm7123-vga/8
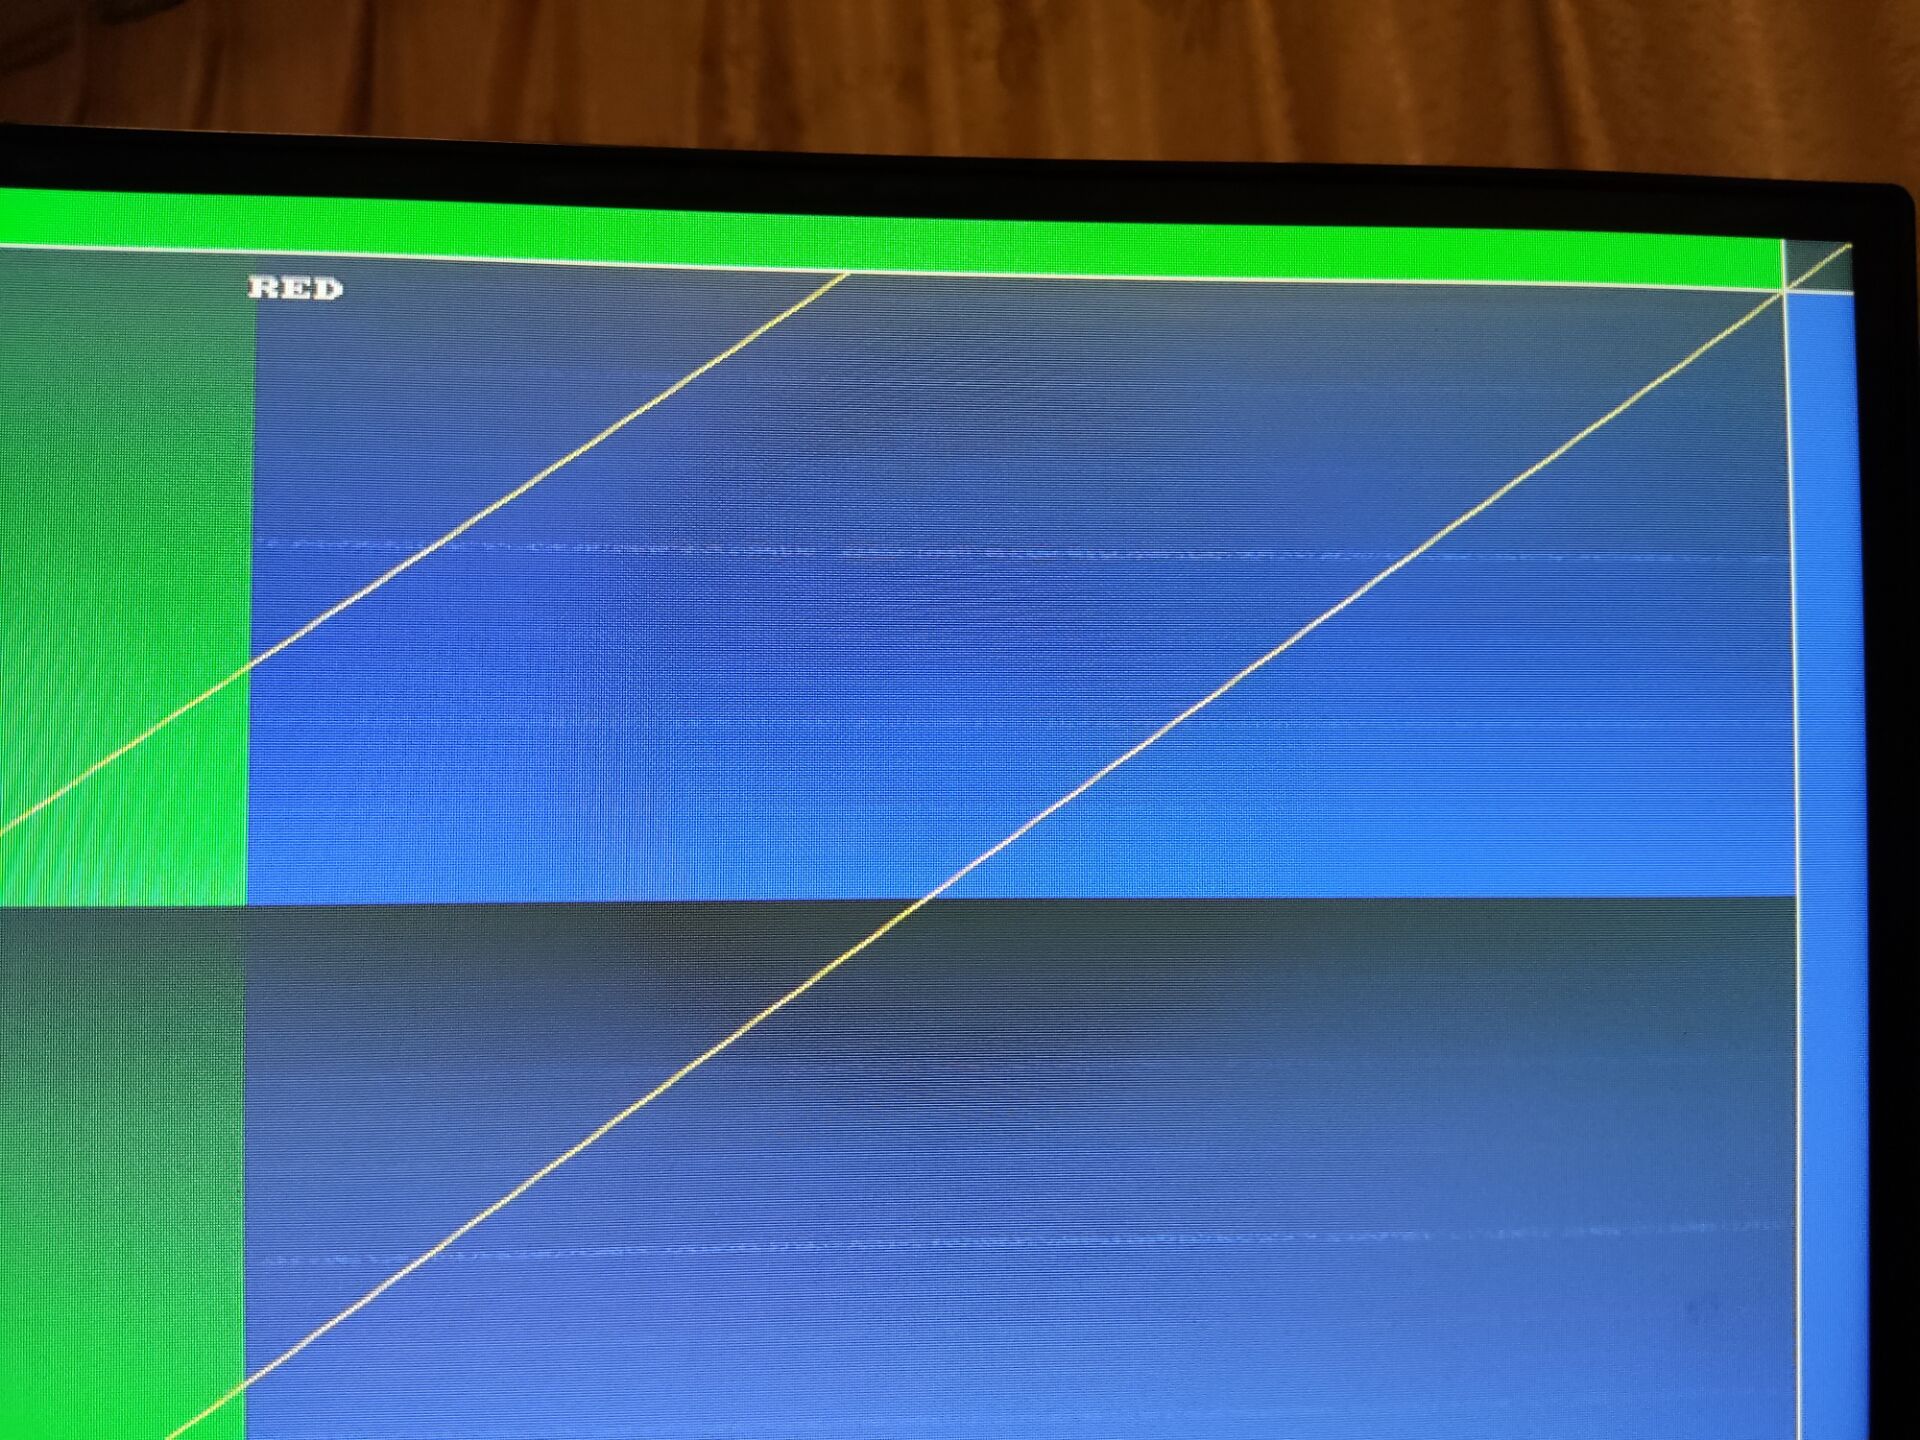
【横行江湖二十年,想出脑血栓也想不通的问题】H500s(A33) 通过GM7123接VGA显示器,蓝色部分有条纹,其它颜色正常。
交换 R / B 寄存器之后, 蓝色部分仍然有条纹。
#26 Re: 全志 SOC » 点屏强芯全志D1s可以申请样片了,本站网友开源原理图与PCB送两片D1s(不能与其他网友作品雷同) » 2021-08-20 10:16:42
支持楼主, 我来发个F133手册: F133_User_Manual_V1.0.pdf
果然是点屏强芯, 看了一下手册, 就没有他点不亮的屏:
2.2.5 Video Output
2.2.5.1 RGB and LVDS LCD
	Supports RGB interface with DE/SYNC mode, up to 1920 x 1080@60fps
	Supports serial RGB/dummy RGB interface, up to 800 x 480@60fps
	Supports LVDS interface with dual link, up to 1920 x 1080@60fps
	Supports LVDS interface with single link, up to 1366 x 768@60fps
	Supports i8080 interface, up to 800 x 480@60fps
	Supports BT656 interface for NTSC and PAL
	RGB666 and RGB565 with dither function
	Gamma correction with R/G/B channel independence
2.2.5.2 MIPI DSI
	Compliance with MIPI DSI v1.01
	Supports 4-lane MIPI DSI, up to 1280 x 720@60fps and 1920 x 1200@60fps resolution
	Supports non-burst mode with sync pulse/sync event and burst mode
	Supports pixel format: RGB888, RGB666, RGB666 loosely packed and RGB565
	Supports continuous and non-continuous lane clock modes
	Supports bidirectional communication of all generic commands in LP through data lane 0
	Supports low power data transmission
	Supports ULPS and escape modes
	Hardware checksum capabilities
2.2.5.3 CVBS OUT
	1-channel CVBS output
	Supports NTSC and PAL format
	Plug status auto detecting
	10 bits DAC output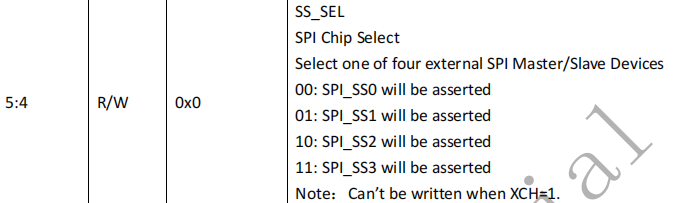
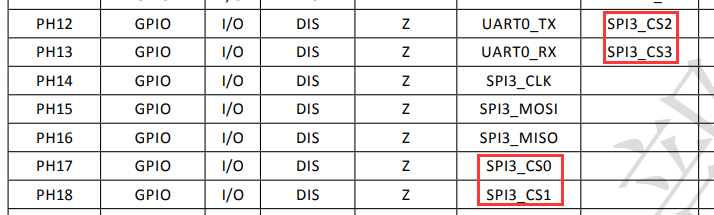
#29 Re: 全志 SOC » 终于找到了全志SPI CS片选最多的soc了, 一共四个片选引脚 » 2021-08-15 10:45:50
https://whycan.com/files/members/3907/A33-user-manual-release-1_1.pdf
https://whycan.com/files/members/3/Allwinner_S3_Datasheet_V0_2.pdf
https://whycan.com/files/members/3907/D1_Datasheet_V0.1_Draft_Version.pdf
https://whycan.com/files/members/3907/D1_User_Manual_V0.1_Draft_Version.pdf
https://dl.linux-sunxi.org/H3/Allwinner_H3_Datasheet_V1.0.pdf
https://linux-sunxi.org/images/a/a3/Allwinner_H5_Manual_v1.0.pdf
翻遍了这些都没找到多片选。
#30 Re: 全志 SOC » 终于找到了全志SPI CS片选最多的soc了, 一共四个片选引脚 » 2021-08-15 09:42:33
;----------------------------------------------------------------------------------
;SPI controller configuration
;----------------------------------------------------------------------------------
[spi0]
spi_used       = 0
spi_cs_bitmap  = 1
spi_cs0        = port:PC19<3><1><default><default>
spi_sclk       = port:PC02<3><default><default><default>
spi_mosi       = port:PC00<3><default><default><default>
spi_miso       = port:PC01<3><default><default><default>

[spi1]
spi_used       = 0
spi_cs_bitmap  = 1
spi_cs0        =
spi_sclk       =
spi_mosi       =
spi_miso       =

[spi2]
spi_used       = 0
spi_cs_bitmap  = 1
spi_cs0        = port:PE04<3><1><default><default>
spi_sclk       = port:PE05<3><default><default><default>
spi_mosi       = port:PE06<3><default><default><default>
spi_miso       = port:PE07<3><default><default><default>

[spi3]
spi_used       = 0
spi_cs_bitmap  = 1
spi_cs0        = port:PH17<2><1><default><default>
spi_cs1        = port:PH18<2><1><default><default>
spi_cs2        = port:PH12<3><1><default><default>
spi_cs3        = port:PH13<3><default><default><default>
spi_sclk       = port:PH14<2><default><default><default>
spi_mosi       = port:PH15<2><default><default><default>
spi_miso       = port:PH16<2><default><default><default>

;----------------------------------------------------------------------------------
;SPI device configuration
;----------------------------------------------------------------------------------
[spi_devices]
spi_dev_num = 1

[spi_board0]
modalias      = "m25p32"
max_speed_hz  = 33000000
bus_num       = 0
chip_select   = 0
mode          = 0
https://github.com/linux-sunxi/sunxi-boards/blob/master/sys_config/a80/cubieboard4.fex
#31 全志 SOC » 终于找到了全志SPI CS片选最多的soc了, 一共四个片选引脚 » 2021-08-15 09:39:10
- 拉轰的脚踏车
- 回复: 9
#32 Re: 全志 SOC » 小智X3开发板,lvds驱动给大家参考一下!!! » 2021-07-31 20:31:59
#33 Re: 全志 SOC » LVDS电路硬件设计 » 2021-07-31 20:28:04
#34 Re: DIY/综合/Arduino/写字机/3D打印机/智能小车/平衡车/四轴飞行/MQTT/物联网 » 请问 X-powers AC108 I2S 接口四路麦克风采集是什么原理?pdf里面没有看到时序图,是不是I2S口需要两路输出? » 2021-07-31 11:59:46
https://www.shangmayuan.com/a/0681b9511ac54b73823cd2f6.html
3.TDM(时分多路复用)
TDM感受不算是一种接口,而是一种方式。由于I2S仅仅可以两个通道,当须要传输多个通道的数据时就得歇菜了,而PCM经过时分复用TDM方式能够承载多达N(N>8)通道的数据,并有一个相似于I2S的数据/时钟结构。
TDM每一个通道的数据都使用数据总线上的一个槽(Slot),其宽度至关于帧的1/N,
其中N是传输通道的数量。出于实用考虑,N一般四舍五入到最近的2次幂(二、四、八、或16),而且任何多余通道都被空闲。一个TDM帧时钟一般实现为一位宽的脉冲,这与I2S的50%占空比时钟相反。超过25
MHz的时钟速率一般不用于TDM数据,缘由是较高的频率会引发印刷电路板设计者要避免的板面布局问题。
TDM: 包括PCM format 和 I2S format,下图是TDM-I2S Mode, 在I2S format下传输多channel。

#35 Re: DIY/综合/Arduino/写字机/3D打印机/智能小车/平衡车/四轴飞行/MQTT/物联网 » 请问 X-powers AC108 I2S 接口四路麦克风采集是什么原理?pdf里面没有看到时序图,是不是I2S口需要两路输出? » 2021-07-31 09:48:23
le062 说:一个IO配合LRCK可以传双通道
两个IO配合LRCK就能传四通道把一般soc的i2s麦克风只支持立体声麦克风(2通道),如何接这四通道呢?那是不是不能用呢?
感谢楼上大佬回复, 我也有同样的疑问。
树莓派也是一路麦克风输入, 为什么他可以采集这个四路 AC108 ?
#36 DIY/综合/Arduino/写字机/3D打印机/智能小车/平衡车/四轴飞行/MQTT/物联网 » 请问 X-powers AC108 I2S 接口四路麦克风采集是什么原理?pdf里面没有看到时序图,是不是I2S口需要两路输出? » 2021-07-31 09:13:05
- 拉轰的脚踏车
- 回复: 5
http://www.x-powers.com/en.php/Info/product_detail/article_id/41
https://cdn.sparkfun.com/assets/6/0/d/c/a/AC108_Datasheet_V1.1.pdf
请问 X-powers AC108 I2S 接口四路麦克风采集是什么原理?pdf里面没有看到时序图,是不是I2S口需要两路输出?
- I2S/PCM format using 2 pins to output 4 channel data
一般的I2S不是只能一路输出(mic)和一路输入(speaker)吗?
#37 Re: 全志 SOC » 分享一个在nano 4.15.0上使用的RTL8188EU/RTL8188ETV的驱动 » 2021-07-30 17:25:26
insmod r8723bs.ko 也出错了:
[   38.355036] r8723bs: module is from the staging directory, the quality is unknown, you have been warned.
[   38.367400] RTL8723BS: module init start
[   38.367443] RTL8723BS: rtl8723bs v4.3.5.5_12290.20140916_BTCOEX20140507-4E40
[   38.367452] RTL8723BS: rtl8723bs BT-Coex version = BTCOEX20140507-4E40
[   38.379098] pnetdev = c26ed800
[   38.452533] Unable to handle kernel NULL pointer dereference at virtual address 00000004
[   38.452571] pgd = c27c4000
[   38.452584] [00000004] *pgd=42721835, *pte=00000000, *ppte=00000000
[   38.452620] Internal error: Oops: 817 [#1] SMP ARM
[   38.452632] Modules linked in: r8723bs(C+)
[   38.452667] CPU: 0 PID: 167 Comm: insmod Tainted: G         C      4.13.0-licheepi-zero+ #29
[   38.452676] Hardware name: Allwinner sun8i Family
[   38.452685] task: c2a95cc0 task.stack: c2770000
[   38.453333] PC is at rtw_drv_register_netdev+0x48/0x7c [r8723bs]
[   38.453366] LR is at netif_carrier_off+0x14/0x50
[   38.453375] pc : [<bf0559b0>]    lr : [<c04e44ac>]    psr: 60000013
[   38.453383] sp : c2771d30  ip : 00000000  fp : 000036c4
[   38.453392] r10: 000036b0  r9 : 000036b4  r8 : 000036b8
[   38.453402] r7 : c26ed800  r6 : c4277000  r5 : 00000000  r4 : c26ed800
[   38.453411] r3 : c427a318  r2 : 00000004  r1 : 9f5d8388  r0 : c26ed800
[   38.453424] Flags: nZCv  IRQs on  FIQs on  Mode SVC_32  ISA ARM  Segment none
[   38.453433] Control: 10c5387d  Table: 427c406a  DAC: 00000051
[   38.453445] Process insmod (pid: 167, stack limit = 0xc2770210)
[   38.453456] Stack: (0xc2771d30 to 0xc2772000)
[   38.453470] 1d20:                                     c4277000 c26ec000 c2441400 bf058054
[   38.453485] 1d40: bf057e64 c2441408 c2441400 00000000 bf06a5ec bf05cf9c 0000000a c21432c0
[   38.453499] 1d60: 0000b6ce c04546b4 c2441408 c0c76b98 00000000 bf06a5ec 00000000 c037f2b0
[   38.453513] 1d80: 00000000 c2441408 bf06a5ec c244143c 00000000 00000001 c2143288 c037f42c
[   38.453527] 1da0: 00000000 bf06a5ec c037f380 c037d7f4 c3911758 c2445434 bf06a5ec c2445500
[   38.453542] 1dc0: c0c2ec28 c037e8dc bf0625a4 00000001 bf06a5ec bf06a5ec bf066000 bf081000
[   38.453556] 1de0: 00000000 c037fcb4 bf06a5dc bf06a5dc bf066000 bf08106c bf06a680 bf06a680
[   38.453570] 1e00: bf081000 c0101790 c2771e08 00000000 00000000 c0c6af80 c0c063c4 c3df05c8
[   38.453584] 1e20: c0c38080 8040003f 00000012 00000003 c0b635c8 0328d000 c3e44480 c3e45860
[   38.453599] 1e40: bf06a680 00000001 c0c666bc bf06a680 bf06a680 bf06a680 c2143340 c2143280
[   38.453612] 1e60: 00000001 c018b61c c2771f48 bf06a680 c2771f48 bf06a680 00000001 c018aab0
[   38.453627] 1e80: bf06a68c 00007fff bf06a680 c0187e88 c2771f40 00000124 00000000 bf06a6c8
[   38.453641] 1ea0: bf06a794 bf06a7b0 c0602fc0 bf06a83c 000a3196 00000000 c2bebb40 c01f5554
[   38.453654] 1ec0: 000a3196 00000000 00000000 00000000 00000000 00000000 00000000 00000000
[   38.453667] 1ee0: 00000000 00000000 00000000 00000000 00000000 00000000 00000000 00000000
[   38.453681] 1f00: 7fffffff 7fffffff 00000000 00000000 000c7008 c0107444 c2770000 00000000
[   38.453695] 1f20: 00000000 c018b048 7fffffff 00000000 00000003 c2447a00 00000020 c467a000
[   38.453709] 1f40: 000a3196 00000000 c46dc42d c467a000 000a3196 c46e4fe8 c46e4e1f c4711ac8
[   38.453723] 1f60: 00070000 000776a0 00000000 00000000 00000000 0001acb0 0000002a 0000002b
[   38.453737] 1f80: 00000020 00000000 00000012 00000000 000c7008 000c7008 ffffffff bec9eed6
[   38.453752] 1fa0: 0000017b c0107280 000c7008 ffffffff 00000003 000c7008 00000000 bec9eed6
[   38.453766] 1fc0: 000c7008 ffffffff bec9eed6 0000017b 000c67ac 00000000 b6f45000 00000000
[   38.453780] 1fe0: bec9ec18 bec9ec08 0001d874 b6eac020 60000010 00000003 00000000 00000000
[   38.454427] [<bf0559b0>] (rtw_drv_register_netdev [r8723bs]) from [<bf058054>] (rtw_drv_init+0x1f0/0x224 [r8723bs])
[   38.454681] [<bf058054>] (rtw_drv_init [r8723bs]) from [<c04546b4>] (sdio_bus_probe+0x100/0x118)
[   38.454726] [<c04546b4>] (sdio_bus_probe) from [<c037f2b0>] (driver_probe_device+0x22c/0x2fc)
[   38.454748] [<c037f2b0>] (driver_probe_device) from [<c037f42c>] (__driver_attach+0xac/0xb0)
[   38.454768] [<c037f42c>] (__driver_attach) from [<c037d7f4>] (bus_for_each_dev+0x60/0x94)
[   38.454787] [<c037d7f4>] (bus_for_each_dev) from [<c037e8dc>] (bus_add_driver+0x1a0/0x218)
[   38.454803] [<c037e8dc>] (bus_add_driver) from [<c037fcb4>] (driver_register+0x78/0xf8)
[   38.455041] [<c037fcb4>] (driver_register) from [<bf08106c>] (rtw_drv_entry+0x6c/0x1000 [r8723bs])
[   38.455275] [<bf08106c>] (rtw_drv_entry [r8723bs]) from [<c0101790>] (do_one_initcall+0x40/0x168)
[   38.455308] [<c0101790>] (do_one_initcall) from [<c018b61c>] (do_init_module+0x60/0x1f0)
[   38.455330] [<c018b61c>] (do_init_module) from [<c018aab0>] (load_module+0x1dbc/0x2188)
[   38.455348] [<c018aab0>] (load_module) from [<c018b048>] (SyS_finit_module+0x8c/0x9c)
[   38.455367] [<c018b048>] (SyS_finit_module) from [<c0107280>] (ret_fast_syscall+0x0/0x3c)
[   38.455388] Code: e2863c33 e59421d8 e1a00004 e5b31018 (e5821000)
[   38.455410] ---[ end trace da7adddc61e75a09 ]---
[ 133.603423] r8723bs: module is from the staging directory, the quality is unknown, you have been warned.#38 Re: 全志 SOC » Lcd和hdmi同屏显示 » 2021-07-26 20:30:12
#39 Re: DIY/综合/Arduino/写字机/3D打印机/智能小车/平衡车/四轴飞行/MQTT/物联网 » V3s控制GPIO扩展芯片 NXP PCF8574, 可以读IO电平,但是怎么也写不了低电平,请各位大佬帮我瞅瞅 » 2021-07-26 10:03:36
#40 Re: 司徒开源 » 安卓手机如何解决按键不能同时按的问题? » 2021-07-21 19:52:46
#41 Re: VMWare/Linux/Ubuntu/Fedora/CentOS/U-BOOT » 记录一下常用易忘的Linux日常操作 » 2021-07-17 15:52:09
英文月份看不懂, 试一试这样:
ls -l --time-style="+%Y-%m-%d" /
$ ls -l --time-style="+%Y-%m-%d" /
total 2097272
drwxr-xr-x   2 root root       4096 2021-07-15 bin
drwxr-xr-x   3 root root       4096 2021-07-15 boot
drwxrwxr-x   2 root root       4096 2019-06-23 cdrom
drwxr-xr-x  18 root root       4320 2021-07-16 dev
drwxr-xr-x 139 root root      12288 2021-07-17 etc
drwxr-xr-x   5 root root       4096 2021-01-20 home
lrwxrwxrwx   1 root root         32 2021-06-25 initrd.img -> boot/initrd.img-5.4.0-77-generic
lrwxrwxrwx   1 root root         32 2021-06-25 initrd.img.old -> boot/initrd.img-5.4.0-74-generic
drwxr-xr-x  21 root root       4096 2020-12-22 lib
drwxr-xr-x   2 root root       4096 2020-12-22 lib32
drwxr-xr-x   2 root root       4096 2020-12-22 lib64
drwxr-xr-x   2 root root      12288 2020-12-22 libx32
drwx------   2 root root      16384 2019-06-24 lost+found
drwxr-xr-x   3 root root       4096 2019-02-10 media
drwxr-xr-x   7 root root       4096 2021-02-23 mnt
drwxr-xr-x  28 cube cube       4096 2021-07-16 opt
dr-xr-xr-x 396 root root          0 2021-07-16 proc
drwx------   4 root root       4096 2021-02-11 root
drwxr-xr-x  34 root root       1120 2021-07-17 run
drwxr-xr-x   2 root root      12288 2021-07-15 sbin
drwxr-xr-x  14 root root       4096 2021-07-02 snap
drwxr-xr-x   2 root root       4096 2019-02-10 srv
-rw-------   1 root root 2147483648 2019-06-24 swapfile
dr-xr-xr-x  13 root root          0 2021-07-16 sys
drwxrwxrwt  15 root root       4096 2021-07-17 tmp
drwxr-xr-x  17 root root       4096 2021-05-16 usr
drwxr-xr-x  15 root root       4096 2020-08-25 var
lrwxrwxrwx   1 root root         29 2021-06-25 vmlinuz -> boot/vmlinuz-5.4.0-77-generic
lrwxrwxrwx 1 root root 29 2021-06-25 vmlinuz.old -> boot/vmlinuz-5.4.0-74-generic#44 全志 SOC » AIC800 I2C 上面挂了一颗 PCF8563 RTC 时钟芯片,发现挂不上去 » 2021-07-07 10:58:06
- 拉轰的脚踏车
- 回复: 2
[    0.783778] rtc-pcf8563 0-0051: pcf8563_write_block_data: err=-6 addr=0e, data=03
[    0.783804] rtc-pcf8563 0-0051: pcf8563_probe: write error
[    0.783886] rtc-pcf8563: probe of 0-0051 failed with error -5
正常应该是这样的:
[    0.790354] i2c /dev entries driver
[    0.799312] rtc-pcf8563 0-0051: rtc core: registered rtc-pcf8563 as rtc0
[ 0.847478] rtc-pcf8563 0-0051: setting system clock to 2021-07-07 00:00:16 UTC (1625616016)#45 Re: DIY/综合/Arduino/写字机/3D打印机/智能小车/平衡车/四轴飞行/MQTT/物联网 » 请大家推荐一下串口屏,公司最近有个新的项目,迪文/大彩/欣瑞达/陶晶驰/昆仑 哪个性价比好,稳定性好,开发友好呢? » 2021-07-06 09:22:58
#46 Re: 全志 SOC » 40P的FPC座子哪一种最常用? » 2021-07-06 08:22:51
#49 Re: DIY/综合/Arduino/写字机/3D打印机/智能小车/平衡车/四轴飞行/MQTT/物联网 » 请问 32位 / 64位 CPU 有什么区别? » 2021-06-19 16:48:08
最本质的区别是寻址范围, 比如 intel x86 32位处理器 寻址范围 2^32 = 4GB
64位处理器 2^64 = 太大了, 自己算吧
#50 Re: 全志 SOC » 终于搞清楚汇编代码的重定位判断语句是怎么实现的了 » 2021-06-18 11:39:32
#51 Re: 全志 SOC » V3s cat 出现 I/O error » 2021-06-13 12:18:04
#52 Re: 全志 SOC » V3s cat 出现 I/O error » 2021-06-13 12:09:55
#53 Re: RISC-V » 用汇编学习risc-v指令集,并在线仿真,点亮led » 2021-06-05 20:06:46
#54 Re: 全志 SOC » 全志D1芯片之终极探索 » 2021-06-05 20:01:40
#55 Re: 全志 SOC » 自制荔枝派zero翻车,求帮忙~~ » 2021-06-03 16:41:44
#56 Re: DIY/综合/Arduino/写字机/3D打印机/智能小车/平衡车/四轴飞行/MQTT/物联网 » 这个十五年前的松下相机电池还能抢救一下吗? 放到冰箱-18℃里面冻了几天了。 » 2021-06-01 11:25:00
#57 DIY/综合/Arduino/写字机/3D打印机/智能小车/平衡车/四轴飞行/MQTT/物联网 » 这个十五年前的松下相机电池还能抢救一下吗? 放到冰箱-18℃里面冻了几天了。 » 2021-06-01 11:21:38


#58 Re: 全志 SOC » 大佬们求帮助,自画荔枝派,ea3036芯片的电压没有输出来 » 2021-05-23 18:58:34
#59 Re: 全志 SOC » 全志D1芯片之终极探索 » 2021-05-23 18:16:11
#60 Re: 全志 SOC » 终于搞定f1c100s的i2s输出 » 2021-05-23 17:23:52
好评好评! 我也以为 F1C 和 S3一样没有MCLK引脚, 结果还真有.
S3手册V0.2: Allwinner_S3_Datasheet_V0_2.pdf
F1C100s手册: F1C100s_Datasheet_V1_0.pdf
#61 Re: DIY/综合/Arduino/写字机/3D打印机/智能小车/平衡车/四轴飞行/MQTT/物联网 » 发现一个学习 arm 体系结构和汇编程序的好项目 » 2021-05-19 17:46:42
#62 Re: DIY/综合/Arduino/写字机/3D打印机/智能小车/平衡车/四轴飞行/MQTT/物联网 » 发现一个学习 arm 体系结构和汇编程序的好项目 » 2021-05-19 14:18:51
thumb 与 arm 状态切换 demo:
https://github.com/dwelch67/qemu_arm_samples/tree/master/thumb01
https://github.com/dwelch67/qemu_arm_samples/blob/master/thumb01/notmain.c
https://github.com/dwelch67/qemu_arm_samples/blob/master/thumb01/strap.s
https://github.com/dwelch67/qemu_arm_samples/blob/master/thumb01/memmap
https://github.com/dwelch67/qemu_arm_samples/blob/master/thumb01/Makefile
#63 DIY/综合/Arduino/写字机/3D打印机/智能小车/平衡车/四轴飞行/MQTT/物联网 » 发现一个学习 arm 体系结构和汇编程序的好项目 » 2021-05-19 14:09:38
- 拉轰的脚踏车
- 回复: 2
https://github.com/dwelch67/qemu_arm_samples
准备工作:
sudo apt install qemu-system-arm gcc-arm-linux-gnueabi -y
进入目录执行make, 生成 notmain.bin
用qemu虚拟机运行:
qemu-system-arm -M versatilepb -m 128M -nographic -kernel notmain.bin
ctrl + a 然后按 x 退出虚拟机。
#66 Re: VMWare/Linux/Ubuntu/Fedora/CentOS/U-BOOT » 记录一下常用易忘的Linux日常操作 » 2021-05-17 14:20:18
显示某目录下面 *.deb 文件个数:
ls /var/cache/apt/archives/*.deb -l |wc -l把 *.deb 安装文件拷贝出来
先安装软件包
sudo apt-get install device-tree-compiler查找
#ls /var/cache/apt/archives/*device*
/var/cache/apt/archives/device-tree-compiler_1.4.0+dfsg-1_amd64.deb
这个就是我们需要的文件了:
/var/cache/apt/archives/device-tree-compiler_1.4.0+dfsg-1_amd64.deb
安装:
sudo dpkg -i device-tree-compiler_1.4.0+dfsg-1_amd64.deb
$ sudo dpkg -i /var/cache/apt/archives/device-tree-compiler_1.4.0+dfsg-1_amd64.deb
Selecting previously unselected package device-tree-compiler.
(Reading database ... 184641 files and directories currently installed.)
Preparing to unpack .../device-tree-compiler_1.4.0+dfsg-1_amd64.deb ...
Unpacking device-tree-compiler (1.4.0+dfsg-1) ...
Setting up device-tree-compiler (1.4.0+dfsg-1) ...
Processing triggers for man-db (2.6.7.1-1ubuntu1) ...
Processing triggers for doc-base (0.10.5) ...
Processing 2 added doc-base files...#67 Re: 全志 SOC » 荔枝派zeroplus S3安装opkg » 2021-05-16 20:35:27

#69 Re: 全志 SOC » 我来推荐在线 ARM/ARM64指令 二进制 互转网站 » 2021-05-12 16:38:57
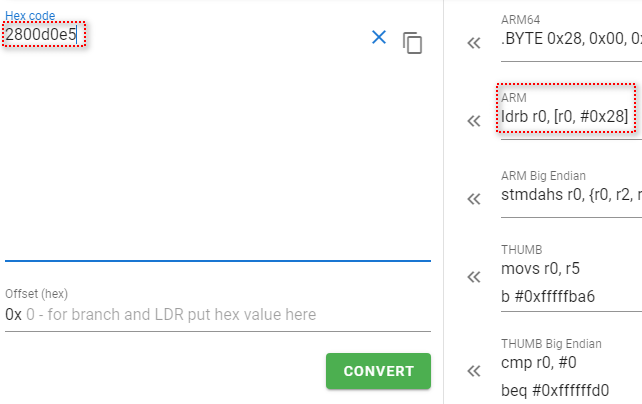
#70 全志 SOC » 我来推荐在线 ARM/ARM64指令 二进制 互转网站 » 2021-05-12 16:35:03
- 拉轰的脚踏车
- 回复: 1
通过 arm instruction set online translate 搜索到的:
https://www.google.com/search?q=arm+instruction+set+online+translate
#71 Re: VMWare/Linux/Ubuntu/Fedora/CentOS/U-BOOT » 记录一下常用易忘的Linux日常操作 » 2021-05-05 08:56:18
解决 搬瓦工 Linux VPS主机时区问题
http://whycan.com/t_1240.html#p12783
~/.bashrc 最后一行添加:
timedatectl set-timezone Asia/Shanghai#72 Re: 全志 SOC » tina 勾选 CONFIG_PACKAGE_fswebcam 但是目标文件系统还是没有生成 /usr/bin/fswebcam » 2021-04-21 21:09:15
#73 Re: 全志 SOC » 怎么把文件系统移到sd卡? » 2021-04-21 21:08:28
#74 Re: 全志 SOC » C100S跟V3S换个名字又可以出来卖多几颗了 » 2021-04-21 20:52:52
#75 Re: ESP32/ESP8266 » ESP32-C3片子好像出来了 » 2021-04-09 10:43:47
#77 Re: 全志 SOC » 关于V3S使用usb摄像头的问题 » 2021-03-29 20:52:51
#80 Re: 全志 SOC » 请问 全志X3 uboot 内存初始化超时是什么问题呢? » 2021-03-10 22:29:20
#81 Re: 全志 SOC » [荔枝派zero萌新向]r8723WIFI的正确打开方式!超级详细ing » 2021-03-09 14:37:04
[    8.344512] r8723bs: module is from the staging directory, the quality is unknown, you have been warned.
[    8.377909] RTL8723BS: module init start
[    8.381866] RTL8723BS: rtl8723bs v4.3.5.5_12290.20140916_BTCOEX20140507-4E40
[    8.389066] RTL8723BS: rtl8723bs BT-Coex version = BTCOEX20140507-4E40
[    8.397998] pnetdev = 94a12032
[    8.458378] RTL8723BS: rtw_ndev_init(wlan0)
[    8.465335] RTL8723BS: module init ret =0
wpa_supplicant v2.9
random: Trying to read entropy from /dev/random
Successfully initialized wpa_supplicant
Initializing interface 'wlan0' conf '/etc/wpa_supplicant.conf' driver 'default' ctrl_interface 'N/A' bridge 'N/A'
Configuration file '/etc/wpa_supplicant.conf' -> '/etc/wpa_supplicant.conf'
Reading configuration file '/etc/wpa_supplicant.conf'
ctrl_interface='/var/run/wpa_supplicant'
ap_scan=1
Priority group 0
   id=0 ssid='cube'
nl80211: Supported cipher 00-0f-ac:1
nl80211: Supported cipher 00-0f-ac:5
nl80211: Supported cipher 00-0f-ac:2
nl80211: Supported cipher 00-0f-ac:4
nl80211: Supported cipher 00-0f-ac:6
nl80211: Using driver-based off-channel TX
nl80211: interface wlan0 in phy phy0
nl80211: Set mode ifindex 3 iftype 2 (STATION)
nl80211: Subscribe to mgmt frames with non-AP handle 0x1d79c8
nl80211: Register frame type=0xd0 (WLAN_FC_STYPE_ACTION) nl_handle=0x1d79c8 match=0104
nl80211: Register frame type=0xd0 (WLAN_FC_STYPE_ACTION) nl_handle=0x1d79[    9.484053] rtl8723bs: acquire FW from file:rtlwifi/rtl8723bs_nic.bin
c8 match=040a
nl80211: Register frame type=0xd0 (WLAN_FC_STYPE_ACTION) nl_handle=0x1d79c8 match=040b
nl80211: Register frame type=0xd0 (WLAN_FC_STYPE_ACTION) nl_handle=0x1d79c8 match=040c
nl80211: Register frame type=0xd0 (WLAN_FC_STYPE_ACTION) nl_handle=0x1d79c8 match=040d
nl80211: Register frame type=0xd0 (WLAN_FC_STYPE_ACTION) nl_handle=0x1d79c8 match=090a
nl80211: Register frame type=0xd0 (WLAN_FC_STYPE_ACTION) nl_handle=0x1d79c8 match=090b
nl80211: Register frame type=0xd0 (WLAN_FC_STYPE_ACTION) nl_handle=0x1d79c8 match=090c
nl80211: Register frame type=0xd0 (WLAN_FC_STYPE_ACTION) nl_handle=0x1d79c8 match=090d
nl80211: Register frame type=0xd0 (WLAN_FC_STYPE_ACTION) nl_handle=0x1d79c8 match=0409506f9a09
nl80211: Register frame type=0xd0 (WLAN_FC_STYPE_ACTION) nl_handle=0x1d79c8 match=7f506f9a09
nl80211: Register frame type=0xd0 (WLAN_FC_STYPE_ACTION) nl_handle=0x1d79c8 match=0409506f9a1a
nl80211: Register frame type=0xd0 (WLAN_FC_STYPE_ACTION) nl_handle=0x1d79c8 match=0801
nl80211: Register frame type=0xd0 (WLAN_FC_STYPE_ACTION) nl_handle=0x1d79c8 match=06
nl80211: Register frame type=0xd0 (WLAN_FC_STYPE_ACTION) nl_handle=0x1d79c8 match=0a07
nl80211: Register frame type=0xd0 (WLAN_FC_STYPE_ACTION) nl_handle=0x1d79c8 match=0a11
nl80211: Register frame type=0xd0 (WLAN_FC_STYPE_ACTION) nl_handle=0x1d79c8 match=0a1a
nl80211: Register frame type=0xd0 (WLAN_FC_STYPE_ACTION) nl_handle=0x1d79c8 match=1101
nl80211: Register frame type=0xd0 (WLAN_FC_STYPE_ACTION) nl_handle=0x1d79c8 match=1102
nl80211: Register frame type=0xd0 (WLAN_FC_STYPE_ACTION) nl_handle=0x1d79c8 match=0505
nl80211: Register frame type=0xd0 (WLAN_FC_STYPE_ACTION) nl_handle=0x1d79c8 match=0500
rfkill: Cannot open RFKILL control device
nl80211: RFKILL status not available
netlink: Operstate: ifindex=3 linkmode=1 (userspace-control), operstate=5 (IF_OPER_DORMANT)
Add interface wlan0 to a new radio phy0
nl80211: Regulatory information - country=00
nl80211: 2402-2472 @ 40 MHz 20 mBm
nl80211: 2457-2482 @ 20 MHz 20 mBm (no IR)
nl80211: 2474-2494 @ 20 MHz 20 mBm (no OFDM) (no IR)
nl80211: 5170-5250 @ 80 MHz 20 mBm (no IR)
nl80211: 5250-5330 @ 80 MHz 20 mBm (DFS) (no IR)
nl80211: 5490-5730 @ 160 MHz 20 mBm (DFS) (no IR)
nl80211: 5735-5835 @ 80 MHz 20 mBm (no IR)
nl80211: 57240-63720 @ 2160 MHz 0 mBm
nl80211: Added 802.11b mode based on 802.11g information
nl80211: Mode IEEE 802.11g: 2412 2417 2422 2427 2432 2437 2442 2447 2452 2457 2462 2467 2472 2484[DISABLED]
nl80211: Mode IEEE 802.11b: 2412 2417 2422 2427 2432 2437 2442 2447 2452 2457 2462 2467 2472 2484[DISABLED]
wlan0: Own MAC address: cc:d2:9b:4b:8e:a8
wpa_driver_nl80211_set_key: ifindex=3 (wlan0) alg=0 addr=(nil) key_idx=0 set_tx=0 seq_len=0 key_len=0
wpa_driver_nl80211_set_key: ifindex=3 (wlan0) alg=0 addr=(nil) key_idx=1 set_tx=0 seq_len=0 key_len=0
wpa_driver_nl80211_set_key: ifindex=3 (wlan0) alg=0 addr=(nil) key_idx=2 set_tx=0 seq_len=0 key_len=0
wpa_driver_nl80211_set_key: ifindex=3 (wlan0) alg=0 addr=(nil) key_idx=3 set_tx=0 seq_len=0 key_len=0
wpa_driver_nl80211_set_key: ifindex=3 (wlan0) alg=0 addr=(nil) key_idx=4 set_tx=0 seq_len=0 key_len=0
wpa_driver_nl80211_set_key: ifindex=3 (wlan0) alg=0 addr=(nil) key_idx=5 set_tx=0 seq_len=0 key_len=0
wlan0: RSN: flushing PMKID list in the driver
nl80211: Flush PMKIDs
wlan0: Setting scan request: 0.100000 sec
wlan0: WPS: UUID based on MAC address: 862b1fe5-386c-581d-a861-e1ca6ec113b3
EAPOL: SUPP_PAE entering state DISCONNECTED
EAPOL: Supplicant port status: Unauthorized
nl80211: Skip set_supp_port(unauthorized) while not associated
EAPOL: KEY_RX entering state NO_KEY_RECEIVE
EAPOL: SUPP_BE entering state INITIALIZE
EAP: EAP entering state DISABLED
wlan0: Added interface wlan0
wlan0: State: DISCONNECTED -> DISCONNECTED
nl80211: Set wlan0 operstate 0->0 (DORMANT)
netlink: Operstate: ifindex=3 linkmode=-1 (no change), operstate=5 (IF_OPER_DORMANT)
Daemonize..
udhcpc: started, v1.31.1
udhcpc: sending discover
[   13.389353] RTL8723BS: rtw_set_802_11_connect(wlan0)  fw_state = 0x00000008
[   13.649836] RTL8723BS: start auth
[   13.657544] RTL8723BS: auth success, start assoc
[   13.691218] RTL8723BS: rtw_cfg80211_indicate_connect(wlan0) BSS not found !!
[   13.698419] RTL8723BS: assoc success
[   13.753360] RTL8723BS: send eapol packet
[   13.786000] RTL8723BS: send eapol packet
[   13.793098] RTL8723BS: set pairwise key camid:4, addr:56:db:ea:42:af:c6, kid:0, type:AES
[   13.811423] RTL8723BS: set group key camid:5, addr:56:db:ea:42:af:c6, kid:1, type:AES
udhcpc: sending discover
udhcpc: sending select for 192.168.43.186
udhcpc: lease of 192.168.43.186 obtained, lease time 3599
deleting routers
adding dns 192.168.43.1
我的tiny200 + RTL8723BS 连手机WIFI热点OK
#82 Re: 全志 SOC » 打算用荔枝派zero做核心板来开发一款产品 » 2021-02-26 15:06:32
#83 全志 SOC » 【分享】buildroot 另外勾选部分package, make编译出现uuid出错的解决方案 » 2021-02-26 15:05:28
- 拉轰的脚踏车
- 回复: 3
checking for ZLIB... yes
checking for UUID... no
checking for library containing clock_gettime... none required
checking for clock_gettime... yes
checking whether /opt/v3s/buildroot_GC0308/output/host/bin/arm-linux-gnueabihf-gcc is Clang... no
checking whether pthreads work with -pthread... yes
checking for joinable pthread attribute... PTHREAD_CREATE_JOINABLE
checking whether more special flags are required for pthreads... no
checking for PTHREAD_PRIO_INHERIT... yes
checking for lzo1x_1_15_compress in -llzo2... yes
checking openssl/rand.h usability... yes
checking openssl/rand.h presence... yes
checking for openssl/rand.h... yes
checking for OPENSSL... yes
checking execinfo.h usability... yes
checking execinfo.h presence... yes
checking for execinfo.h... yes
configure: WARNING: cannot find uuid library required for mkfs.ubifs
configure: mtd-utils can optionally be built without mkfs.ubifs
configure: error: missing one or more dependencies
package/pkg-generic.mk:254: recipe for target '/opt/v3s/buildroot_GC0308/output/build/mtd-2.1.1/.stamp_configured' failed
make[1]: *** [/opt/v3s/buildroot_GC0308/output/build/mtd-2.1.1/.stamp_configured] Error 1
Makefile:84: recipe for target '_all' failed
make: *** [_all] Error 2
删掉这几个包, 重新make 即可
rm output/build/util-linux-2.35.1/ -rf
rm output/build/host-util-linux-2.35.1/ -rf
rm output/build/host-e2fsprogs-1.45.6/ -rf#84 Re: 全志 SOC » [zero]萌新求教,卡启动进不了系统,急!谢谢了(趴 » 2021-02-24 22:27:25
[    1.399269] List of all partitions:
[    1.406114] b300        15558144 mmcblk0
[    1.406122]  driver: mmcblk
[    1.418951]   b301           16384 mmcblk0p1 65b4f93d-01
[    1.418954]
[    1.431653]   b302        15540736 mmcblk0p2 65b4f93d-02
[    1.431655]
[    1.444110] No filesystem could mount root, tried:
[    1.444112]  ext3
[    1.451810]  ext2
[    1.456485]  ext4
[    1.461084]  vfat
[    1.465637]
[    1.473999] Kernel panic - not syncing: VFS: Unable to mount root fs on unknown-block(179,2)
[    1.485023] CPU: 0 PID: 1 Comm: swapper/0 Not tainted 4.10.15-licheepi-zero #4
[    1.494868] Hardware name: Allwinner sun8i Family
[    1.502176] [<c010e2fc>] (unwind_backtrace) from [<c010b098>] (show_stack+0x10/0x14)
[    1.512680] [<c010b098>] (show_stack) from [<c03366a4>] (dump_stack+0x84/0x98)
[    1.522704] [<c03366a4>] (dump_stack) from [<c01a6ccc>] (panic+0xdc/0x248)
[    1.532448] [<c01a6ccc>] (panic) from [<c090127c>] (mount_block_root+0x214/0x260)
[    1.542858] [<c090127c>] (mount_block_root) from [<c09013e8>] (mount_root+0x120/0x128)
[    1.553780] [<c09013e8>] (mount_root) from [<c0901540>] (prepare_namespace+0x150/0x194)
[    1.564777] [<c0901540>] (prepare_namespace) from [<c0900e40>] (kernel_init_freeable+0x1d4/0x1e4)
[    1.576710] [<c0900e40>] (kernel_init_freeable) from [<c064df58>] (kernel_init+0x8/0x10c)
[    1.587964] [<c064df58>] (kernel_init) from [<c0107638>] (ret_from_fork+0x14/0x3c)
[    1.598579] Rebooting in 5 seconds..
根文件系统挂载失败
#85 Re: 全志 SOC » widora tiny200 spi nand 测试 » 2021-02-22 14:47:10
Program/Erase/Read Speed
- Page Program time: 400us typical
- Block Erase time: 3ms typical
- Page read time: 80us maximum(w/I ECC)
这是GD5F1GQ4XBXIG 手册的速度,
折算下来
整片擦除应该是: 3ms * 1024 = 3.072s
整片读 80us * 1024 * 64 = 5242880us = 5.242880s
整片写: 400us * 1024 * 64 = 26214400us = 26.214400s
应该靠近这个速度才对。
#86 Re: 全志 SOC » 请问 buildroot 根文件系统 ubi和ubifs有什么区别呢? » 2021-02-19 14:02:30
/opt/f1c100s/buildroot/output/host/sbin/mkfs.ubifs -d /opt/f1c100s/buildroot/output/build/buildroot-fs/ubifs/target -e 0x1f800 -c 2048 -m 0x800 -x lzo -o /opt/f1c100s/buildroot_/output/images/rootfs.ubifs
/opt/f1c100s/buildroot/output/host/sbin/ubinize -o /opt/f1c100s/buildroot/output/images/rootfs.ubi -m 0x800 -p 0x20000 -s 512 /opt/f1c100s/buildroot/output/build/ubinize.cfg
好奇去看了一下buildroot log
#87 Re: 全志 SOC » 海豚派V3s开发板 camdroid 完整入坑记录 » 2021-02-17 18:12:18
#88 Re: 全志 SOC » zero,按照论坛的方法编译了uboot,dtb,zimage烧如TF卡以后无法启动求助 » 2021-02-17 18:04:47
奔跑的孩子 说:没有 boot.scr
感谢回复,我是按照论坛教程编译的,没有提到和生成boot.scr,这个文件在哪里生成的?
这个是修改 sun8i.h 的版本:
荔枝派Zero V3s开发板入坑记录 (TF/SD卡启动)(主线Linux,主线u-boot)
http://whycan.com/t_561.html
boot.scr 参考这个帖子:
为新设备构建主线u-boot
http://whycan.com/t_5474.html#p55106
#90 Re: 全志 SOC » v3s 文件系统超150m报错,请问各位大神这个问题怎样解决? » 2021-02-15 12:24:35
#91 Re: 全志 SOC » mangopi r3 编译QT5 » 2021-02-15 12:23:24
#93 全志 SOC » 分享一个好不容易下载到的 XR829 Datasheet V1.0.pdf » 2021-02-13 17:34:11
- 拉轰的脚踏车
- 回复: 3
直接打开: XR829 Datasheet V1.0.pdf
#94 Re: DIY/综合/Arduino/写字机/3D打印机/智能小车/平衡车/四轴飞行/MQTT/物联网 » 嫌全字库ttf文件太肥的朋友,可以进来看看了,按需剪裁, 减肥/瘦身/不留赘肉 » 2021-02-07 22:29:39
#95 Re: VMWare/Linux/Ubuntu/Fedora/CentOS/U-BOOT » 请问大家是怎么解决LVGL后插入USB鼠标即插即用的问题?各种鼠标可用eventX设备号都不同,而且没插的时候设备也是不能打开的. » 2021-02-06 23:41:55
找到一个mdev实现的脚本,
把 /dev/input/eventX 映射成 /dev/input/touchscreen0
#96 Re: VMWare/Linux/Ubuntu/Fedora/CentOS/U-BOOT » 请问大家是怎么解决LVGL后插入USB鼠标即插即用的问题?各种鼠标可用eventX设备号都不同,而且没插的时候设备也是不能打开的. » 2021-02-06 13:59:26
#97 Re: VMWare/Linux/Ubuntu/Fedora/CentOS/U-BOOT » 请问大家是怎么解决LVGL后插入USB鼠标即插即用的问题?各种鼠标可用eventX设备号都不同,而且没插的时候设备也是不能打开的. » 2021-02-06 13:51:37
#98 Re: VMWare/Linux/Ubuntu/Fedora/CentOS/U-BOOT » 请问大家是怎么解决LVGL后插入USB鼠标即插即用的问题?各种鼠标可用eventX设备号都不同,而且没插的时候设备也是不能打开的. » 2021-02-06 10:26:55
#include <stdio.h>
#include <unistd.h>
#include <fcntl.h>

int main(int argc, char** argv)
{
    int fd, bytes;
    unsigned char data[3];

    const char *pDevice = "/dev/input/mice";

    // Open Mouse
    fd = open(pDevice, O_RDWR);
    if(fd == -1)
    {
        printf("ERROR Opening %s\n", pDevice);
        return -1;
    }

    int left, middle, right;
    signed char x, y;
    while(1)
    {
        // Read Mouse
        bytes = read(fd, data, sizeof(data));

        if(bytes > 0)
        {
            left = data[0] & 0x1;
            right = data[0] & 0x2;
            middle = data[0] & 0x4;

            x = data[1];
            y = data[2];
            printf("x=%d, y=%d, left=%d, middle=%d, right=%d\n", x, y, left, middle, right);
        }
    }
    return 0;
}# /mnt/media/mmcblk1p1/test1
x=1, y=1, left=0, middle=0, right=0
x=-6, y=-5, left=0, middle=0, right=0
x=-9, y=-9, left=0, middle=0, right=0
x=-9, y=-9, left=0, middle=0, right=0
x=-8, y=-10, left=0, middle=0, right=0
x=-7, y=-11, left=0, middle=0, right=0
x=-5, y=-9, left=0, middle=0, right=0
x=-6, y=-8, left=0, middle=0, right=0
x=-4, y=-9, left=0, middle=0, right=0
x=-3, y=-7, left=0, middle=0, right=0
x=-3, y=-6, left=0, middle=0, right=0
x=-1, y=-6, left=0, middle=0, right=0
x=0, y=-6, left=0, middle=0, right=0
x=0, y=-5, left=0, middle=0, right=0
x=-1, y=-2, left=0, middle=0, right=0
x=0, y=-2, left=0, middle=0, right=0
x=-1, y=-1, left=0, middle=0, right=0
x=-1, y=-2, left=0, middle=0, right=0
x=0, y=1, left=0, middle=0, right=0
x=0, y=2, left=0, middle=0, right=0
x=1, y=5, left=0, middle=0, right=0
x=1, y=6, left=0, middle=0, right=0
x=1, y=6, left=0, middle=0, right=0
x=1, y=6, left=0, middle=0, right=0
x=2, y=6, left=0, middle=0, right=0
x=1, y=4, left=0, middle=0, right=0#99 Re: VMWare/Linux/Ubuntu/Fedora/CentOS/U-BOOT » 请问大家是怎么解决LVGL后插入USB鼠标即插即用的问题?各种鼠标可用eventX设备号都不同,而且没插的时候设备也是不能打开的. » 2021-02-06 10:09:59
貌似可以用 /dev/input/mice
请问 /dev/input/mouse 与 /dev/input/mice 有什么区别?
http://whycan.com/t_5988.html#p59466
(出处:哇酷开发者社区)
#100 Re: VMWare/Linux/Ubuntu/Fedora/CentOS/U-BOOT » 请问 /dev/input/mouse 与 /dev/input/mice 有什么区别? » 2021-02-06 10:09:15
#101 Re: 全志 SOC » A33主线Linux跑起OpenGL/ES » 2021-02-06 09:58:28
#102 Re: VMWare/Linux/Ubuntu/Fedora/CentOS/U-BOOT » 请问大家是怎么解决LVGL后插入USB鼠标即插即用的问题?各种鼠标可用eventX设备号都不同,而且没插的时候设备也是不能打开的. » 2021-02-06 09:56:26
可以用 by-id, 这样只对同款鼠标有效, 而且嵌入式设备先开机, 后插入鼠标, 还不能打开设备, 因为设备名都不存在.
# ls /dev/input/by-path/ -l
total 0
lrwxrwxrwx    1 root     root             9 Jan  1 10:35 platform-1c1a000.usb-usb-0:1.1:1.0-event-mouse -> ../event2
lrwxrwxrwx    1 root     root             9 Jan  1 10:35 platform-1c1a000.usb-usb-0:1.1:1.0-mouse -> ../mouse0
lrwxrwxrwx    1 root     root             9 Jan  1 00:00 platform-1c1a000.usb-usb-0:1.4:1.0-event -> ../event1
lrwxrwxrwx    1 root     root             9 Jan  1 00:00 platform-rotary@0-event -> ../event0
#
#
# ls /dev/input/by-id/ -l
total 0
lrwxrwxrwx    1 root     root             9 Jan  1 00:00 usb-2M_WebCam_2M_WebCam-event-if00 -> ../event1
lrwxrwxrwx    1 root     root             9 Jan  1 10:35 usb-SIGMACHIP_Usb_Mouse-event-mouse -> ../event2
lrwxrwxrwx 1 root root 9 Jan 1 10:35 usb-SIGMACHIP_Usb_Mouse-mouse -> ../mouse0#103 VMWare/Linux/Ubuntu/Fedora/CentOS/U-BOOT » 请问大家是怎么解决LVGL后插入USB鼠标即插即用的问题?各种鼠标可用eventX设备号都不同,而且没插的时候设备也是不能打开的. » 2021-02-06 09:47:10
#104 VMWare/Linux/Ubuntu/Fedora/CentOS/U-BOOT » 请问 /dev/input/mouse 与 /dev/input/mice 有什么区别? » 2021-02-06 09:23:20
#105 Re: DIY/综合/Arduino/写字机/3D打印机/智能小车/平衡车/四轴飞行/MQTT/物联网 » 发一个 Qt 雕刻软件 Candle 的 静态链接版本 » 2021-02-03 11:13:14
#106 Re: 全志 SOC » V3S禁用屏幕log,用于显示qt » 2021-02-01 22:08:38
#107 Re: 全志 SOC » 匠芯 AIC502 有没有朋友用过? » 2021-01-31 21:37:39
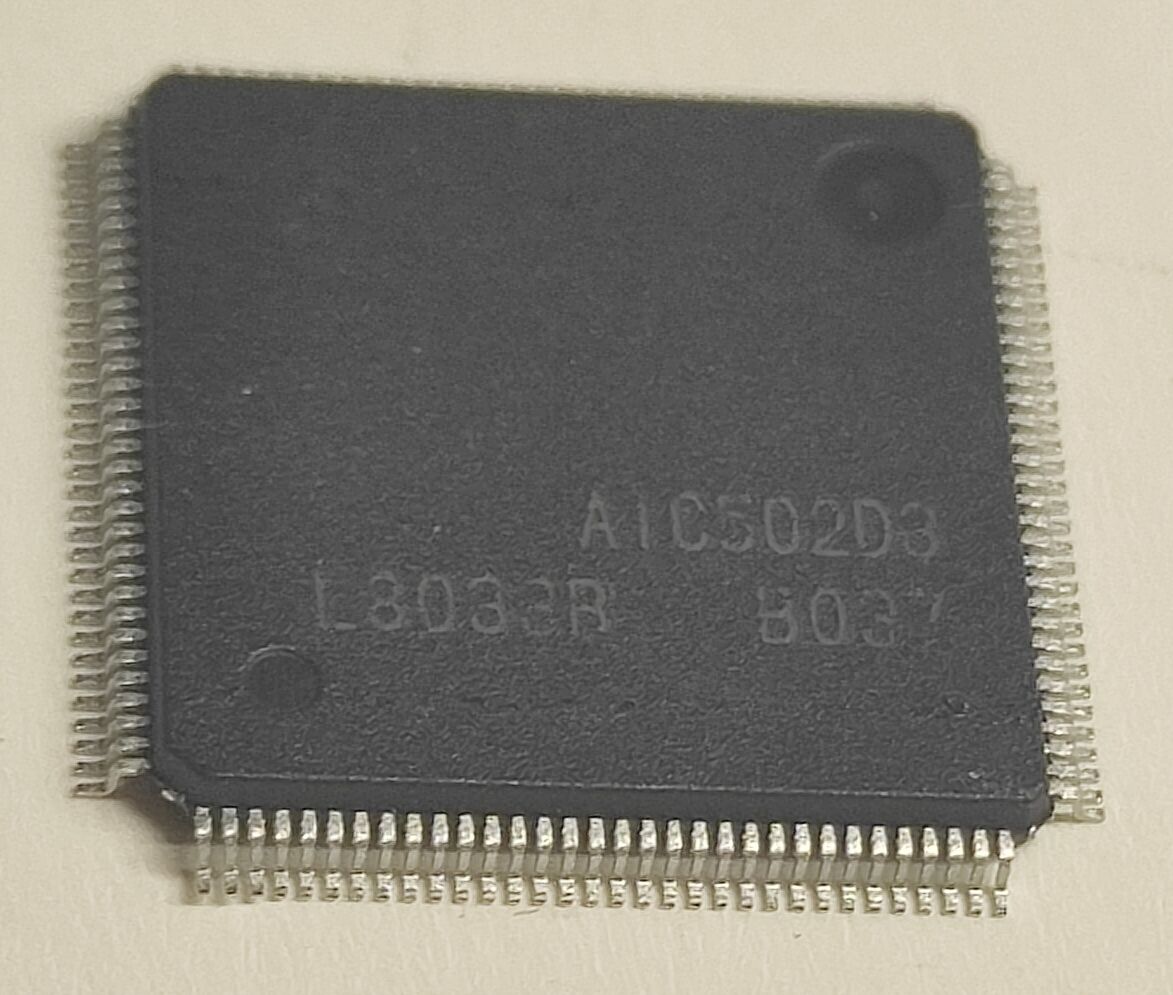
#108 全志 SOC » 匠芯 AIC502 有没有朋友用过? » 2021-01-31 21:37:03
- 拉轰的脚踏车
- 回复: 15
#109 Re: 8051/STC8/AT89C51/N76E003 » 请问 Keil C51 在目标ROM的的指定地址(如 0x10000)写 字符A, 请问C语言代码应该如何表达? » 2021-01-25 15:03:32
https://www.keil.com/support/man/docs/c51/c51_ap_at.htm
路过, 变量可以C51用 _at_ 关键字, 常量不知道怎么做
#110 Re: 全志 SOC » 【填坑求精】荔枝派rndis-host驱动合宙4G模块,荔枝派插入WIN/Unbutu识别为Rndis网卡 » 2021-01-25 14:57:56
也发一个荔枝派zero 全志V3s 32M spi flash 固件,800x480 LCD, 开机自动运行 Qt analogclock
http://whycan.com/t_3400.html#p47841
(出处:哇酷开发者社区)
#112 Re: 全志 SOC » 荔枝派nano Linux系统电阻屏触摸驱动的具体配置文件是怎样的? » 2021-01-23 10:08:41
#113 Re: 计算机图形/GUI/RTOS/FileSystem/OpenGL/DirectX/SDL2 » LVGL6.0的linux_frame_buffer项目支持PNG解码 » 2021-01-23 09:01:14
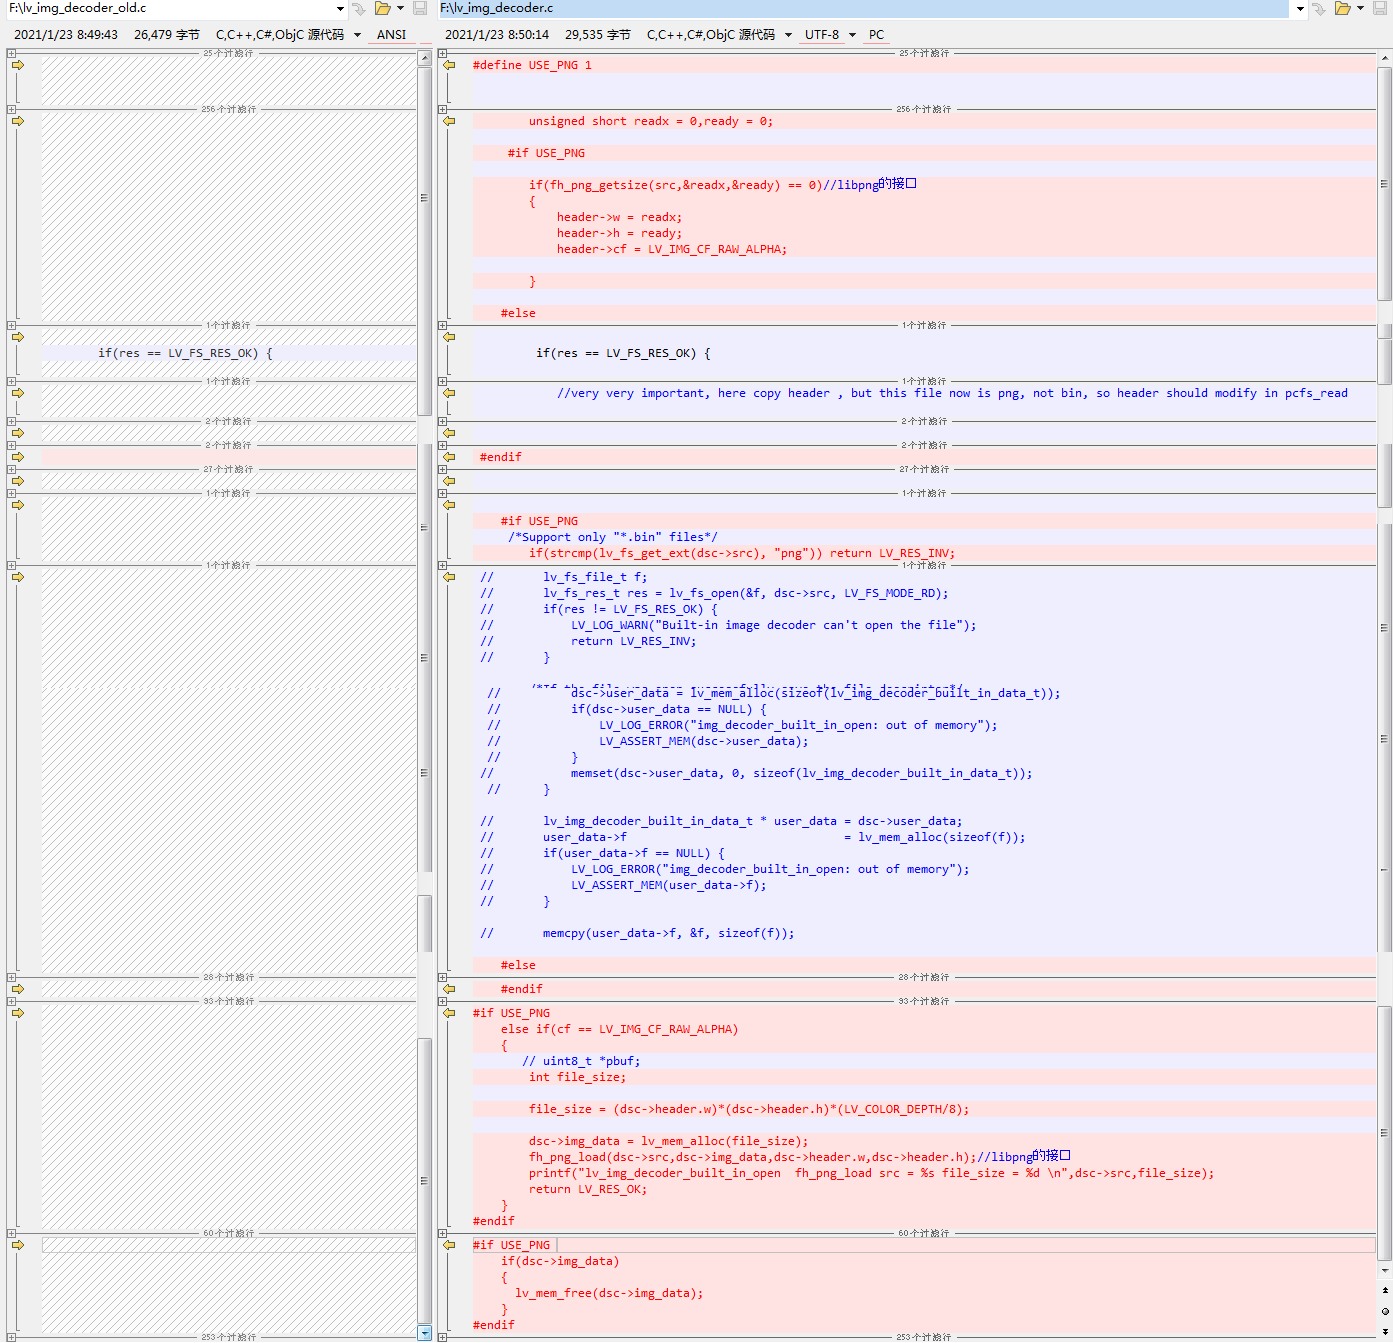

https://raw.githubusercontent.com/lvgl/lvgl/release/v6/src/lv_draw/lv_img_decoder.c
楼主干得漂亮, 顺便用beyond compare 对比了一下。
#114 Re: 全志 SOC » 请教V3S,BSP内核,USB如何虚拟成网卡 » 2021-01-23 08:46:42
#115 Re: 全志 SOC » 荔枝派nano Linux系统电阻屏触摸驱动的具体配置文件是怎样的? » 2021-01-22 22:17:28
#116 Re: 全志 SOC » 荔枝派nano Linux系统电阻屏触摸驱动的具体配置文件是怎样的? » 2021-01-22 21:42:34
#118 Re: 全志 SOC » f1c100/200能通过tf卡启动并把系统自动烧写到spiflash嘛 » 2021-01-20 10:29:29
完全可行,aodzip的tiny200 sdk里面的卡刷就是这么干的,在量产的时候很有优势。
我记@aodzip patch那个是用u-boot的spi 编程命令。
buildroot-tiny200 (F1C100/200s) 开发包近期更新内容 * 已支持DVP摄像头 *
http://whycan.com/t_5221.html
(出处:哇酷开发者社区)
#119 Re: 计算机图形/GUI/RTOS/FileSystem/OpenGL/DirectX/SDL2 » 试一试 直接用 win32 api 运行 OpenGL 程序 » 2021-01-18 20:25:26
搬出我多年前的收藏给楼主助威吧,NEHE OpenGL 教学例程,例程个个精美:
nehegl.zip
大哥! 太强大了!
整整48个例程啊, 我直接用VC2017编译了最后一个例程, 改了两三行就编译运行了, 真不依赖任何第三方库.
顺便请教一个问题, 现在我们公司的软件有点变态, 里面最多可能有一百万条线段的连接, OpenGL渲染可能要好几十微秒,
这种情况下鼠标还要能继续画线, 如果一起渲染的画感觉有点卡了,
请问OpenGL有没有增量渲染呢?或者说局部渲染? 这样感觉可以提高流畅度.
#120 Re: 计算机图形/GUI/RTOS/FileSystem/OpenGL/DirectX/SDL2 » 试一试 直接用 win32 api 运行 OpenGL 程序 » 2021-01-18 17:08:09
#121 计算机图形/GUI/RTOS/FileSystem/OpenGL/DirectX/SDL2 » 试一试 直接用 win32 api 运行 OpenGL 程序 » 2021-01-18 17:06:35
- 拉轰的脚踏车
- 回复: 4
/* An example of an OpenGL animation loop using the Win32 API. Also
demonstrates palette management for RGB and color index modes and
general strategies for message handling. */
#include <windows.h> /* must include this before GL/gl.h */
#include <windowsx.h>
#include <GL/gl.h> /* OpenGL header file */
#include <stdio.h>
#pragma comment(lib, "opengl32.lib")
HDC hDC; /* device context */
HPALETTE hPalette = 0; /* custom palette (if needed) */
GLboolean animate = GL_TRUE; /* animation flag */
#define IDT_TIMER1 1000
float fZoom = 1.0f;
POINT m_lastPos = {0, 0};
float m_xMove;
float m_yMove;
bool in_drag = false;//是否处于拖动模式
void display()
{
glClear(GL_COLOR_BUFFER_BIT);
glLoadIdentity();
glClearColor(1, 1, 1, 1);
glScalef(fZoom, fZoom, 0);
glTranslatef(m_xMove, m_yMove, -10.0);
/*
glBegin(GL_TRIANGLES); // Drawing Using Triangles
glColor3f(0.2, 0.2, 0.5);
glVertex3f(0.0f, 1.0f, 0.0f); // Top
glVertex3f(-1.0f, -1.0f, 0.0f); // Bottom Left
glVertex3f(1.0f, -1.0f, 0.0f); // Bottom Right
glEnd();
*/
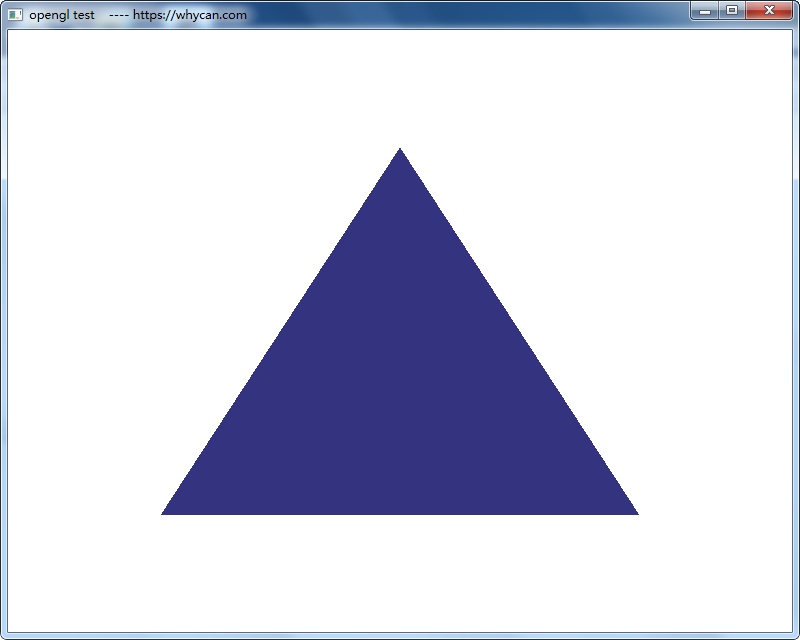
glBegin(GL_TRIANGLES); // Drawing Using Triangles
glColor3f(0.2f, 0.2f, 0.5f);
glVertex3f(-0.0f, 1.0f, 0.0f); // Top
glVertex3f(-1.0f, -1.0f, 0.0f); // Bottom Left
glVertex3f(1.0f, -1.0f, 0.0f); // Bottom Right
glEnd();
glFlush();
SwapBuffers(hDC); /* nop if singlebuffered */
}
LONG WINAPI WindowProc(HWND hWnd, UINT uMsg, WPARAM wParam, LPARAM lParam)
{
static PAINTSTRUCT ps;
int delta = 0;
char strLog[64];
switch (uMsg) {
case WM_CREATE:
//SetTimer(hWnd, IDT_TIMER1, 1, NULL);
break;
case WM_PAINT:
BeginPaint(hWnd, &ps);
display();
EndPaint(hWnd, &ps);
return 0;
case WM_TIMER:
switch (wParam)
{
case IDT_TIMER1:
PostMessage(hWnd, WM_PAINT, 0, 0);
return 0;
}
break;
case WM_MOUSEWHEEL:
if ((wParam & MK_CONTROL) == MK_CONTROL)
{
delta += (short)HIWORD(wParam); // 120 or -120
if (delta >= 120)
{
fZoom += 0.03f;
}
else if (delta <= -120)
{
fZoom -= 0.03f;
}
if (fZoom < 0.00001f)
fZoom = 0.01f;
}
if (HIBYTE(GetKeyState(VK_MENU)) & 0x80)
{
OutputDebugString("alt is press\n");
}
// PostMessage(hWnd, WM_PAINT, 0, 0);
SendMessage(hWnd, WM_PAINT, 0, 0);
snprintf(strLog, sizeof(strLog), "%f\n", fZoom);
OutputDebugString(strLog);
break;
case WM_MBUTTONUP:
break;
case WM_LBUTTONDOWN:
if ((wParam & MK_CONTROL) == MK_CONTROL)
{
POINT pt;
pt.x = GET_X_LPARAM(lParam);
pt.y = GET_Y_LPARAM(lParam);
snprintf(strLog, sizeof(strLog), "press: %d,%d\n", pt.x, pt.y);
OutputDebugString(strLog);
m_lastPos = pt;
in_drag = true;
}
break;
case WM_LBUTTONUP:
POINT pt2;
pt2.x = GET_X_LPARAM(lParam);
pt2.y = GET_Y_LPARAM(lParam);
snprintf(strLog, sizeof(strLog), "release: %d,%d\n", pt2.x, pt2.y);
OutputDebugString(strLog);
in_drag = false;
break;
case WM_MOUSEMOVE:
if (((wParam & MK_CONTROL) == MK_CONTROL) && in_drag)
{
POINT pt3;
int dx, dy;
float dx_scale, dy_scale;
pt3.x = GET_X_LPARAM(lParam);
pt3.y = GET_Y_LPARAM(lParam);
snprintf(strLog, sizeof(strLog), "move: %d,%d\n", pt3.x, pt3.y);
OutputDebugString(strLog);
dx = pt3.x - m_lastPos.x;
dy = pt3.y - m_lastPos.y;
dx_scale = dx * (1 / (float)800);
dy_scale = -dy * (1 / (float)640);
m_xMove = m_xMove + dx_scale;
m_yMove = m_yMove + dy_scale;
m_lastPos = pt3;
SendMessage(hWnd, WM_PAINT, 0, 0);
}
break;
case WM_SIZE:
glViewport(0, 0, LOWORD(lParam), HIWORD(lParam));
PostMessage(hWnd, WM_PAINT, 0, 0);
return 0;
case WM_CHAR:
switch (wParam) {
case 27: /* ESC key */
PostQuitMessage(0);
break;
case ' ':
animate = !animate;
break;
}
return 0;
#if 0
case WM_ACTIVATE:
if (IsIconic(hWnd))
animate = GL_FALSE;
else
animate = GL_TRUE;
return 0;
#endif
case WM_PALETTECHANGED:
if (hWnd == (HWND)wParam)
break;
/* fall through to WM_QUERYNEWPALETTE */
case WM_QUERYNEWPALETTE:
if (hPalette) {
UnrealizeObject(hPalette);
SelectPalette(hDC, hPalette, FALSE);
RealizePalette(hDC);
return TRUE;
}
return FALSE;
case WM_CLOSE:
PostQuitMessage(0);
return 0;
}
return DefWindowProc(hWnd, uMsg, wParam, lParam);
}
HWND CreateOpenGLWindow(char* title, int x, int y, int width, int height,
BYTE type, DWORD flags)
{
int n, pf;
HWND hWnd;
WNDCLASS wc;
LOGPALETTE* lpPal;
PIXELFORMATDESCRIPTOR pfd;
static HINSTANCE hInstance = 0;
/* only register the window class once - use hInstance as a flag. */
if (!hInstance) {
hInstance = GetModuleHandle(NULL);
wc.style = CS_OWNDC;
wc.lpfnWndProc = (WNDPROC)WindowProc;
wc.cbClsExtra = 0;
wc.cbWndExtra = 0;
wc.hInstance = hInstance;
wc.hIcon = LoadIcon(NULL, IDI_WINLOGO);
wc.hCursor = LoadCursor(NULL, IDC_ARROW);
wc.hbrBackground = NULL;
wc.lpszMenuName = NULL;
wc.lpszClassName = "OpenGL";
if (!RegisterClass(&wc)) {
MessageBox(NULL, "RegisterClass() failed: "
"Cannot register window class.", "Error", MB_OK);
return NULL;
}
}
hWnd = CreateWindow("OpenGL", title, WS_OVERLAPPEDWINDOW |
WS_CLIPSIBLINGS | WS_CLIPCHILDREN,
x, y, width, height, NULL, NULL, hInstance, NULL);
if (hWnd == NULL) {
MessageBox(NULL, "CreateWindow() failed: Cannot create a window.",
"Error", MB_OK);
return NULL;
}
hDC = GetDC(hWnd);
/* there is no guarantee that the contents of the stack that become
the pfd are zeroed, therefore _make sure_ to clear these bits. */
memset(&pfd, 0, sizeof(pfd));
pfd.nSize = sizeof(pfd);
pfd.nVersion = 1;
pfd.dwFlags = PFD_DRAW_TO_WINDOW | PFD_SUPPORT_OPENGL | flags;
pfd.iPixelType = type;
pfd.cColorBits = 32;
pf = ChoosePixelFormat(hDC, &pfd);
if (pf == 0) {
MessageBox(NULL, "ChoosePixelFormat() failed: "
"Cannot find a suitable pixel format.", "Error", MB_OK);
return 0;
}
if (SetPixelFormat(hDC, pf, &pfd) == FALSE) {
MessageBox(NULL, "SetPixelFormat() failed: "
"Cannot set format specified.", "Error", MB_OK);
return 0;
}
DescribePixelFormat(hDC, pf, sizeof(PIXELFORMATDESCRIPTOR), &pfd);
if (pfd.dwFlags & PFD_NEED_PALETTE ||
pfd.iPixelType == PFD_TYPE_COLORINDEX) {
n = 1 << pfd.cColorBits;
if (n > 256) n = 256;
lpPal = (LOGPALETTE*)malloc(sizeof(LOGPALETTE) +
sizeof(PALETTEENTRY) * n);
memset(lpPal, 0, sizeof(LOGPALETTE) + sizeof(PALETTEENTRY) * n);
lpPal->palVersion = 0x300;
lpPal->palNumEntries = n;
GetSystemPaletteEntries(hDC, 0, n, &lpPal->palPalEntry[0]);
/* if the pixel type is RGBA, then we want to make an RGB ramp,
otherwise (color index) set individual colors. */
if (pfd.iPixelType == PFD_TYPE_RGBA) {
int redMask = (1 << pfd.cRedBits) - 1;
int greenMask = (1 << pfd.cGreenBits) - 1;
int blueMask = (1 << pfd.cBlueBits) - 1;
int i;
/* fill in the entries with an RGB color ramp. */
for (i = 0; i < n; ++i) {
lpPal->palPalEntry[i].peRed =
(((i >> pfd.cRedShift) & redMask) * 255) / redMask;
lpPal->palPalEntry[i].peGreen =
(((i >> pfd.cGreenShift) & greenMask) * 255) / greenMask;
lpPal->palPalEntry[i].peBlue =
(((i >> pfd.cBlueShift) & blueMask) * 255) / blueMask;
lpPal->palPalEntry[i].peFlags = 0;
}
}
else {
lpPal->palPalEntry[0].peRed = 0;
lpPal->palPalEntry[0].peGreen = 0;
lpPal->palPalEntry[0].peBlue = 0;
lpPal->palPalEntry[0].peFlags = PC_NOCOLLAPSE;
lpPal->palPalEntry[1].peRed = 255;
lpPal->palPalEntry[1].peGreen = 0;
lpPal->palPalEntry[1].peBlue = 0;
lpPal->palPalEntry[1].peFlags = PC_NOCOLLAPSE;
lpPal->palPalEntry[2].peRed = 0;
lpPal->palPalEntry[2].peGreen = 255;
lpPal->palPalEntry[2].peBlue = 0;
lpPal->palPalEntry[2].peFlags = PC_NOCOLLAPSE;
lpPal->palPalEntry[3].peRed = 0;
lpPal->palPalEntry[3].peGreen = 0;
lpPal->palPalEntry[3].peBlue = 255;
lpPal->palPalEntry[3].peFlags = PC_NOCOLLAPSE;
}
hPalette = CreatePalette(lpPal);
if (hPalette) {
SelectPalette(hDC, hPalette, FALSE);
RealizePalette(hDC);
}
free(lpPal);
}
ReleaseDC(hWnd, hDC);
return hWnd;
}
int APIENTRY WinMain(HINSTANCE hCurrentInst, HINSTANCE hPreviousInst,
LPSTR lpszCmdLine, int nCmdShow)
{
HGLRC hRC; /* opengl context */
HWND hWnd; /* window */
MSG msg; /* message */
DWORD buffer = PFD_DOUBLEBUFFER; /* buffering type */
BYTE color = PFD_TYPE_RGBA; /* color type */
if (strstr(lpszCmdLine, "-sb")) {
buffer = 0;
}
if (strstr(lpszCmdLine, "-ci")) {
color = PFD_TYPE_COLORINDEX;
}
if (strstr(lpszCmdLine, "-h")) {
MessageBox(NULL, "animate [-ci] [-sb]\n"
" -sb single buffered\n"
" -ci color index\n",
"Usage help", MB_ICONINFORMATION);
exit(0);
}
hWnd = CreateOpenGLWindow((char*)"opengl test ---- https://whycan.com", 0, 0, 800, 640, color, buffer);
if (hWnd == NULL)
exit(1);
hDC = GetDC(hWnd);
hRC = wglCreateContext(hDC);
wglMakeCurrent(hDC, hRC);
ShowWindow(hWnd, SW_SHOW);
UpdateWindow(hWnd);
while (GetMessage(&msg, NULL, 0, 0))
{
TranslateMessage(&msg);
DispatchMessage(&msg);
}
wglMakeCurrent(NULL, NULL);
ReleaseDC(hWnd, hDC);
wglDeleteContext(hRC);
DestroyWindow(hWnd);
if (hPalette)
DeleteObject(hPalette);
return 0;
}不依赖任何第三方库, 可执行文件下载: win32_opengl_test_1.7z
#122 Qt/MSVC/MINGW/C++/MFC/GTK+/Delphi/BCB » 如果你的Visual Studio 2017 (VC++2017)目标平台不能选择 WinXP, 试一试这样操作 » 2021-01-18 16:24:29
#123 Re: VMWare/Linux/Ubuntu/Fedora/CentOS/U-BOOT » 拼拼凑凑写了一个简单脚本,粗略测试嵌入式Linux的帧率fps, widora tiny200s 800x480 37fps左右 » 2021-01-13 10:18:43
貌似发现了更精确的测试方法, 直接解码成 yuv420
libjpeg自带的tjbench:
# tjbench /usr/images/hehua.jpg  -yuv -subsamp 420

Testing YUV planar encoding/decoding

>>>>>  JPEG 4:2:0 --> BGR (Top-down)  <<<<<

Image size: 1280 x 720
Decomp to YUV --> Frame rate:         34.059825 fps
                  Throughput:         31.389535 Megapixels/sec
YUV Decode    --> Frame rate:         71.475664 fps
Throughput: 65.871972 Megapixels/sec#124 Re: VMWare/Linux/Ubuntu/Fedora/CentOS/U-BOOT » 拼拼凑凑写了一个简单脚本,粗略测试嵌入式Linux的帧率fps, widora tiny200s 800x480 37fps左右 » 2021-01-13 09:28:51
#!/bin/sh

n=0
t1=`date +%s`
count=1000

while [ true ]; do
        let n++
        if [ $(($n % 10)) -eq 0 ]; then
                echo -e ".\c"
        fi

        if [ $n -gt $count ]; then
                break;
        fi

        djpeg -outfile /dev/null /usr/images/hehua.jpg

done;


t2=`date +%s`

fps=$(($count/($t2 - $t1)))

echo -e "\ntest result: $fps fps"
V3s neno指令加速的1280x720 jpeg文件解码粗略测试15fps:
# ./test.sh
....................................................................................................
test result: 15 fps
连续测试同一个文件jpeg解码,解码完成的结果直接扔/dev/null
如果把全志的编解码器搞起来, 至少应该 50fps吧?
#125 Re: 全志 SOC » f1c100s 在linux环境下编译 helloword 后 执行没反应 » 2021-01-12 13:54:08
raspberryman 说:LinuxGo 说:在main里就写了printf,用gcc 编译器编译后,可以有输出,。用arm-linux-gcc编译后,放到TF卡里,nano执行后啥都没输出
arm-linux-gcc 命令行加 -static 编译试一试
还是不行……
在 ubuntu@x86 用 chroot 到 ARM 平台的 rootfs
http://whycan.cn/t_3251.html
(出处:哇酷开发者社区【VMWare/Linux/Ubuntu/Fedora/CentOS/U-BOOT】)
#127 Re: 计算机图形/GUI/RTOS/FileSystem/OpenGL/DirectX/SDL2 » 试一试 Qt5 运行 OpenGL 程序 » 2021-01-09 16:53:08
https://github.com/james-yoo/CodeBase
#include "myopenglweight.h"
#include <QOpenGLFunctions>
#include <math.h>


MyOpenGLWeight::MyOpenGLWeight(QWidget *parent, Qt::WindowFlags f) :
    QOpenGLWidget(parent, f)
{

    zoomScale = 1.0f;
//    QSurfaceFormat format;
//    format.setDepthBufferSize(24);
//    format.setStencilBufferSize(8);
//    format.setVersion(3, 2);
//    format.setProfile(QSurfaceFormat::CoreProfile);
//    setFormat(format);

    rotationX = 0.0;
    rotationY = 0.0;
    rotationZ = 0.0;
    faceColor[0] = Qt::red;
    faceColor[1] = Qt::green;
    faceColor[2] = Qt::blue;
    faceColor[3] = Qt::yellow;


}

MyOpenGLWeight::~MyOpenGLWeight()
{

}

void MyOpenGLWeight::initializeGL()
{
    //QOpenGLFunctions *f = QOpenGLContext::currentContext()->functions();
    glClearColor(0.2f, 0.1f, 0.5f, 1.0f);
    glEnable(GL_DEPTH_TEST);
}

void MyOpenGLWeight::resizeGL(int w, int h)
{
    glViewport(0, 0, w, h);
    glMatrixMode(GL_PROJECTION);
    glLoadIdentity();
    GLfloat x = GLfloat(w) / h;
    glFrustum(-x, +x, -1, +1, 5.0, 30.0);
    glMatrixMode(GL_MODELVIEW);

}

void MyOpenGLWeight::paintGL()
{
    glClear(GL_COLOR_BUFFER_BIT | GL_DEPTH_BUFFER_BIT);

    draw();
}

void MyOpenGLWeight::mousePressEvent(QMouseEvent *event)
{
    if(event->button() == Qt::LeftButton)
    {
        startPoint = event->pos();
    }
    mouseMoveEvent(event);

}

void MyOpenGLWeight::mouseMoveEvent(QMouseEvent *event)
{
    if (event->buttons() & Qt::LeftButton)
    {
        QPoint movePoint = event->pos() - startPoint;
        {
            rotationX += movePoint.y();
            rotationY += movePoint.x();
        }
        update();
        startPoint = event->pos();
     }

}

void MyOpenGLWeight::wheelEvent(QWheelEvent *event)
{
    QPoint numDegrees = event->angleDelta();
    if (numDegrees.y() < 0)  zoomScale = zoomScale/1.1;
    if (numDegrees.y() > 0)  zoomScale = zoomScale*1.1;

    paintGL(); // call paintGL()
    //update();
}

GLfloat ctrlpoints[4][3] = {
        { -4.0, -4.0, 0.0}, { -2.0, 4.0, 0.0},
        {2.0, -4.0, 0.0}, {4.0, 4.0, 0.0}};

void MyOpenGLWeight::draw()
{
    static const GLfloat P1[3] = {0.0, -1.0, 2.0};
    static const GLfloat P2[3] = {1.0, -1.0, -2.0};
    static const GLfloat P3[3] = {0.5, 1.0, 1.5};
    static const GLfloat P4[3] = {-1.0, 0.0, -1.5};

    static const GLfloat * const coords[4][3] = {
        {P1, P2, P3},
        {P1, P3, P4},
        {P1, P4, P2},
        {P2, P4, P3},
    };

    int range = 1000;
    glLoadIdentity();
    int height = 320;
    int width = 240;
    //glScalef(zoomScale, zoomScale, zoomScale);
        //glOrtho(-0.5*range*zoomScale, +0.5*range*zoomScale, -0.5*height/width*range*zoomScale, +0.5*height/width*range*zoomScale, -5*range, +5*range);

    glTranslatef(0.0, 0.0, -10);
    glRotatef(rotationX, 1.0, 0.0, 0.0);
    glRotatef(rotationY, 0.0, 1.0, 0.0);
    glRotatef(rotationZ, 0.0, 0.0, 1.0);

    glBegin(GL_LINES);
    glVertex3f(-0.6f, -0.3f, 0.2f);
    glVertex3f(0.6f, 0.3f, 0.3f);

    glVertex3f(0.6f, 0.3f, 0.3f);
    glVertex3f(0.1f, 0.1f, -0.2f);

    glVertex3f(0.1f, 0.1f, -0.2f);
    glVertex3f(-0.6f, -0.3f, 0.2f);
    glEnd();

    glBegin(GL_LINES);
    float s = 3;
    glColor3f(255.0, 0, 0);
    glVertex3f( 0, 0, 0 );
    glVertex3f( s, 0, 0 );
    glColor3f(0, 255.0, 0);
    glVertex3f( 0, 0, 0 );
    glVertex3f( 0, s, 0 );
    glColor3f(0, 0, 255.0);
    glVertex3f( 0, 0, 0 );
    glVertex3f( 0, 0, s );
    glEnd();

    glBegin(GL_LINE_STRIP);
        for (int i = 0; i <= 30; i++)
           glEvalCoord1f((GLfloat) i/30.0);
     glEnd();
     /* The following code displays the control points as dots. */
     glPointSize(5.0);
     glColor3f(1.0, 1.0, 0.0);
     glBegin(GL_POINTS);
        for (int i = 0; i < 4; i++)
           glVertex3fv(&ctrlpoints[i][0]);
     glEnd();


//    for(int i = 0; i < 4; ++i)
//    {
//        glBegin(GL_TRIANGLES);
//        glColor3f(faceColor[i].redF(), faceColor[i].greenF(), faceColor[i].blueF());
//        for(int j = 0; j < 4; ++j)
//            glVertex3f(coords[i][j][0], coords[i][j][1], coords[i][j][2]);
//        glEnd();
//    }


}
本站下载: qt_opengl_zoom.7z
https://docs.microsoft.com/en-us/windows/win32/opengl/the-program-ported-to-win32
#128 Re: 好钜润半导体(TIKY) » TKM32F499配4.0寸IPS屏在RGB888模式下截屏功能 » 2021-01-09 14:25:04
试一试 Qt5 运行 OpenGL 程序
http://whycan.com/t_5820.html#p57905
(出处:哇酷开发者社区【计算机图形/GUI/RTOS/FileSystem/OpenGL/DirectX/SDL2】)
借用了一下素材 ^_^
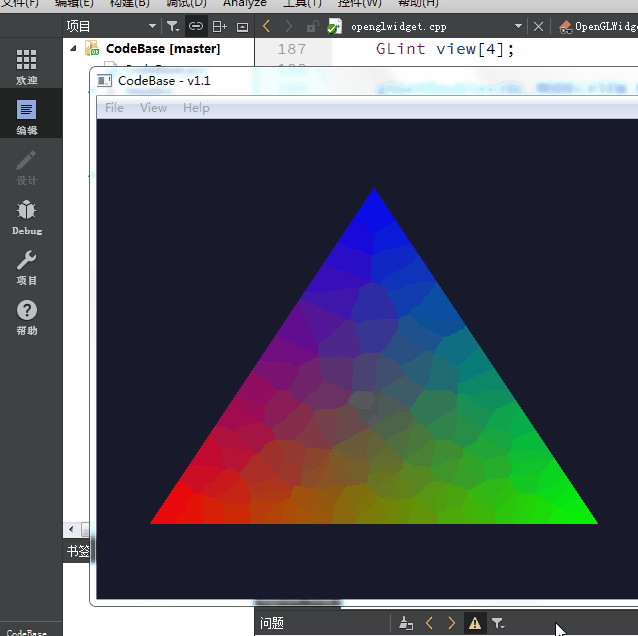
#129 Re: 计算机图形/GUI/RTOS/FileSystem/OpenGL/DirectX/SDL2 » 试一试 Qt5 运行 OpenGL 程序 » 2021-01-09 14:23:30
ffmpeg 转码 MOV/MP4 文件到 yuv, 尺寸 1920x1080:
ffmpeg -i tiky.mov tiky.yuv
如果只需生成一帧, 用这个命令
ffmpeg -i tiky.mov -vframes 1 tiky.yuv
顺手推荐一个在线显示YUV/RGB格式文件的网站: https://rawpixels.net/
视频素材来源:
TKM32F499配4.0寸IPS屏在RGB888模式下截屏功能
http://whycan.com/t_5830.html
(出处:哇酷开发者社区【好钜润半导体(TIKY)】)
#130 Re: 好钜润半导体(TIKY) » TKM32F499配4.0寸IPS屏在RGB888模式下截屏功能 » 2021-01-09 14:15:12
拉轰的脚踏车 说:xiaohui 说:此处@晕哥
好像大部分是 浏览器不支持非 mp4 文件。
有在线的视频转码网站的。 https://convertio.co/zh/mp4-converter/
这个好,收藏!
#131 Re: 计算机图形/GUI/RTOS/FileSystem/OpenGL/DirectX/SDL2 » 试一试 Qt5 运行 OpenGL 程序 » 2021-01-09 14:14:30
顺手推荐一个在线显示YUV/RGB格式文件的网站: https://rawpixels.net/
#133 Re: 全志 SOC » f1c200 spi1工作不正常 » 2021-01-09 14:10:00
#134 Re: 全志 SOC » V3S测试问题记录 » 2021-01-09 14:08:27
#135 Re: ST/STM8/STM8S/STM8L » 开源自己DIY的恒温控制器(养小动物的) » 2021-01-09 14:07:26
#137 Re: 计算机图形/GUI/RTOS/FileSystem/OpenGL/DirectX/SDL2 » 试一试 Qt5 运行 OpenGL 程序 » 2021-01-09 10:08:49

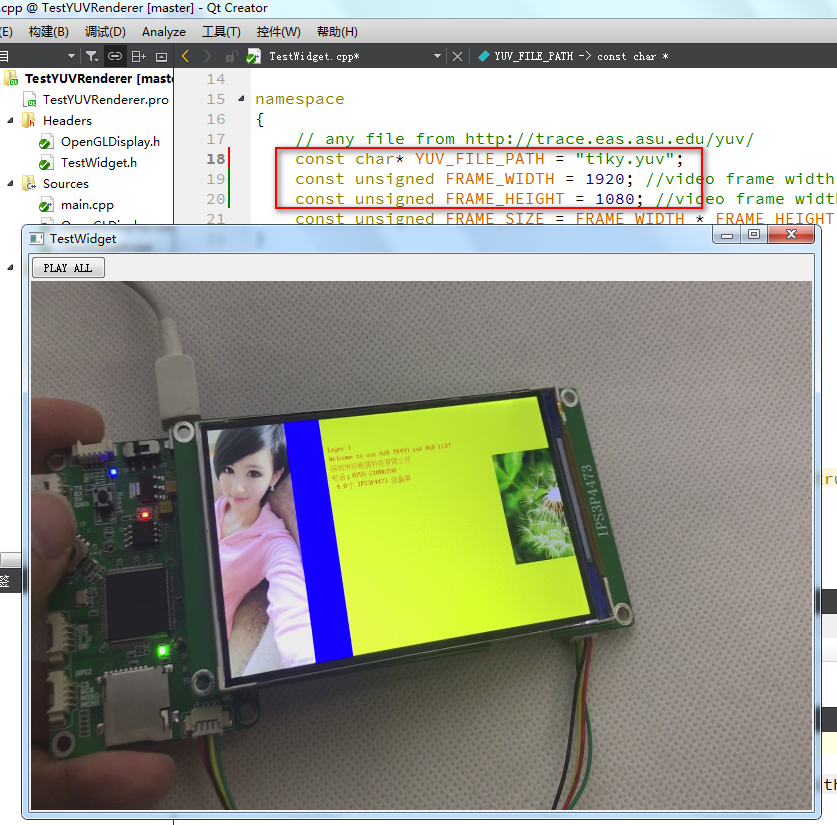
Qt5 用 OpenGL 把 YUV 转 RGB显示到 Widget的故事: https://github.com/MasterAler/SampleYUVRenderer
YUV测试文件这里下载: http://trace.eas.asu.edu/yuv/
解压、改名test.yuv复制到 bin 目录即可运行。
也可以本站下载
YUV: akiyo_cif.7z
#138 Re: 计算机图形/GUI/RTOS/FileSystem/OpenGL/DirectX/SDL2 » 看傅老师的OpenGL视频教程, 试着自己写Demo » 2021-01-08 14:22:49
#include <iostream>
#include <Windows.h>
//#define GLEW_STATIC
#include <gl/glew.h>
#include <GLFW/glfw3.h>
#pragma comment(lib, "glew32.lib")
#pragma comment(lib, "opengl32.lib")
#pragma comment(linker, "/subsystem:\"windows\"")
float vertices[] = {
-0.5f, -0.5f, 0.0f,
0.5f, -0.5f, 0.0f,
0.0f, 0.5f, 0.0f
};
void processInput(GLFWwindow* window)
{
if (glfwGetKey(window, GLFW_KEY_ESCAPE) == GLFW_PRESS)
{
glfwSetWindowShouldClose(window, true);
}
}
int WinMain(
HINSTANCE hInstance,
HINSTANCE hPrevInstance,
LPSTR lpCmdLine,
int nShowCmd
)
{
const char *vertexShaderSource = "#version 330 core\n"
"layout (location = 0) in vec3 aPos;\n"
"void main()\n"
"{\n"
" gl_Position = vec4(aPos.x, aPos.y, aPos.z, 1.0);\n"
"}\0";
const char *fragmentShaderSource = "#version 330 core\n"
"out vec4 FragColor;\n"
"void main()\n"
"{\n"
" FragColor = vec4(1.0f, 0.5f, 0.2f, 1.0f);\n"
"} ";
glfwInit();
glfwWindowHint(GLFW_CONTEXT_VERSION_MAJOR, 3);
glfwWindowHint(GLFW_CONTEXT_VERSION_MINOR, 3);
glfwWindowHint(GLFW_OPENGL_PROFILE, GLFW_OPENGL_CORE_PROFILE);
GLFWwindow* window = glfwCreateWindow(640, 480, "OpenGL Test", NULL, NULL);
if (!window)
{
printf("create window failure\n");
glfwTerminate();
}
glfwMakeContextCurrent(window);
glewExperimental = true;
if (glewInit() != GLEW_OK)
{
printf("Init GLEW failed");
glfwTerminate();
return -1;
}
glViewport(0, 0, 640, 480);
unsigned int VAO;
glGenVertexArrays(1, &VAO);
glBindVertexArray(VAO);
unsigned int VBO;
glGenBuffers(1, &VBO);
glBindBuffer(GL_ARRAY_BUFFER, VBO);
glBufferData(GL_ARRAY_BUFFER, sizeof(vertices), vertices, GL_STATIC_DRAW);
unsigned int vertexShader;
vertexShader = glCreateShader(GL_VERTEX_SHADER);
glShaderSource(vertexShader, 1, &vertexShaderSource, NULL);
glCompileShader(vertexShader);
unsigned int fragmentShader;
fragmentShader = glCreateShader(GL_FRAGMENT_SHADER);
glShaderSource(fragmentShader, 1, &fragmentShaderSource, NULL);
glCompileShader(fragmentShader);
int success;
char infoLog[512];
glGetShaderiv(vertexShader, GL_COMPILE_STATUS, &success);
if (!success)
{
glGetShaderInfoLog(vertexShader, 512, NULL, infoLog);
std::cout << "ERROR::SHADER::VERTEX::COMPILATION_FAILED\n" << infoLog << std::endl;
}
unsigned int shaderProgram;
shaderProgram = glCreateProgram();
glAttachShader(shaderProgram, vertexShader);
glAttachShader(shaderProgram, fragmentShader);
glLinkProgram(shaderProgram);
glUseProgram(shaderProgram);
glVertexAttribPointer(0, 3, GL_FLOAT, GL_FALSE, 3 * sizeof(float), (void*)0);
glEnableVertexAttribArray(0);
while (!glfwWindowShouldClose(window))
{
processInput(window);
glClearColor(0.2, 0.3, 0.3, 1);
glClear(GL_COLOR_BUFFER_BIT);
glBindVertexArray(VAO);
glUseProgram(shaderProgram);
glDrawArrays(GL_TRIANGLES, 0, 3);
glfwSwapBuffers(window);
glfwPollEvents();
Sleep(20);
}
return 0;
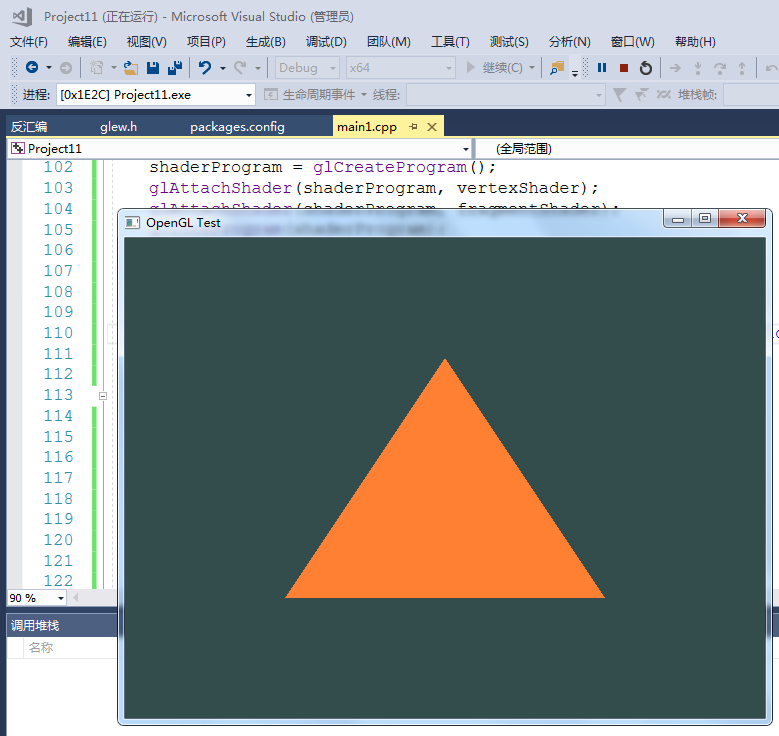
}VC2017工程本站下载: vc2017_glfw_opengl_demo3.7z
#139 计算机图形/GUI/RTOS/FileSystem/OpenGL/DirectX/SDL2 » 看傅老师的OpenGL视频教程, 试着自己写Demo » 2021-01-08 09:31:25
- 拉轰的脚踏车
- 回复: 1
视频地址: https://www.bilibili.com/video/BV11W411N7b9?p=3
#include <iostream>
#include <Windows.h>
//#define GLEW_STATIC
#include <gl/glew.h>
#include <GLFW/glfw3.h>

#pragma comment(lib, "glew32.lib")
#pragma comment(lib, "opengl32.lib")
#pragma comment(linker, "/subsystem:\"windows\"")

int WinMain(
	HINSTANCE hInstance,
	HINSTANCE hPrevInstance,
	LPSTR     lpCmdLine,
	int       nShowCmd
)
{
	glfwInit();
	glfwWindowHint(GLFW_CONTEXT_VERSION_MAJOR, 3);
	glfwWindowHint(GLFW_CONTEXT_VERSION_MINOR, 3);
	glfwWindowHint(GLFW_OPENGL_PROFILE, GLFW_OPENGL_CORE_PROFILE);

	GLFWwindow* window = glfwCreateWindow(640, 480, "OpenGL Test", NULL, NULL);
	if (!window)
	{
		printf("create window failure\n");
		glfwTerminate();
	}
	glfwMakeContextCurrent(window);

	glewExperimental = true;
	if (glewInit() != GLEW_OK)
	{
		printf("Init GLEW failed");
		glfwTerminate();
		return -1;
	}

	glViewport(0, 0, 640, 480);

	while (!glfwWindowShouldClose(window))
	{
		glfwSwapBuffers(window);
		glfwPollEvents();
		Sleep(20);
	}

	return 0;
}
VC2017工程本站下载: vc2017_glfw_opengl_demo2.7z
#140 Re: 计算机图形/GUI/RTOS/FileSystem/OpenGL/DirectX/SDL2 » 试一试 Qt5 运行 OpenGL 程序 » 2021-01-07 17:35:04

#include "myopenglweight.h"
#include <QOpenGLFunctions>
#include <math.h>


MyOpenGLWeight::MyOpenGLWeight(QWidget *parent, Qt::WindowFlags f) :
    QOpenGLWidget(parent, f)
{

//    QSurfaceFormat format;
//    format.setDepthBufferSize(24);
//    format.setStencilBufferSize(8);
//    format.setVersion(3, 2);
//    format.setProfile(QSurfaceFormat::CoreProfile);
//    setFormat(format);

    rotationX = 0.0;
    rotationY = 0.0;
    rotationZ = 0.0;
    faceColor[0] = Qt::red;
    faceColor[1] = Qt::green;
    faceColor[2] = Qt::blue;
    faceColor[3] = Qt::yellow;


}

MyOpenGLWeight::~MyOpenGLWeight()
{

}

void MyOpenGLWeight::initializeGL()
{
    //QOpenGLFunctions *f = QOpenGLContext::currentContext()->functions();
    glClearColor(0.2f, 0.1f, 0.5f, 1.0f);
    glEnable(GL_DEPTH_TEST);
}

void MyOpenGLWeight::resizeGL(int w, int h)
{
    glViewport(0, 0, w, h);
    glMatrixMode(GL_PROJECTION);
    glLoadIdentity();
    GLfloat x = GLfloat(w) / h;
    glFrustum(-x, +x, -1, +1, 5.0, 30.0);
    glMatrixMode(GL_MODELVIEW);

}

void MyOpenGLWeight::paintGL()
{
    glClear(GL_COLOR_BUFFER_BIT | GL_DEPTH_BUFFER_BIT);
    draw();

}

void MyOpenGLWeight::mousePressEvent(QMouseEvent *event)
{
    if(event->button() == Qt::LeftButton)
    {
        startPoint = event->pos();
    }
    mouseMoveEvent(event);

}

void MyOpenGLWeight::mouseMoveEvent(QMouseEvent *event)
{
    if (event->buttons() & Qt::LeftButton)
    {
        QPoint movePoint = event->pos() - startPoint;
        {
            rotationX += movePoint.y();
            rotationY += movePoint.x();
        }
        update();
        startPoint = event->pos();
     }

}

GLfloat ctrlpoints[4][3] = {
        { -4.0, -4.0, 0.0}, { -2.0, 4.0, 0.0},
        {2.0, -4.0, 0.0}, {4.0, 4.0, 0.0}};

void MyOpenGLWeight::draw()
{
    static const GLfloat P1[3] = {0.0, -1.0, 2.0};
    static const GLfloat P2[3] = {1.0, -1.0, -2.0};
    static const GLfloat P3[3] = {0.5, 1.0, 1.5};
    static const GLfloat P4[3] = {-1.0, 0.0, -1.5};

    static const GLfloat * const coords[4][3] = {
        {P1, P2, P3},
        {P1, P3, P4},
        {P1, P4, P2},
        {P2, P4, P3},
    };

    glLoadIdentity();
    glTranslatef(0.0, 0.0, -10);
    glRotatef(rotationX, 1.0, 0.0, 0.0);
    glRotatef(rotationY, 0.0, 1.0, 0.0);
    glRotatef(rotationZ, 0.0, 0.0, 1.0);

    glBegin(GL_LINES);
    float s = 3;
    glColor3f(255.0, 0, 0);
    glVertex3f( 0, 0, 0 );
    glVertex3f( s, 0, 0 );
    glColor3f(0, 255.0, 0);
    glVertex3f( 0, 0, 0 );
    glVertex3f( 0, s, 0 );
    glColor3f(0, 0, 255.0);
    glVertex3f( 0, 0, 0 );
    glVertex3f( 0, 0, s );
    glEnd();

    glBegin(GL_LINE_STRIP);
        for (int i = 0; i <= 30; i++)
           glEvalCoord1f((GLfloat) i/30.0);
     glEnd();
     /* The following code displays the control points as dots. */
     glPointSize(5.0);
     glColor3f(1.0, 1.0, 0.0);
     glBegin(GL_POINTS);
        for (int i = 0; i < 4; i++)
           glVertex3fv(&ctrlpoints[i][0]);
     glEnd();


//    for(int i = 0; i < 4; ++i)
//    {
//        glBegin(GL_TRIANGLES);
//        glColor3f(faceColor[i].redF(), faceColor[i].greenF(), faceColor[i].blueF());
//        for(int j = 0; j < 4; ++j)
//            glVertex3f(coords[i][j][0], coords[i][j][1], coords[i][j][2]);
//        glEnd();
//    }

}
https://github.com/PhoebeTsou/TestGL.git
本站下载: TestGL.7z
#141 Re: 全志 SOC » [慢更]小白探索如何使用V3s播放音乐 » 2021-01-07 15:37:10
#142 Re: 全志 SOC » 求一个V3S的spiflash镜像,自己编译遇到问题了 » 2021-01-07 14:32:03
那个教程肯定缺了一步应用默认 defconfig 的操作。
荔枝派Zero V3s开发板入坑记录 (TF/SD卡启动)(主线Linux,主线u-boot)
http://whycan.com/t_561.html
(出处:哇酷开发者社区【全志 V3S/F1C100s/X3】)
#143 计算机图形/GUI/RTOS/FileSystem/OpenGL/DirectX/SDL2 » 试一试 Qt5 运行 OpenGL 程序 » 2021-01-07 14:28:25
- 拉轰的脚踏车
- 回复: 5
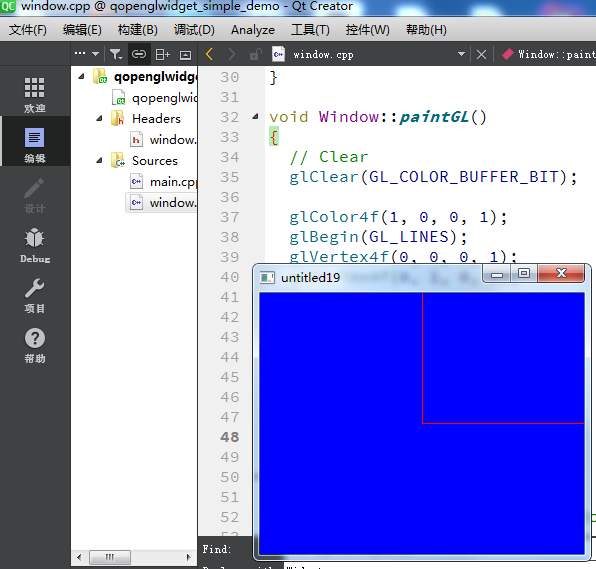
window.cpp
#include "window.h"
#include <QDebug>
#include <QString>

Window::~Window()
{
  makeCurrent();
  teardownGL();
}

/*******************************************************************************
 * OpenGL Events
 ******************************************************************************/

void Window::initializeGL()
{
  // Initialize OpenGL Backend
  initializeOpenGLFunctions();
  printContextInformation();

  // Set global information
  glClearColor(0.0f, 0.0f, 1.0f, 1.0f);
}

void Window::resizeGL(int width, int height)
{
  // Currently we are not handling width/height changes
  (void)width;
  (void)height;
}

void Window::paintGL()
{
  // Clear
  glClear(GL_COLOR_BUFFER_BIT);

  glColor4f(1, 0, 0, 1);
  glBegin(GL_LINES);
  glVertex4f(0, 0, 0, 1);
  glVertex4f(0, 1, 0, 1);

  glVertex4f(0, 0, 0, 1);
  glVertex4f(1, 0, 0, 1);

  glVertex4f(0, 0, 0, 1);
  glVertex4f(0, 0, 1, 1);
  glEnd();
}

void Window::teardownGL()
{
  // Currently we have no data to teardown
}

/*******************************************************************************
 * Private Helpers
 ******************************************************************************/

void Window::printContextInformation()
{
  QString glType;
  QString glVersion;
  QString glProfile;

  // Get Version Information
  glType = (context()->isOpenGLES()) ? "OpenGL ES" : "OpenGL";
  glVersion = reinterpret_cast<const char*>(glGetString(GL_VERSION));

  // Get Profile Information
#define CASE(c) case QSurfaceFormat::c: glProfile = #c; break
  switch (format().profile())
  {
    CASE(NoProfile);
    CASE(CoreProfile);
    CASE(CompatibilityProfile);
  }
#undef CASE

  // qPrintable() will print our QString w/o quotes around it.
  qDebug() << qPrintable(glType) << qPrintable(glVersion) << "(" << qPrintable(glProfile) << ")";
}
window.h
#ifndef WINDOW_H
#define WINDOW_H

#include <QOpenGLWindow>
#include <QOpenGLFunctions>

class Window : public QOpenGLWindow,
               protected QOpenGLFunctions
{
  Q_OBJECT

// OpenGL Events
public:
  ~Window();

  void initializeGL();
  void resizeGL(int width, int height);
  void paintGL();
  void teardownGL();

private:
  // Private Helpers
  void printContextInformation();
};

#endif // WINDOW_H#144 Re: 计算机图形/GUI/RTOS/FileSystem/OpenGL/DirectX/SDL2 » Visual C++ 编译一个SDL2 Demo » 2021-01-06 17:23:49
https://github.com/crust/sdl2-examples/blob/master/glcontext.cpp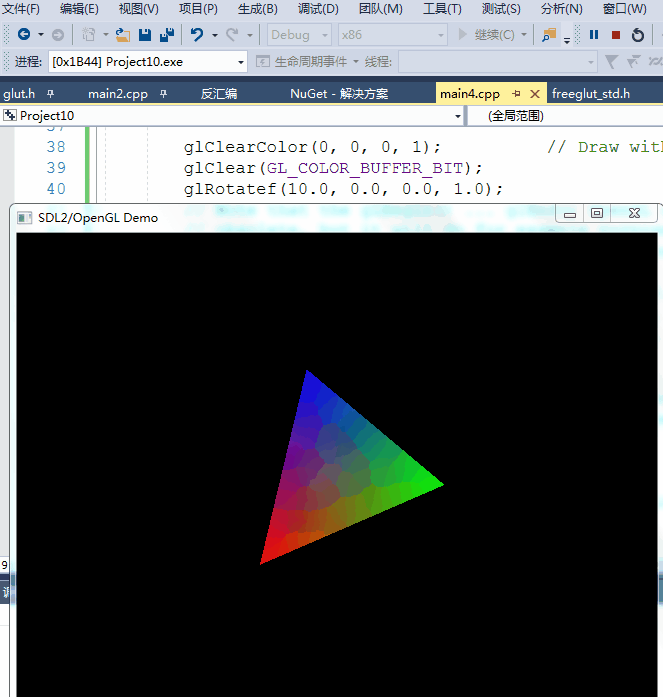
#pragma comment(lib,"opengl32.lib")
#pragma comment(lib, "msvcrtd.lib")
#pragma comment(lib, "vcruntimed.lib")
#pragma comment(lib, "ucrtd.lib")
#pragma comment(linker, "/subsystem:\"windows\" /entry:\"SDL_main\"")

#include <iostream>
#include <SDL.h>
#include <SDL_opengl.h>

using std::cout;

int main(int argc, char* argv[]) {

	SDL_Init(SDL_INIT_VIDEO); // Init SDL2

	// Create a window. Window mode MUST include SDL_WINDOW_OPENGL for use with OpenGL.
	SDL_Window *window = SDL_CreateWindow(
		"SDL2/OpenGL Demo", SDL_WINDOWPOS_UNDEFINED, SDL_WINDOWPOS_UNDEFINED, 640, 480, SDL_WINDOW_OPENGL | SDL_WINDOW_RESIZABLE
	);

	// Create an OpenGL context associated with the window.
	SDL_GLContext glcontext = SDL_GL_CreateContext(window);

	// Now, regular OpenGL functions ...
	glMatrixMode(GL_PROJECTION | GL_MODELVIEW);
	glLoadIdentity();
	glOrtho(-320, 320, 240, -240, 0, 1);

	// ... can be used alongside SDL2.
	SDL_Event e;
	float x = 0.0, y = 30.0;
	SDL_PollEvent(&e);
	while (e.type != SDL_KEYDOWN && e.type != SDL_QUIT) {  // Enter main loop.

		SDL_PollEvent(&e);      // Check for events.

		glClearColor(0, 0, 0, 1);          // Draw with OpenGL.
		glClear(GL_COLOR_BUFFER_BIT);
		glRotatef(10.0, 0.0, 0.0, 1.0);
		// Note that the glBegin() ... glEnd() OpenGL style used below is actually
		// obsolete, but it will do for example purposes. For more information, see
		// SDL_GL_GetProcAddress() or find an OpenGL extension loading library.
		glBegin(GL_TRIANGLES);
		glColor3f(1.0, 0.0, 0.0); glVertex2f(x, y + 90.0);
		glColor3f(0.0, 1.0, 0.0); glVertex2f(x + 90.0, y - 90.0);
		glColor3f(0.0, 0.0, 1.0); glVertex2f(x - 90.0, y - 90.0);
		glEnd();

		SDL_GL_SwapWindow(window);  // Swap the window/buffer to display the result.
		SDL_Delay(100);              // Pause briefly before moving on to the next cycle.

	}

	// Once finished with OpenGL functions, the SDL_GLContext can be deleted.
	SDL_GL_DeleteContext(glcontext);

	// Done! Close the window, clean-up and exit the program.
	SDL_DestroyWindow(window);
	SDL_Quit();
	return 0;

}#145 Re: 计算机图形/GUI/RTOS/FileSystem/OpenGL/DirectX/SDL2 » Visual C++ 编译一个OpenGL Demo » 2021-01-06 15:43:57
glut 的设计有问题, 单核CPU占用率100%, 双核占用率50%, 这里有讨论:
https://community.khronos.org/t/100-cpu-usage/63231/6
glutIdleFunc()在单核上占用100%的CPU,在双核上占用50%的CPU。
如何在不使用Shrieks Win32“ Sleep()”函数的情况下解决CPU使用率过高的问题?
我可以经常使用glutTimerFunc()来glutPostRedisplay(),但我想知道是否有更清洁的方法吗?
https://gamedev.net/forums/topic/388780-glut-100-cpu-issue/3571642/
嘿,希望有人能希望能帮助我解决我遇到的问题。基本上,我创建了一个GLUT应用程序,每次我编译并运行它时都会达到100%的CPU使用率。奇怪而令人困惑的是,它在任何其他PC上都能正常工作,如果我在PC上运行任何其他GLUT应用程序,它只会使我的CPU耗尽。有任何想法吗?
#146 Re: 计算机图形/GUI/RTOS/FileSystem/OpenGL/DirectX/SDL2 » Visual C++ 编译一个OpenGL Demo » 2021-01-06 15:13:09
#147 Re: 计算机图形/GUI/RTOS/FileSystem/OpenGL/DirectX/SDL2 » Visual C++ 编译一个OpenGL Demo » 2021-01-06 11:56:49
#include <GL/glut.h>
//窗口长宽
int width = 400, height = 400;
//鼠标点击位置
int hit_pos_x, hit_pos_y;
//鼠标拖动位置
int move_pos_x, move_pos_y;
//鼠标操作种类
int button_kind = -1;
void display()
{
// 清除屏幕
glClear(GL_COLOR_BUFFER_BIT | GL_DEPTH_BUFFER_BIT);
//重新设置OpenGL窗口:原点位置为左上角,x轴从左到右,y轴从上到下,坐标值与像素坐标值相同
glViewport(0, 0, (GLsizei)width, (GLsizei)height);
glMatrixMode(GL_PROJECTION);
glLoadIdentity();
gluOrtho2D(0, width, height, 0);
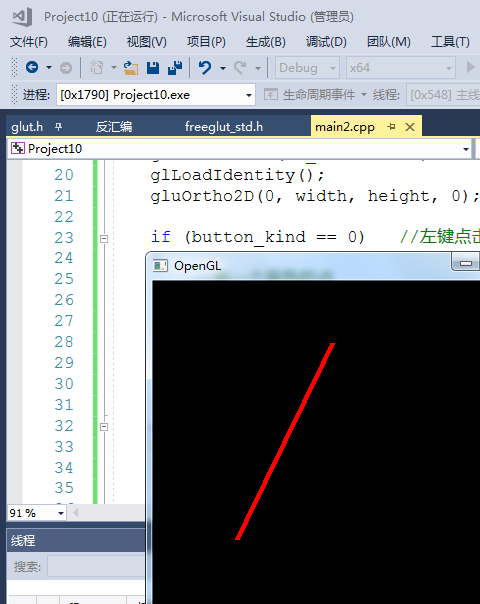
if (button_kind == 0) //左键点击
{
		//画一个蓝色的点
		glPointSize(20);
		glBegin(GL_POINTS);
		glColor3f(0.0f, 0.0f, 1.0f);
		glVertex2f(hit_pos_x, hit_pos_y);
		glEnd();
}
else if (button_kind == 2) //右键点击
{
//画一个绿色的点
glPointSize(20);
glBegin(GL_POINTS);
glColor3f(0.0f, 1.0f, 0.0f);
glVertex2f(hit_pos_x, hit_pos_y);
glEnd();
}
else if (button_kind == 3) //鼠标拖动
{
//沿拖动轨迹画一条红色的线
glLineWidth(5);
glColor3f(1.0f, 0.0f, 0.0f);
glBegin(GL_LINES);
glVertex2f(hit_pos_x, hit_pos_y);
glVertex2f(move_pos_x, move_pos_y);
glEnd();
}
//双缓存交换缓存以显示图像
glutSwapBuffers();
//每次更新显示
glutPostRedisplay();
}
void mouse_hit(int button, int state, int x, int y)
{
//鼠标操作种类赋值
button_kind = button;
//鼠标操作基本结构
switch (button)
{
case GLUT_LEFT_BUTTON: //左键操作,也可为数字0
if (state == GLUT_DOWN) //左键按下时
{
//记录按键位置
hit_pos_x = x;
hit_pos_y = y;
}
break;
case GLUT_RIGHT_BUTTON: //右键操作,也可为数字1
if (state == GLUT_DOWN) //右键按下时
{
//记录按键位置
hit_pos_x = x;
hit_pos_y = y;
}
break;
default:
break;
}
}
void mouse_move(int x, int y)
{
//鼠标移动时操作种类设为3(0 1 2分别为左键、中键、右键)
button_kind = 3;
//记录拖动位置
move_pos_x = x;
move_pos_y = y;
}
void main(int argc, char** argv)
{
//初始化GL
glutInit(&argc, argv);
//设置显示参数(双缓存,RGB格式)
glutInitDisplayMode(GLUT_DOUBLE | GLUT_RGB);
//设置窗口尺寸:width*height
glutInitWindowSize(width, height);
//设置窗口位置:在屏幕左上角像素值(100,100)处
glutInitWindowPosition(100, 100);
//设置窗口名称
glutCreateWindow("OpenGL");
//显示函数,display事件需要自行编写
glutDisplayFunc(display);
//鼠标点击函数,mouse_hit事件需要自行编写
glutMouseFunc(mouse_hit);
//鼠标拖动函数,mouse_move事件需要自行编写
glutMotionFunc(mouse_move);
//重复循环GLUT事件
glutMainLoop();
}https://zhuanlan.zhihu.com/p/24735850
OpenGL鼠标操作
#148 Re: 计算机图形/GUI/RTOS/FileSystem/OpenGL/DirectX/SDL2 » Visual C++ 编译一个OpenGL Demo » 2021-01-06 11:35:14
https://www.cnblogs.com/1024Planet/p/5650131.html
#include <stdio.h>
#include <Windows.h>
#include <gl/glut.h>
/*
功能描述:使用OpenGL简单画一个虚心水壶
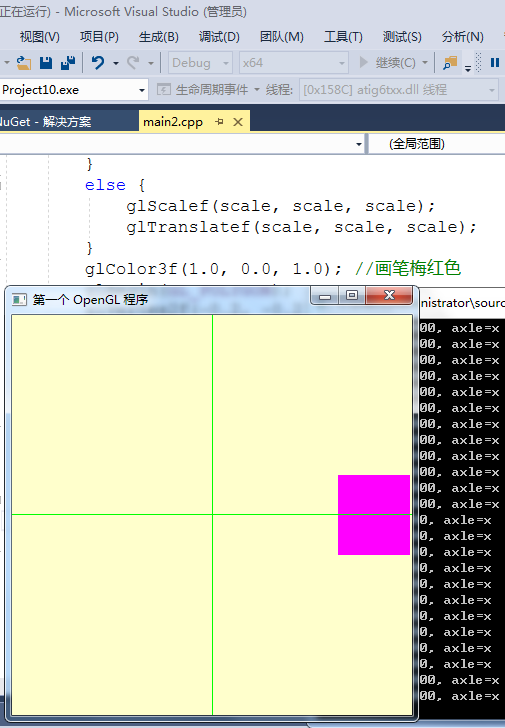
缩放变换函数glScalef
*/
//输出模式,0-单缓存模式;非0双缓存模式
#define OUTPUT_MODE 1
float scale = 0.0;
bool add = true;
unsigned char axle = 'x';
void init(void)
{
//glClearColor函数设置好清除颜色,glClear利用glClearColor函数设置好的当前清除颜色设置窗口颜色
glClearColor(1.0, 1.0, 0.8, 1.0);
}
void display(void)
{
printf("scale=%f, axle=%c\n", scale, axle);
glClear(GL_COLOR_BUFFER_BIT);
//配置缩放比例大小scale
scale = (add ? scale + 0.1 : scale - 0.1);
if (scale >= 2.0)
{
add = false;
} else if (scale <= 0.0) {
add = true;
}
//开始绘画
glPushMatrix();
{
if (axle == 'x') {
glScalef(scale, 1, 1);
} else if (axle == 'y') {
glScalef(1, scale, 1);
} else if (axle == 'z') {
glScalef(1, 1, scale);
} else {
glScalef(scale, scale, scale);
}
glColor3f (1.0, 0.0, 1.0); //画笔梅红色
glBegin(GL_POLYGON);
glVertex2f(-0.2, -0.2);
glVertex2f(-0.2, 0.2);
glVertex2f(0.2, 0.2);
glVertex2f(0.2, -0.2);
glEnd();
}
glPopMatrix();
glLoadIdentity(); //加载单位矩阵
glColor3f (0.0, 0.0, 1.0); //画笔蓝色
//--------画直线START--------
//画直线
glBegin(GL_LINES);
glVertex2f(-0.5, 0);
glVertex2f(0.5, 0);
glVertex2f(0, 0.5);
glVertex2f(0, -0.5);
glEnd();
//--------画直线E N D--------
if (OUTPUT_MODE == 0) {
glFlush();//单缓存GLUT_SINGLE时使用
} else {
glutSwapBuffers();//因为使用的是双缓存GLUT_DOUBLE,所以这里必须要交换缓存才会显示
}
Sleep(50);
}
void reshape(int w, int h)
{
int offset = 50;
int dis = (w > h ? h : w) - offset * 2;
//配置显示物体屏幕的大小
glViewport(offset, offset, (GLsizei)dis, (GLsizei)dis);
printf("reshape: w=%d, h=%d, dis=%d\n", w, h, dis);
glMatrixMode(GL_PROJECTION);
glLoadIdentity();
glOrtho(-1.5, 1.5, -1.5, 1.5, 0, 10);
//gluOrtho2D(-1.5, 1.5, -1.5, 1.5);
glMatrixMode(GL_MODELVIEW);
glLoadIdentity();
}
void keyboard(unsigned char key, int x, int y)
{
switch (key) {
case 'x':
case 'X':
axle = 'x';
glutPostRedisplay();
break;
case 'y':
case 'Y':
axle = 'y';
glutPostRedisplay();
break;
case 'z':
case 'Z':
axle = 'z';
glutPostRedisplay();
break;
case 'a':
case 'A':
axle = 'a';
glutPostRedisplay();
break;
default:
break;
}
printf("按键%c\n", key);
}
int main(int argc, char *argv[])
{
printf("可通过按键xyza控制图形按哪一轴缩放\n");
glutInit(&argc, argv);
glutInitDisplayMode(GLUT_RGB | (OUTPUT_MODE == 0 ? GLUT_SINGLE : GLUT_DOUBLE));
glutInitWindowPosition(100, 100);
glutInitWindowSize(400, 400);
glutCreateWindow("第一个 OpenGL 程序");
init();
glutDisplayFunc(&display);
glutIdleFunc(display); //设置不断调用显示函数
glutReshapeFunc(reshape);
glutKeyboardFunc(keyboard);
glutMainLoop();
return 0;
}#149 Re: 计算机图形/GUI/RTOS/FileSystem/OpenGL/DirectX/SDL2 » Visual C++ 编译一个SDL2 Demo » 2021-01-06 08:50:14
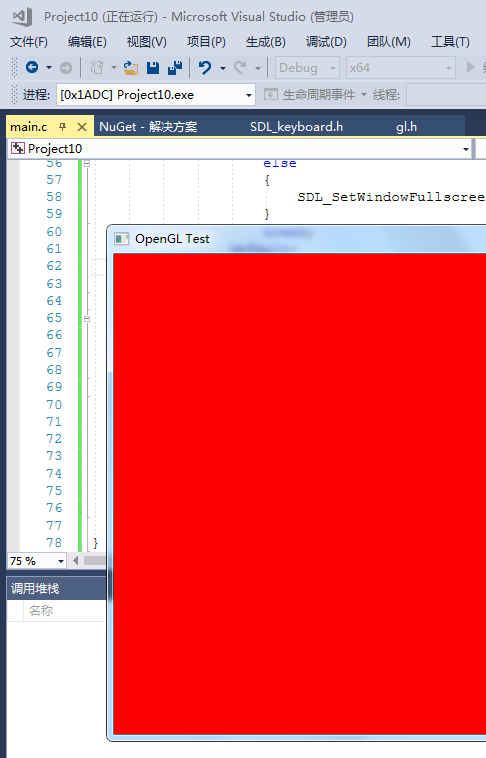
// To compile with gcc:  (tested on Ubuntu 14.04 64bit):
//	 g++ sdl2_opengl.cpp -lSDL2 -lGL
// To compile with msvc: (tested on Windows 7 64bit)
//   cl sdl2_opengl.cpp /I C:\sdl2path\include /link C:\path\SDL2.lib C:\path\SDL2main.lib /SUBSYSTEM:CONSOLE /NODEFAULTLIB:libcmtd.lib opengl32.lib

#include <stdio.h>
#include <stdint.h>
#include <assert.h>
#include <SDL.h>
#include <SDL_opengl.h>
#include <GL/gl.h>

#pragma comment(lib,"opengl32.lib")
#pragma comment(lib, "msvcrtd.lib")
#pragma comment(lib, "vcruntimed.lib")
#pragma comment(lib, "ucrtd.lib")
#pragma comment(linker, "/subsystem:\"windows\" /entry:\"SDL_main\"")

typedef int32_t i32;
typedef uint32_t u32;
typedef int32_t b32;

#define WinWidth 640
#define WinHeight 480

int main(int ArgCount, char **Args)
{

	u32 WindowFlags = SDL_WINDOW_OPENGL;
	SDL_Window *Window = SDL_CreateWindow("OpenGL Test",
		SDL_WINDOWPOS_CENTERED, SDL_WINDOWPOS_CENTERED,
		WinWidth, WinHeight, WindowFlags);
	assert(Window);
	SDL_GLContext Context = SDL_GL_CreateContext(Window);

	b32 Running = 1;
	b32 FullScreen = 0;
	while (Running)
	{
		SDL_Event Event;
		while (SDL_PollEvent(&Event))
		{
			if (Event.type == SDL_KEYDOWN)
			{
				switch (Event.key.keysym.sym)
				{
				case SDLK_ESCAPE:
					Running = 0;
					break;
				case 'f':
					FullScreen = !FullScreen;
					if (FullScreen)
					{
						SDL_SetWindowFullscreen(Window, WindowFlags | SDL_WINDOW_FULLSCREEN_DESKTOP);
					}
					else
					{
						SDL_SetWindowFullscreen(Window, WindowFlags);
					}
					break;
				default:
					break;
				}
			}
			else if (Event.type == SDL_QUIT)
			{
				Running = 0;
			}
		}

		glViewport(0, 0, WinWidth/2, WinHeight/2);
		glClearColor(1.f, 0.f, 0.f, 0.5f);
		glClear(GL_COLOR_BUFFER_BIT);

		SDL_GL_SwapWindow(Window);
	}
	return 0;
}
VC++2017 工程下载: Project10_sdl2_opengl_simple_demo.7z
#150 Re: 计算机图形/GUI/RTOS/FileSystem/OpenGL/DirectX/SDL2 » Visual C++ 编译一个SDL2 Demo » 2021-01-06 01:01:21
// To compile with gcc:  (tested on Ubuntu 14.04 64bit):
//	 g++ sdl2_opengl.cpp -lSDL2 -lGL
// To compile with msvc: (tested on Windows 7 64bit)
//   cl sdl2_opengl.cpp /I C:\sdl2path\include /link C:\path\SDL2.lib C:\path\SDL2main.lib /SUBSYSTEM:CONSOLE /NODEFAULTLIB:libcmtd.lib opengl32.lib

#include <stdio.h>
#include <stdint.h>
#include <assert.h>
#include <SDL2/SDL.h>
#include <SDL2/SDL_opengl.h>
#include <GL/gl.h>

typedef int32_t i32;
typedef uint32_t u32;
typedef int32_t b32;

#define WinWidth 1000
#define WinHeight 1000

int main (int ArgCount, char **Args)
{

  u32 WindowFlags = SDL_WINDOW_OPENGL;
  SDL_Window *Window = SDL_CreateWindow("OpenGL Test", 0, 0, WinWidth, WinHeight, WindowFlags);
  assert(Window);
  SDL_GLContext Context = SDL_GL_CreateContext(Window);

  b32 Running = 1;
  b32 FullScreen = 0;
  while (Running)
  {
    SDL_Event Event;
    while (SDL_PollEvent(&Event))
    {
      if (Event.type == SDL_KEYDOWN)
      {
        switch (Event.key.keysym.sym)
        {
          case SDLK_ESCAPE:
            Running = 0;
            break;
          case 'f':
            FullScreen = !FullScreen;
            if (FullScreen)
            {
              SDL_SetWindowFullscreen(Window, WindowFlags | SDL_WINDOW_FULLSCREEN_DESKTOP);
            }
            else
            {
              SDL_SetWindowFullscreen(Window, WindowFlags);
            }
            break;
          default:
            break;
        }
      }
      else if (Event.type == SDL_QUIT)
      {
        Running = 0;
      }
    }

    glViewport(0, 0, WinWidth, WinHeight);
    glClearColor(1.f, 0.f, 1.f, 0.f);
    glClear(GL_COLOR_BUFFER_BIT);

    SDL_GL_SwapWindow(Window);
  }
  return 0;
}
https://gist.github.com/jordandee/94b187bcc51df9528a2f
SDL2 & OpenGL Simple Demo
gcc -o test2 test2.c -lSDL2 -lGL
#151 Re: 计算机图形/GUI/RTOS/FileSystem/OpenGL/DirectX/SDL2 » Visual C++ 编译一个SDL2 Demo » 2021-01-05 17:33:23
#152 计算机图形/GUI/RTOS/FileSystem/OpenGL/DirectX/SDL2 » Visual C++ 编译一个SDL2 Demo » 2021-01-05 17:27:58
- 拉轰的脚踏车
- 回复: 4
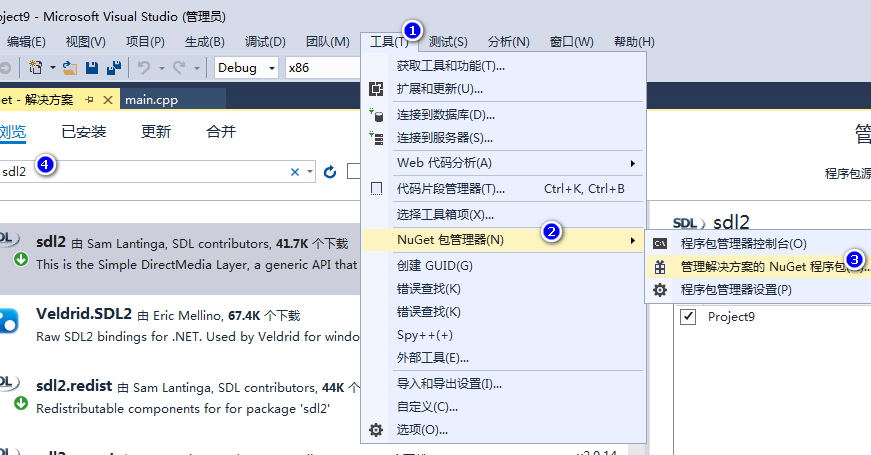
1. 新建新项目, 通过nuget安装sdl2
2. 添加一个main.cpp文件, 文件内容 https://github.com/AlmasB/SDL2-Demo/blob/master/src/Main.cpp
#include <SDL.h>
#include <iostream>

const int SCREEN_WIDTH = 800;
const int SCREEN_HEIGHT = 600;

int main(int arc, char ** argv) {

    if (SDL_Init( SDL_INIT_VIDEO ) < 0) {
        std::cout << "SDL could not initialize! SDL_Error: " << SDL_GetError() << std::endl;
    } else {

        SDL_CreateWindow(
            "SDL2 Demo",
            SDL_WINDOWPOS_CENTERED, SDL_WINDOWPOS_CENTERED,
            SCREEN_WIDTH, SCREEN_HEIGHT,
            SDL_WINDOW_SHOWN
        );

        SDL_Delay(2000);
    }

    return 0;
}
3. main.cpp 添加内容:
#pragma comment(lib, "msvcrtd.lib")
#pragma comment(lib, "vcruntimed.lib")
#pragma comment(lib, "ucrtd.lib")
#pragma comment(linker, "/subsystem:\"windows\" /entry:\"SDL_main\"")
4. F5 运行就出SDL2窗口了。
https://www.libsdl.org/release/SDL-1.2.15/docs/html/guidevideoopengl.html
#153 Re: 全志 SOC » V3s 4.10.15 内核裁剪不知如何下刀?现在内核有10M , 做mplayer 音频播放用,无视频,有没有高手指导一下裁剪方向? » 2021-01-05 17:23:21
请问全志V3s使用荔枝派最新的 linux 4.13-y 分支,如何支持声卡?
http://whycan.com/t_489.html#p1595
(出处:哇酷开发者社区【全志 V3S/F1C100s/X3】)
先把声音放出来
#154 计算机图形/GUI/RTOS/FileSystem/OpenGL/DirectX/SDL2 » Ubuntu编译 LearnOpenGL Demo 程序 » 2021-01-05 15:06:28
- 拉轰的脚踏车
- 回复: 0
#准备工作
sudo apt-get install cmake g++ libglfw3-dev libassimp-dev libx11-dev libxcursor-dev libxi-dev libxinerama-dev libfreetype6-dev -y

#克隆
git clone https://github.com/JoeyDeVries/LearnOpenGL

cd LearnOpenGL

export LOGL_ROOT_PATH=${PWD}

cmake .

#编译
make

#跑个demo程序试一试:
cd bin/4.advanced_opengl
./4.advanced_opengl__5.1.framebuffers
#155 Re: 计算机图形/GUI/RTOS/FileSystem/OpenGL/DirectX/SDL2 » Visual C++ 编译一个OpenGL Demo » 2021-01-05 11:58:59
glOrtho 设置原点
glGenRenderbuffers OpenGL离屏渲染
https://stackoverflow.com/questions/12157646/how-to-render-offscreen-on-opengl
#156 Re: 全志 SOC » v3s,用主线 5.2.y,摄像头选 ov5640,启动后无 /dev/videox 设备 » 2021-01-05 11:57:46
http://github.com/torvalds/linux
https://github.com/torvalds/linux/tree/v5.4
这样克隆代码 git clone https://github.com/torvalds/linux -b v5.4
应该就是 linux 5.4 了
#157 Re: 计算机图形/GUI/RTOS/FileSystem/OpenGL/DirectX/SDL2 » Visual C++ 编译一个OpenGL Demo » 2021-01-05 11:39:20
#158 Re: 技术人生/软件使用技巧/破解经验/技术吐槽/灌水 » 我的小米手机微信/QQ双开,别的app分享到微信/QQ有一个提示对话框,现在被小孩默认勾选了第一个,再也不弹出选择对话框了,我应该怎么把选择 » 2021-01-05 08:42:20
https://kuaibao.qq.com/s/20200304A08S6400
设置 -> 应用设置 -> 应用双开 -> 选择微信 -> 个性设置 -> 登录和分享 -> 每次询问
这样以后每次都会弹出选择用哪个 app 的对话框了。
#159 Re: Qt/MSVC/MINGW/C++/MFC/GTK+/Delphi/BCB » Qt 的矢量svg编辑器示例 ---- VectorEditor » 2021-01-04 11:22:00
#160 Re: Cortex M0/M3/M4/M7 » cJSON专题笔记(一):介绍与下载 » 2020-12-31 11:19:24
#161 Re: 全志 SOC » 全志 H3 硬件编解码库 (转) » 2020-12-18 16:10:51
https://github.com/torvalds/linux/tree/v4.20/drivers/staging/media/sunxi/cedrus
linux 主线内核自从 4.20 版本开始内置了编解码驱动, 有没有朋友测试过?
或者用 aodzip 大佬这个:
编解码引擎 CedarX for Mainline Linux v5.4
http://whycan.com/t_4219.html
(出处:哇酷开发者社区【全志 V3S/F1C100s/X3】)
这个是移植全志官方bsp的驱动
#162 Re: 全志 SOC » 编解码引擎 CedarX for Mainline Linux v5.4 » 2020-12-18 16:10:06
aodzip 说:白嫖: https://github.com/aodzip/cedar/
配套的ion驱动: https://github.com/aodzip/cedar-ion/想尝鲜的可以冲了
Allwinner S3 YUV to H264编码测试已经通过第二个链接失效了 能发下文件吗 谢谢
第二个项目已经合并到第一个项目了, 看git log就知道了。
#163 Re: 全志 SOC » 全志 H3 硬件编解码库 (转) » 2020-12-18 16:07:14
https://github.com/torvalds/linux/tree/v4.20/drivers/staging/media/sunxi/cedrus
linux 主线内核自从 4.20 版本开始内置了编解码驱动, 有没有朋友测试过?
#164 Re: 全志 SOC » 全志 H3 硬件编解码库 (转) » 2020-12-18 16:04:25
测试了几个 github 上面的 全志编码器程序, 都不能正常运行.
http://whycan.com/t_1761.html
(出处:哇酷开发者社区【全志 V3S/F1C100s/X3】)
#165 全志 SOC » 全志 H3 硬件编解码库 (转) » 2020-12-18 16:03:40
- 拉轰的脚踏车
- 回复: 4
https://www.go2aaron.com/blog/index.php/archives/65/
一、需求来源
公司硬件产品使用了 NanoPi NEO Core 这样一款基于全志 H3 的核心板。由于项目中涉及到视频直播、视频录制,且要求添加 OSD 文字信息,故需要视频编解码操作。而使用软件解码仅能满足 1280×720@25fps 解码性能,且解码时间随图像复杂度波动,再使用软件编码就跑不动 25 帧了,只能寻求视频硬件编解码解决方案。
此处下载: h3_vpu_codec.pdf
#166 Re: 全志 SOC » A33主线Linux跑起OpenGL/ES » 2020-12-11 15:09:56
这些二进制Blob非常有用,因为它们允许今天在Allwinner平台上具有完全正常的OpenGL加速:
作为稳定性测试,我们最近在Allwinner A33平台上运行了一个Qt5应用程序,
在Allwinner A33平台上进行OpenGL渲染24H*7,持续了1.5个月。
当然,从长远来看,我们将跟踪Lima项目的进度,
该项目将提供一个完全免费的开源解决方案,
以在Allwinner平台上提供OpenGL加速。
看来,还是挺稳定的
#167 Re: Qt/MSVC/MINGW/C++/MFC/GTK+/Delphi/BCB » 请问为什么Qt5.15不提供 qt-opensource-windows-x86-5.15.2.exe 这种 windows 开发工具安装包 » 2020-12-10 14:20:55
https://git.buildroot.net/buildroot/tag/?h=2020.11
buildroot v2020.11 已经支持 Qt5.15 了,
5.15 是 LTS 长支持版本.
#168 Qt/MSVC/MINGW/C++/MFC/GTK+/Delphi/BCB » 请问为什么Qt5.15不提供 qt-opensource-windows-x86-5.15.2.exe 这种 windows 开发工具安装包 » 2020-12-10 13:59:20
#169 Re: 华芯微特 » SWM320成功移植micropython » 2020-12-03 15:43:41
#170 Re: VMWare/Linux/Ubuntu/Fedora/CentOS/U-BOOT » 发几个关于树莓派raspberrypi的buildroot修改 » 2020-11-30 09:27:36
#171 Re: 全志 SOC » 请问大佬们关于tiny200 r3的小问题!! » 2020-11-27 08:08:17
孤星泪 说:darthmike 说:但大佬说他也是在200上跑的,难道tiny改版换了串口么
楼主并没有说是 tiny200跑
https://whycan.com/files/members/5483/7J6ERUC7RXNPBM9UAZ}}BCF.png
原帖真说了:(
我估计是他自己做的 f1c200s
反编译一下他的 dtb 文件不就知道了么?
#172 Re: 全志 SOC » f1c100s 支持 TV (cvbs) 输入输出, 但是手册却没有相关寄存器资料, 终于在 A20 手册找到了. » 2020-11-27 08:07:37
微凉VeiLiang 说:mcd12 说:你好. 请问,f1c100s:tvd寄存器等于A20吗
不等的,寄存器的位置不一样
谢谢。 在哪里可以找到f1c100的TVD控制寄存器的完整列表?
不就是1楼这个吗?只是基地址不同而已.
本站下载: A20_User_Manual_2013_03_22.pdf
这里面有详细的 TVE/TVD 寄存器定义.
#173 Re: 全志 SOC » 全志主线Linux UART串口使用8250驱动程序,但是没有实现RS485控制,有没有哪位打上了patch? » 2020-11-11 17:37:43
https://www.freelancer.com/projects/linux/add-support-linux-serial-driver/?ngsw-bypass=&w=f
还真有这个项目, 修改全志 A20 8250_dw.c 实现 RS485
建筑家庭自动化解决方案。
我们想使用Allwinner A20 SoC,但是内置的uarts没有rs485。Linux用户开源8250_dw.c驱动程序。任务是添加对rs485的支持(可以从其他8250驱动程序移植过来)。
目前,我们正在测试Olimex Lime2板
We would like to use Allwinner A20 SoC, but build in uarts doesn't have rs485. Linux users open source 8250_dw.c driver. Task would be to add support for rs485 (can be maybe migrated from other 8250 drivers).
Currently we are testing Olimex Lime2 board. [url removed, login to view]
#174 Re: Php/Nodejs/Web/HTML5/Javascript/微信开发/Python » 发现一个好用的一个正则表达式可视化网站 https://regexper.com/ » 2020-10-26 08:48:03
#176 Re: 全志 SOC » 关于硬件图形加速,如何使用F1C100或者SV3S的display engine? » 2020-10-20 08:34:31
@zhouyu2019 因为早期荔枝派zero linux 4.13 LCD是用 simple-framebuffer 驱动的, 而不是drm
https://github.com/Lichee-Pi/linux/blob/zero-4.13.y/arch/arm/boot/dts/sun8i-v3s.dtsi
	chosen {
		#address-cells = <1>;
		#size-cells = <1>;
		ranges;

		simplefb_lcd: framebuffer@0 {
			compatible = "allwinner,simple-framebuffer",
				     "simple-framebuffer";
			allwinner,pipeline = "de0-lcd0";
			clocks = <&ccu CLK_BUS_TCON0>, <&display_clocks 0>,
				 <&display_clocks 6>, <&ccu CLK_TCON0>;
			status = "disabled";
};#177 Re: 全志 SOC » 怎么烧录Tiny200 r3的SPI NAND » 2020-10-15 13:58:19
#179 Re: VMWare/Linux/Ubuntu/Fedora/CentOS/U-BOOT » buildroot 生成的镜像文件和target文件夹都缺少 libstdc++.so,手动复制才行,有什么办法彻底解决吗? » 2020-10-09 11:02:58
buildroot make menconfig:
或者修改一行代码:
BR2_TOOLCHAIN_EXTRA_LIBS="libstdc++"
然后可以本机测试:
buildroot$ find output/target/ |grep libstdc++ |xargs ls -l
lrwxrwxrwx 1 root root 19 Oct  9 10:33 output/target/usr/lib/libstdc++.so -> libstdc++.so.6.0.25
lrwxrwxrwx 1 root root 19 Oct  9 10:33 output/target/usr/lib/libstdc++.so.6 -> libstdc++.so.6.0.25
-rwxr-xr-x 1 root root 1042040 Oct  9 10:50 output/target/usr/lib/libstdc++.so.6.0.25
-rw-r--r-- 1 root  root 2466 Oct  9 10:33 output/target/usr/lib/libstdc++.so.6.0.25-gdb.py


buildroot$ sudo chroot output/target/ /bin/sh
/ # v4l2-ctl

General/Common options:
  --all              display all information available
  -C, --get-ctrl <ctrl>[,<ctrl>...]
                     get the value of the controls [VIDIOC_G_EXT_CTRLS]
  -c, --set-ctrl <ctrl>=<val>[,<ctrl>=<val>...]
                     set the value of the controls [VIDIOC_S_EXT_CTRLS]
  -D, --info         show driver info [VIDIOC_QUERYCAP]
  -d, --device <dev> use device <dev> instead of /dev/video0
                     if <dev> starts with a digit, then /dev/video<dev> is used
                     Otherwise if -z was specified earlier, then <dev> is the entity name
                     or interface ID (if prefixed with 0x) as found in the topology of the
                     media device with the bus info string as specified by the -z option.
在 ubuntu@x86 用 chroot 到 ARM 平台的 rootfs
http://whycan.com/t_3251.html
(出处:哇酷开发者社区【VMWare/Linux/Ubuntu/Fedora/CentOS/U-BOOT】)
#181 Re: 全志 SOC » f1c200s上使用gcc编译helloworld » 2020-09-25 09:44:29
#182 Re: 全志 SOC » 全志f1c200s通过spi使用st7789 1.54寸,240*240像素LCD,初始化完成后只是白屏无法显示串口信息,求助! » 2020-09-24 17:34:51
#183 Re: 全志 SOC » 全志f1c200s通过spi使用st7789 1.54寸,240*240像素LCD,初始化完成后只是白屏无法显示串口信息,求助! » 2020-09-24 15:29:43
smartcar 说:一点显示都没有?那不对啊,驱动还有问题?
对,现在就是开机白屏,用了那个命令之后,就完全黑屏了,串口提示没有空间在设备上,驱动我就是使用的内核文件里的driver/stage里st7789的代码,除了改动了init_display里的代码,把里面的初始化代码改为stm32里初始化屏幕的操作数据,然后我这个屏幕单纯初始化完是花屏,所以昨天花了点时间,按照卖家说的,屏幕花屏是正常的,需要清屏一下,然后清屏完是白屏的状况
这个提示是正常的 cat: write error: No space left on device
可以不需要你初始化, 配置好驱动和dts就可以了, 一行代码都不要改。
#184 Re: 全志 SOC » 运行QT5程序出错,求解 » 2020-09-24 15:28:48
#185 Re: VMWare/Linux/Ubuntu/Fedora/CentOS/U-BOOT » 拼拼凑凑写了一个简单脚本,粗略测试嵌入式Linux的帧率fps, widora tiny200s 800x480 37fps左右 » 2020-09-24 15:28:13
#186 Re: VMWare/Linux/Ubuntu/Fedora/CentOS/U-BOOT » 拼拼凑凑写了一个简单脚本,粗略测试嵌入式Linux的帧率fps, widora tiny200s 800x480 37fps左右 » 2020-09-24 14:08:21
#187 VMWare/Linux/Ubuntu/Fedora/CentOS/U-BOOT » 拼拼凑凑写了一个简单脚本,粗略测试嵌入式Linux的帧率fps, widora tiny200s 800x480 37fps左右 » 2020-09-24 14:07:15
- 拉轰的脚踏车
- 回复: 7
test_fps.sh 文件内容:
#!/bin/sh

n=0
t1=`date +%s`
count=1000

while [ true ]; do
	let n++
	if [ $(($n % 10)) -eq 0 ]; then
		echo -e ".\c"
	fi

	if [ $n -gt $count ]; then
		break;
	fi

	cat /dev/zero > /dev/fb0 2>&1

done;


t2=`date +%s`

fps=$(($count/($t2 - $t1)))

echo -e "\ntest result: $fps fps"
widora tiny200s 800x480 测试结果:
# sh test.sh
....................................................................................................
test result: 37 fps
#189 Re: 全志 SOC » 用 opendir -> readdir -> closedir 方式遍历文件中文文件名问题 » 2020-09-15 16:07:31
这取决于您的平台和文件系统。例如,HFS +文件系统使用UTF-16在内部存储文件名,并将其公开为UTF-8,因此我认为charDirent中的数组应包含UTF-8字符串(无论您的语言环境如何)。
NTFS也将文件名存储在UTF-16中,但是文件公开的形式取决于平台。Windows在系统区域设置和UTF-16之间转换。另一个平台可以在UTF-16和UTF-8之间转换。另一个平台可以在UTF-16和直接环境的语言环境之间转换。
其他文件系统只是将文件名存储和公开为字节数组,因此Dirent将包含最初存储的所有数据。这通常是语言环境编码中的字符串,但不能保证。
从上面看, 应该需要你自己解析这个 d_name, 转码成utf-8才行, iconv 了解一下。
#190 Re: 全志 SOC » 买了两块中科世为的 HMI 屏 玩玩 » 2020-09-12 15:57:40
#193 VMWare/Linux/Ubuntu/Fedora/CentOS/U-BOOT » Linux命令行获取本机外网地址 » 2020-08-31 11:06:26
- 拉轰的脚踏车
- 回复: 6
sudo apt-get install curl -y
以下任意一个命令行均可以:
curl checkip.amazonaws.com
curl ifconfig.me
curl icanhazip.com
curl ipecho.net/plain
curl ifconfig.co
参考: https://www.cyberciti.biz/faq/how-to-find-my-public-ip-address-from-command-line-on-a-linux/
#195 Re: 全志 SOC » f1c100s使用usb wifi上网 » 2020-08-20 09:49:49
#196 Re: DIY/综合/Arduino/写字机/3D打印机/智能小车/平衡车/四轴飞行/MQTT/物联网 » 给大家推荐一个不错的多功能USB读卡器/转接器,还可以接上USB网卡,用手机有线上网哦 » 2020-08-20 09:48:32
#197 Re: NB-IoT/2G模块/4G模块/GPRS模块/GPS/北斗 » 一种在linux上不用全编内核就能识别合宙4G模块的方法 » 2020-08-17 15:46:07
1. 按照 http://ask.openluat.com/article/911 中的方法修改option.c与usb_wwan.c文件
2. 解压压缩包modules.zip,把修改后的文件与usb-wwan.h文件copy到解压后的文件夹内
3. make后会生成option.ko和usb_wwan.ko这两个内核模块
4. 先insmod usb_wwan.ko然后insmod option.ko
出现File exists是因为我之前已经加载过这两个内核模块,正常的话是不会打印任何东西的。
- 首页
- » 搜索
- » 拉轰的脚踏车 发表的帖子