- 首页
- » 搜索
- » 我思故我在 发表的帖子
#1 全志 SOC » V3s 执行 iperf3 满负荷测试两小时挂了 » 2023-12-12 16:50:56
- 我思故我在
- 回复: 7
[  5] 7298.03-7299.06 sec  8.75 MBytes  71.4 Mbits/sec    0    232 KBytes
[  5] 7299.06-7300.09 sec  8.75 MBytes  71.4 Mbits/sec    0    232 KBytes
[  5] 7300.09-7301.12 sec  8.75 MBytes  71.1 Mbits/sec    0    232 KBytes
[  5] 7301.12-7302.00 sec  7.50 MBytes  71.2 Mbits/sec    0    232 KBytes
[  5] 7302.00-7303.03 sec  8.75 MBytes  71.3 Mbits/sec    0    232 KBytes
[  5] 7303.03-7304.06 sec  8.75 MBytes  71.3 Mbits/sec    0    232 KBytes
[  5] 7304.06-7305.09 sec  8.75 MBytes  71.1 Mbits/sec    0    232 KBytes
[  5] 7305.09-7306.13 sec  8.75 MBytes  71.0 Mbits/sec    0    232 KBytes
[  5] 7306.13-7307.02 sec  7.50 MBytes  70.8 Mbits/sec    0    232 KBytes
[  5] 7307.02-7308.05 sec  8.75 MBytes  71.0 Mbits/sec    0    232 KBytes
[  5] 7308.05-7309.08 sec  8.75 MBytes  71.1 Mbits/sec    0    232 KBytes
[  5] 7309.08-7310.11 sec  8.75 MBytes  71.4 Mbits/sec    0    232 KBytes
[  5] 7310.11-7311.14 sec  8.75 MBytes  71.1 Mbits/sec    0    232 KBytes
[  5] 7311.14-7312.02 sec  7.50 MBytes  71.3 Mbits/sec    0    232 KBytes
[  5] 7312.02-7313.06 sec  8.75 MBytes  70.9 Mbits/sec    0    232 KBytes
[ 7458.902753] Unable to handle kernel paging request at virtual address c00d1bc8
[ 7458.910796] pgd = c2690000
[ 7458.913789] [c00d1bc8] *pgd=4000041e(bad)
[ 7458.918245] Internal error: Oops: 8000000d [#1] PREEMPT ARM
[ 7458.924418] Modules linked in:
[ 7458.927813] CPU: 0 PID: 798 Comm: iperf3 Tainted: G    B           4.9.118 #162
[ 7458.935906] Hardware name: sun8iw8
[ 7458.939671] task: c24ee340 task.stack: c268c000
[ 7458.944692] PC is at 0xc00d1bc8
[ 7458.948183] LR is at deactivate_slab+0xbc/0x488
[ 7458.953199] pc : [<c00d1bc8>]    lr : [<c01d1bc8>]    psr: 60000093
[ 7458.953199] sp : c268dcd0  ip : c263e1bc  fp : c3bc27c0
[ 7458.965913] r10: 800c000c  r9 : c263f440  r8 : 800c000b
[ 7458.971698] r7 : c263ecc0  r6 : c34944c0  r5 : c268c000  r4 : c3451680
[ 7458.978925] r3 : c24ee340  r2 : c268dcc0  r1 : 00000000  r0 : 00000001
[ 7458.986156] Flags: nZCv  IRQs off  FIQs on  Mode SVC_32  ISA ARM  Segment none
[ 7458.994154] Control: 10c5387d  Table: 42690059  DAC: 00000051
[ 7459.000516]
[ 7459.000516] PC: 0xc00d1b48:
[ 7459.005240] 1b48  e1a07002 ebffbb0c e5903008 e1a08000 e3130004 1a000011 e5983008 e3130002
[ 7459.014328] 1b68  0a00001e e59f107c e1a00005 e08f1001 ebffbf6a e2505000 03e0400b 0a00000f
[ 7459.023414] 1b88  e1a02007 e1a01006 ebffbf9e e2504000 0a00000c e1a00005 ebffb9c5 ea000007
[ 7459.032500] 1ba8  e59f1044 e1a03007 e1a02006 e1a00005 e08f1001 ebffbfa5 e2504000 aaffffe5
[ 7459.041586] 1bc8  e1a00004 e8bd81f0 e5950004 ebffc237 e2800001 e5850008 e3500001 9affffec
[ 7459.050672] 1be8  e3a04000 eafffff5 00016ba9 00018cc4 e92d43f7 e1a05000 e1a08001 e1a07002
[ 7459.059759] 1c08  e1a09003 ebffbadc e5904008 e1a06000 e2144004 0a000007 e59f10c0 e1a03007
[ 7459.068846] 1c28  e1a02008 e1a00005 e08f1001 ebffbf87 e2504000 ba000003 e5963008 e3130002
[ 7459.077934]
[ 7459.077934] LR: 0xc01d1b48:
[ 7459.082657] 1b48  0a000003 e5962014 e7979002 e3590000 1a00004a e1a0300d e3c39d7f e3a02000
[ 7459.091744] 1b68  e3c9903f e1a08002 e59ba00c e59b3008 e35a0000 e58da03c e58d3000 ba000049
[ 7459.100830] 1b88  e7f001f2 e59d801c e10f2000 e3120080 1a000000 e7f001f2 e59b2014 e3120001
[ 7459.109916] 1ba8  0a000003 e59f13d8 e1a0000b ebff8d81 e7f001f2 e3a00001 e58d3000 ebfd8905
[ 7459.119003] 1bc8  e59b2008 e59d3000 e1530002 1a00001f e59b200c e15a0002 1a00001c e58d805c
[ 7459.128089] 1be8  e1a01fa8 e5db200f e1cb80bc e7ee8858 e7c72391 e5cb200f e1db20be e58b7008
[ 7459.137175] 1c08  e7ce2018 e1cb20be e59b2014 e3120001 0a000003 e59f1368 e1a0000b ebff8d65
[ 7459.146261] 1c28  e7f001f2 e3a00001 ebfd892e e5952004 e3520000 1a000003 e5952000 e3120002
[ 7459.155349]#2 Re: DIY/综合/Arduino/写字机/3D打印机/智能小车/平衡车/四轴飞行/MQTT/物联网 » 请问这种核心板 测试架/治具 金属丝/飞针 学名叫什么?淘宝有卖吗? » 2021-07-26 09:02:37
这个设计挺不错的, 只是多拔插几次核心板,探针上面的“金”也不擦得7788了吧,一样会氧化吧?
#3 Re: 全志 SOC » 分享F1C100S的TVD源码,TVIN0接CVBS摄像头采集数据显示到LCD屏 » 2021-02-14 19:01:41
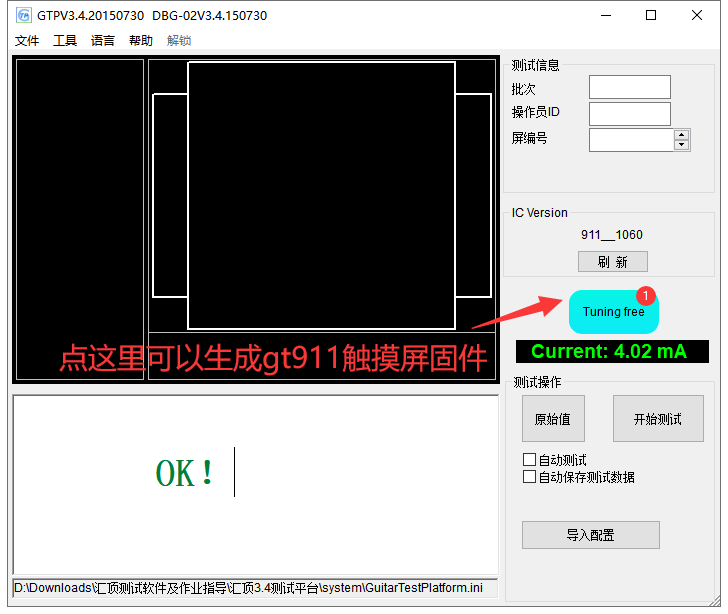
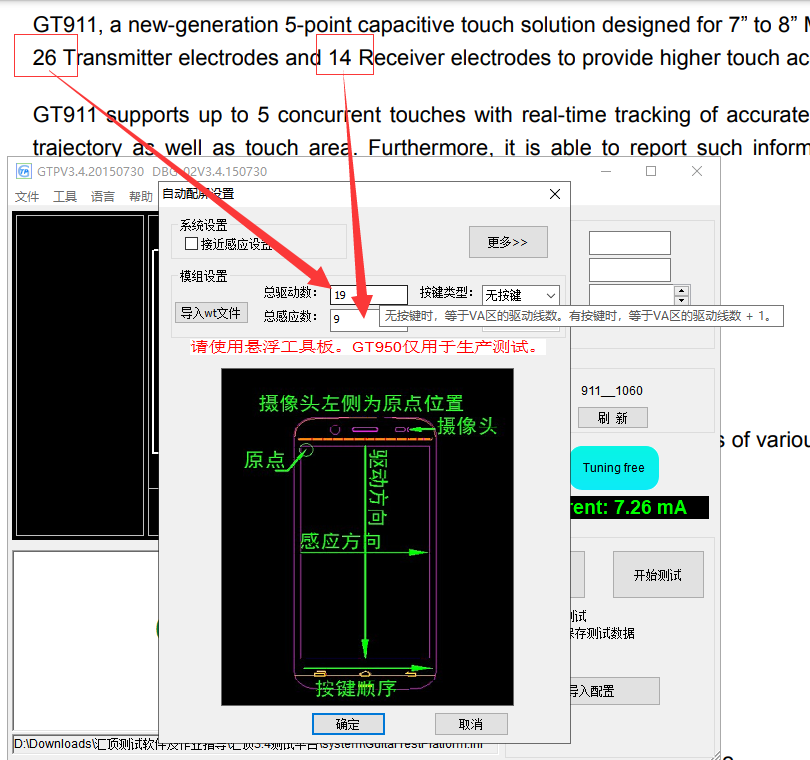
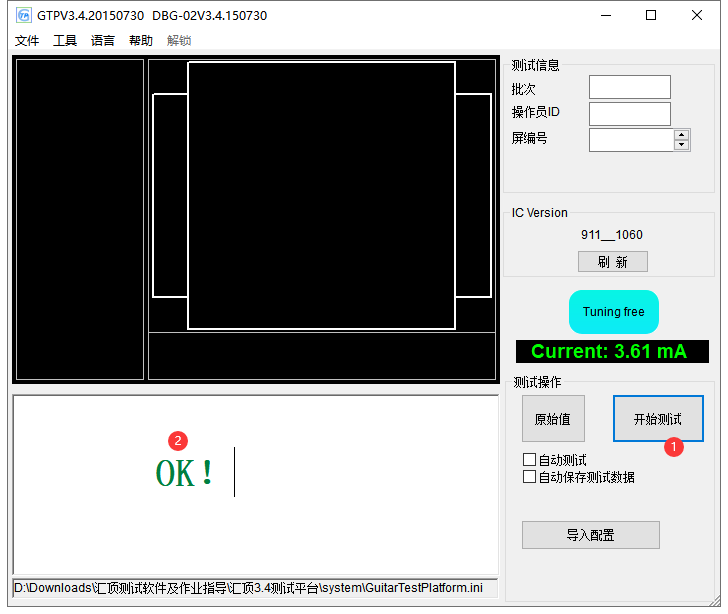
#4 Re: DIY/综合/Arduino/写字机/3D打印机/智能小车/平衡车/四轴飞行/MQTT/物联网 » 下单买了一个 汇顶 GT911/GT9xx 电容触摸屏产测工具 » 2021-02-13 22:53:27

#!/bin/bash

if [[ $# -lt 1 ]]; then
	echo "$0 fw_filename"
	exit 1
fi

file_in="$1"
file_out_bin=${file_in}.bin

print_val ()
{
	val="$1"
	printf "0x%.2x" "$val" | xxd -r -p >> ${file_out_bin}
}

rm -f ${file_out_bin}

size=`cat ${file_in} | wc -w`

checksum=0
i=1
for val in `cat ${file_in}`; do
	val="0x$val"
	if [[ $i == $size ]]; then
		# Config_Fresh
		print_val 0x01
	elif [[ $i == $((size-1)) ]]; then
		# Config_Chksum
		checksum=$(( (~ checksum + 1) & 0xFF))
		print_val $checksum
	else
		checksum=$((checksum + val))
		print_val $val
	fi
	i=$((i+1))
done

echo "Wrote ${file_out_bin}"
生成的 cfg 文件用 touch-goodix-generate-fw.sh 转化成 /lib/firmware/goodix_911_cfg.bin 即可.
#5 Re: 全志 SOC » 全志F10 F15 Melis OS SDK » 2020-12-05 08:09:39
#6 Re: DIY/综合/Arduino/写字机/3D打印机/智能小车/平衡车/四轴飞行/MQTT/物联网 » AP6212无法使用的问题请教 » 2020-10-25 08:26:10
&i2c0 {
	status = "okay";

	hym8563: hym8563@51 {
		compatible = "haoyu,hym8563";
		reg = <0x51>;
		#clock-cells = <0>;
		clock-frequency = <32768>;
		clock-output-names = "xin32k";
	};
};

	sdio_pwrseq: sdio-pwrseq {
		compatible = "mmc-pwrseq-simple";
		clocks = <&hym8563>;
		/* clock-names = "ext_clock"; */
		pinctrl-names = "default";
		pinctrl-0 = <&wifi_enable_h>;

		/*
		 * On the module itself this is one of these (depending
		 * on the actual card populated):
		 * - SDIO_RESET_L_WL_REG_ON
		 * - PDN (power down when low)
		 */
		reset-gpios = <&gpio2 26 GPIO_ACTIVE_LOW>; /* GPIO2_D2 */
	};

	wireless-bluetooth {
		compatible = "bluetooth-platdata";
		clocks = <&hym8563>;
		clock-names = "ext_clock";
		uart_rts_gpios = <&gpio3 6 GPIO_ACTIVE_LOW>;
		pinctrl-names = "default", "rts_gpio";
		pinctrl-0 = <&uart11_rts>;
		pinctrl-1 = <&uart11_rts_gpio>;
		BT,power_gpio = <&gpio2 29 GPIO_ACTIVE_HIGH>;
		BT,wake_host_irq = <&gpio3 26 GPIO_ACTIVE_HIGH>;
		status = "okay";
	};
这个好像是用外部rtc芯片给wifi提供32k?
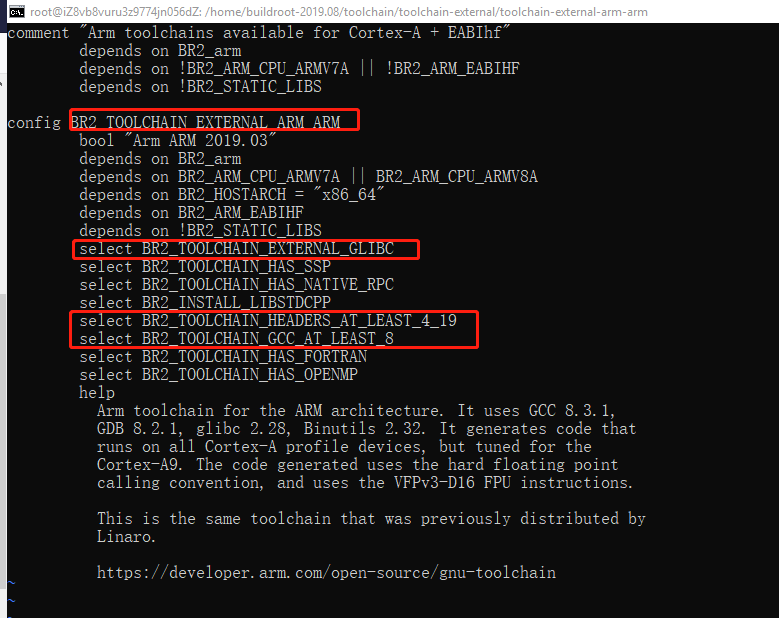
#7 Re: VMWare/Linux/Ubuntu/Fedora/CentOS/U-BOOT » 请教大家,如何设置buildroot可以生成目标平台gcc编译工具,我想直接ssh连到板上开发程序 » 2020-10-16 23:00:14
#
# Legacy options removed in 2013.08
#
# BR2_ARM_OABI is not set
# BR2_PACKAGE_DOSFSTOOLS_DOSFSCK is not set
# BR2_PACKAGE_DOSFSTOOLS_DOSFSLABEL is not set
# BR2_PACKAGE_DOSFSTOOLS_MKDOSFS is not set
# BR2_ELF2FLT is not set
# BR2_VFP_FLOAT is not set
# BR2_PACKAGE_GCC_TARGET is not set
# BR2_HAVE_DEVFILES is not set
2013.08 之前版本的buildroot还真有这个功能: BR2_PACKAGE_GCC_TARGET
不知道为什么新版的把这个功能阉割了
#8 Re: GM8135s/GM8136s/GM8135/GM8136/GM8125/GM8126 » GM8135s入坑记录 » 2020-10-11 12:46:51
楼主,我的海尔摄像机坏了,我用串口通信发现
will read ps5270 ,the id is : 0x0
i2c i2c-0: I2C TX data 0x60 timeout!
Fail to finish Ii2c i2c-0: NAK!
2C transaction, error =-1
i2c i2c-0: I2C TX data 0x60 timeout!
Fail to finish Ii2c i2c-0: NAK!
2C transaction, error =-1
请问是主芯片坏了,还是i2c从芯片坏了,还是固件有文件
1. 可能CMOS感光芯片坏了
2. 可能CPU的i2c引脚挂了
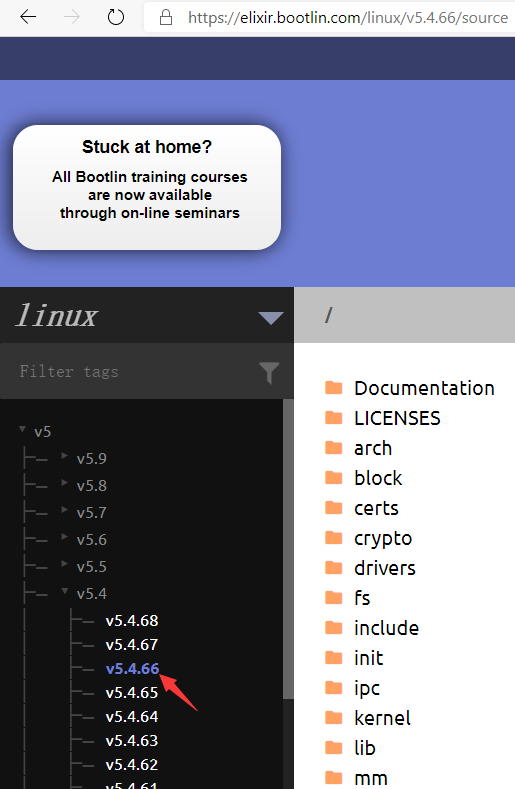
#11 Re: VMWare/Linux/Ubuntu/Fedora/CentOS/U-BOOT » 请教为什么 torvalds/linux/ 找不到这些 v5.4.66 这种标签? » 2020-10-01 21:24:38
#12 VMWare/Linux/Ubuntu/Fedora/CentOS/U-BOOT » 请教为什么 torvalds/linux/ 找不到这些 v5.4.66 这种标签? » 2020-10-01 20:34:07
- 我思故我在
- 回复: 3
#13 Re: 全志 SOC » 荔枝派zero/小智极客S3/V3s使用sunxi-fel 借 u-boot 启动 Linux系统, 无需 spi flash / TF 卡 » 2020-09-27 19:59:30
裸奔测试程序: v3s_s3_fel_autorun_linux_uart2_pb0_pb0_0x41000000.zip
双击 run_0x41000000.bat usb fel 即可运行裸奔程序 v3s_0x41000000.bin, 串口 uart2 (PB0/PB1) 有输出.
#14 Re: 全志 SOC » Windows裸机程序烧录工具,烧录到SD卡 » 2020-09-27 18:54:29
#15 Re: 全志 SOC » RTT下的CSI调试 » 2020-09-23 18:30:08

#20 Re: 全志 SOC » fb0用mmap申请内存刷屏发现分辨率不对 » 2020-09-13 18:37:41
#25 Re: 技术人生/软件使用技巧/破解经验/技术吐槽/灌水 » 大家快来看我的笑话! » 2020-09-12 23:15:29
#26 Re: 技术人生/软件使用技巧/破解经验/技术吐槽/灌水 » 大家快来看我的笑话! » 2020-09-12 22:44:31
我思故我在 说:http://www.xinhuanet.com/politics/2020-06/22/c_1126144559.htm
总理语重心长地强调中国有“6亿中低收入及以下人群,他们平均每个月的收入也就1000元左右”,一时引发海内外舆论热议。
似乎我就是其中一员,干工厂我一年只上几个月的班。平均5k,一年也就那么点钱。各种厂垃圾,就是稳不住。
冒昧问下你的学历如何? 深圳机会很多, 如果不满意, 跳槽很方便的.
#27 Re: 技术人生/软件使用技巧/破解经验/技术吐槽/灌水 » 大家快来看我的笑话! » 2020-09-12 22:30:09
redstar 说:还有六亿人口月收入不足1000块,你至少打败了全国七亿人民。
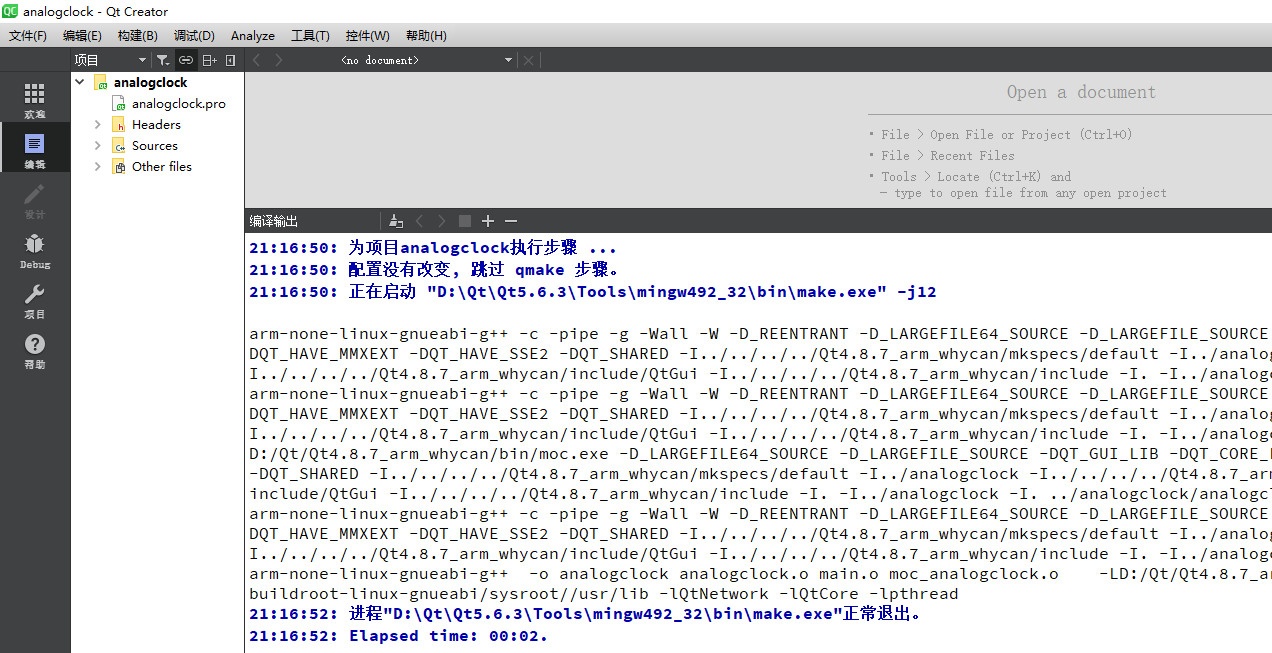
怎么可能?失业人口这么多?
http://www.xinhuanet.com/politics/2020-06/22/c_1126144559.htm
总理语重心长地强调中国有“6亿中低收入及以下人群,他们平均每个月的收入也就1000元左右”,一时引发海内外舆论热议。
#28 Re: 全志 SOC » linux驱动开发的printk打印怎么设置不打印时间戳? » 2020-09-06 12:55:03
#30 Re: 全志 SOC » f1c200 random 随机数问题 » 2020-08-30 12:52:33
#31 Re: 全志 SOC » f1c200 random 随机数问题 » 2020-08-30 11:44:43
#35 Re: 全志 SOC » 看f1c100s裸奔程序受到的启发 » 2020-08-30 11:28:35
#41 Re: RK3288/RK3399/RK1108 » 3399AI开发板值得买吗? » 2020-08-11 22:14:52
#42 Re: 8051/STC8/AT89C51/N76E003 » WCH的ch579介绍 » 2020-08-04 10:55:09
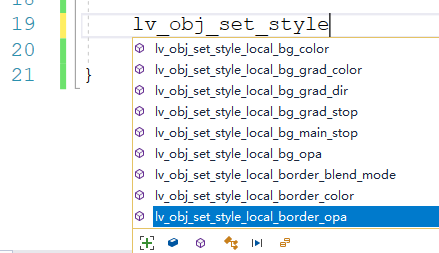
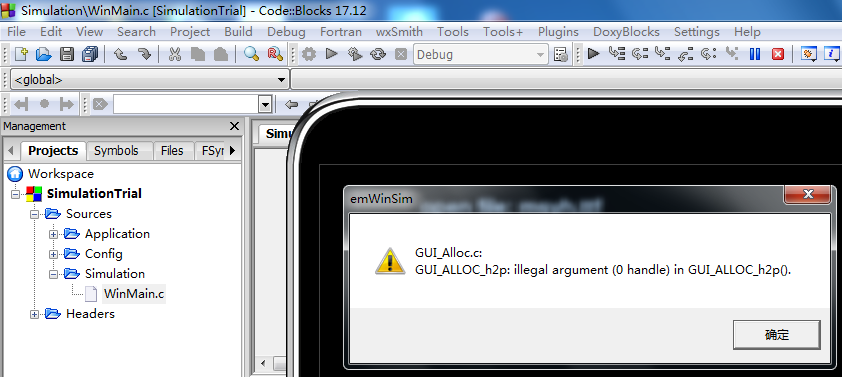
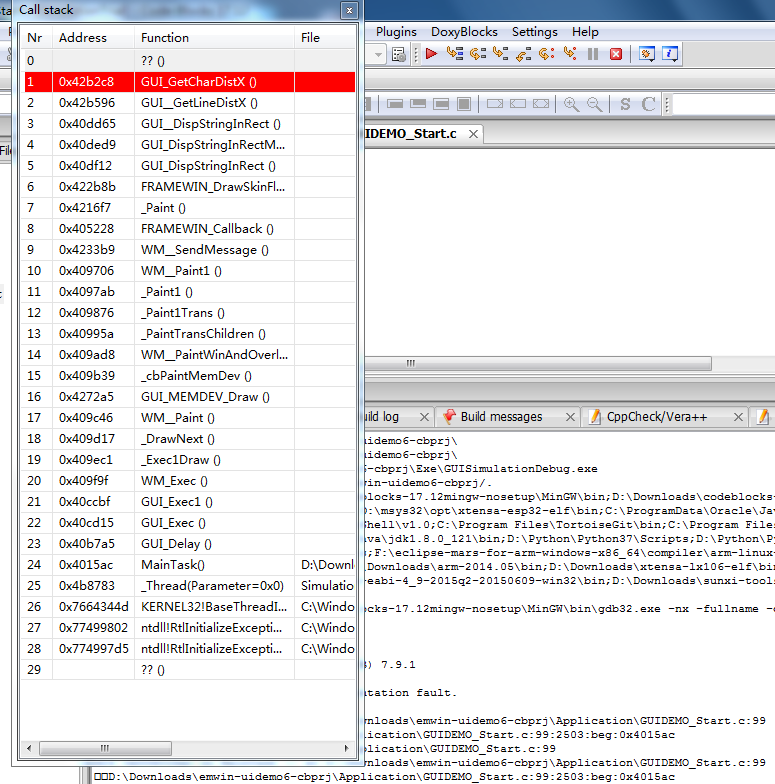
#44 计算机图形/GUI/RTOS/FileSystem/OpenGL/DirectX/SDL2 » 请教各位, LVGL 无法显示汉字 » 2020-08-02 22:57:41
- 我思故我在
- 回复: 8
现象和这个一样: https://github.com/lvgl/lvgl/issues/1662
这个是我的代码:
lv_obj_set_style_local_text_font(label1, LV_LABEL_PART_MAIN, LV_STATE_DEFAULT, &lv_font_simsun_16_cjk);

lv_label_set_text(label1, "ABC\xE4\xB8\x80\xE4\xB8\x83ZZZ"); //"一七"
#45 Re: 全志 SOC » F1C100 使用GPIO模拟SPI 驱动 st7789手表屏 » 2020-08-02 22:28:34
#46 Re: 计算机图形/GUI/RTOS/FileSystem/OpenGL/DirectX/SDL2 » LVGL7接口变化挺大的, lv_label_set_style 这种接口已经没有了. » 2020-08-02 18:07:55
#47 Re: 计算机图形/GUI/RTOS/FileSystem/OpenGL/DirectX/SDL2 » LVGL7接口变化挺大的, lv_label_set_style 这种接口已经没有了. » 2020-08-02 17:36:13
#48 计算机图形/GUI/RTOS/FileSystem/OpenGL/DirectX/SDL2 » LVGL7接口变化挺大的, lv_label_set_style 这种接口已经没有了. » 2020-08-02 16:05:29
#50 Re: VMWare/Linux/Ubuntu/Fedora/CentOS/U-BOOT » Windows使用dd命令烧写U盘(TF卡), 该命令功能太强大,谨慎使用,动辄硬盘灰飞烟灭!!! » 2020-07-21 19:44:43
#51 Re: 全志 SOC » 不得不说, V3s的RTC就是渣渣, 电流10uA, 导致CR2032纽扣电池很快就放完电了, 不得不赶工改用PCF8563或者别的RTC » 2020-07-19 11:56:28
#52 Re: 全志 SOC » V3S 从 spi Nand 启动,有没有讲的比较清楚的 » 2020-07-16 09:52:49
Some SoCs can also boot from SPI NAND flash. Here the BROM tries to read a valid first stage bootloader starting from page number 0, 32, 64, 96, 128, 160, 192 and 224. It only reads the first 1024 bytes from every page. Since it simply sends the standard SPI NAND flash commands, it is a good idea to use a flash with ECC turned on by default and is performed by the flash itself, since errors cannot otherwise be corrected.
社区很早就写着了只是不明显。
https://linux-sunxi.org/Bootable_SPI_flash
嗯,这个不错,清晰明了.
#53 Re: 全志 SOC » 编译 V3s 2019 版本的 u-boot » 2020-07-16 09:50:24
#54 Re: 全志 SOC » 荔枝派nano运行Tina问题 » 2020-07-16 09:49:34
#55 Re: 全志 SOC » 荔枝派nano运行Tina问题 » 2020-07-16 09:38:24
#56 Re: 全志 SOC » V3S 从 spi Nand 启动,有没有讲的比较清楚的 » 2020-07-15 20:00:28
#57 Re: 全志 SOC » 全志V3s只有一个spi口,我用spi flash作为存储和启动设备,那么这组spi还可以接其他设备吗,比如MFRC522,nrf24L01 » 2020-07-15 15:38:18
#58 Re: 全志 SOC » liche pi的uboot v3s_current中打开spl的i2c来配置v3s的pmu后,编译出现i2c没有定义问题? » 2020-07-14 14:52:47
#61 Re: 全志 SOC » 内核都启动了 但是一直打印fatal err updata clk timeout » 2020-06-30 15:54:49
PG0-5 那口的上下拉电阻可能也有问题。
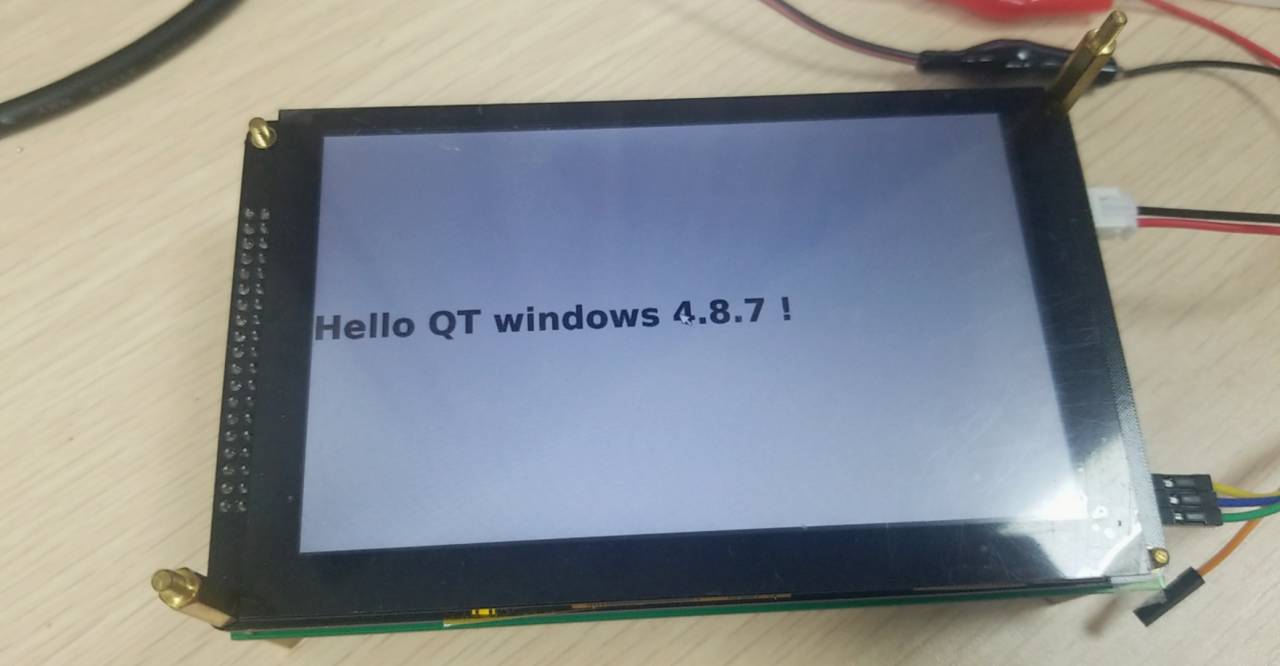
#62 Re: 全志 SOC » 也发一个荔枝派zero 全志V3s 32M spi flash 固件,800x480 LCD, 开机自动运行 Qt analogclock » 2020-06-28 17:17:11
感谢 @路漫漫 你的分享, 关于有线网线检测可以试一试这个:
http://blog.sina.com.cn/s/blog_1a39e3c4a0102z23x.html
这个不错,
刚刚查了一下, 这个文件指示网卡状态改变次数: /sys/class/net/eth0/carrier_changes
这个文件指示当前状态: /sys/class/net/eth0/carrier
#64 Re: DIY/综合/Arduino/写字机/3D打印机/智能小车/平衡车/四轴飞行/MQTT/物联网 » 真受不了这个win10, 天天趁我睡觉更新重启, 把虚拟机又弄没了。 » 2020-06-17 08:24:58
#65 DIY/综合/Arduino/写字机/3D打印机/智能小车/平衡车/四轴飞行/MQTT/物联网 » 真受不了这个win10, 天天趁我睡觉更新重启, 把虚拟机又弄没了。 » 2020-06-17 08:23:44

#68 Re: 全志 SOC » F1C200S PDA手持机调试 » 2020-06-07 16:49:43
#70 Re: Nuvoton N32905/N32926/NUC972/N9H20/N9H26/N9H30 » 使用buildroot构建NUC972文件系统 过程中 applications-1.0.0.tar.gz 文件解压出错 . » 2020-06-07 16:34:04
谁有applications-1.0.0.tar.gz 共享下,我也是在下载这个的时候卡住了
可以手动下载,然后复制到dl目录: https://whycan.cn/t_2639.html
#72 Re: DIY/综合/Arduino/写字机/3D打印机/智能小车/平衡车/四轴飞行/MQTT/物联网 » 请问 AP6212 可以同时做 热点 和 WIFI网卡吗? » 2020-06-05 15:15:55
#73 全志 SOC » V3s Linux4.13 的USB不能枚举设备了 » 2020-06-04 15:10:47
- 我思故我在
- 回复: 0
[    4.016823] rtc-pcf8563 0-0051: low voltage detected, date/time is not reliable.
[    4.038809] dwmac-sun8i 1c30000.ethernet eth0: device MAC address ce:61:db:3b:bc:44
[    4.050021] Generic PHY stmmac-0:01: attached PHY driver [Generic PHY] (mii_bus:phy_addr=stmmac-0:01, irq=-1)
[    4.063362] dwmac-sun8i 1c30000.ethernet eth0: No MAC Management Counters available
[    4.071209] dwmac-sun8i 1c30000.ethernet eth0: PTP not supported by HW
[    5.314400] jffs2: notice: (94) jffs2_get_inode_nodes: Wrong magic bitmask 0x0000 in node header at 0x10000c.
[    7.212177] dwmac-sun8i 1c30000.ethernet eth0: Link is Up - 100Mbps/Full - flow control off
[    9.508975] usb 2-1: new low-speed USB device number 2 using ohci-platform
[    9.948970] usb 2-1: device not accepting address 2, error -62
[   10.148999] usb 2-1: new low-speed USB device number 3 using ohci-platform
[   10.588951] usb 2-1: device not accepting address 3, error -62
[   10.594977] usb usb2-port1: unable to enumerate USB device
开机就这样, 再怎么插U盘, 鼠标键盘都没有反应, 这是为什么呢?
#74 Re: DIY/综合/Arduino/写字机/3D打印机/智能小车/平衡车/四轴飞行/MQTT/物联网 » AIR720拨号到xx局的网络呢?最近手里面有一个项目, 没有头绪 » 2020-06-03 17:18:12
关注, 想不到 AIR724 还有这种问题?
随手操作了一下 AIR720, 标记一下:
感谢回复。
AIR720执行命令, 可以获取到IP, 可以连接服务器:
AT+AUTOAPN=0
AT*CGDFLT=1,"IP","private.vpdn",,,,,,,,,,,,,,,,,,1
AT*CGDFAUTH=1,1,"dghbj2@dghbj2.vpdn.gd","88888888"
但是 AIR724, 执行这个命令设置:
AT+CGDCONT=1,"IP","private.vpdn",
AT+CGAUTH=1,1,"dghbj2@dghbj2.vpdn.gd","88888888"
用这两个命令反查:
AT+CGDCONT?
AT+CGAUTH?
结果是对的, 但是就是没有获取到IP地址:
AT+CGDCONT?
+CGDCONT: 1,"IP","private","IPV4:0.0.0.0",0,0
+CGDCONT: 5,"IP","CTNET","10.2.238.182",0,0OK
AT+CGAUTH?+CGAUTH: 1,1,"dghbj2@dghbj2.vpdn.gd","88888888"
+CGAUTH: 5,0,"",""OK
当然更无法连服务器。
#75 Re: DIY/综合/Arduino/写字机/3D打印机/智能小车/平衡车/四轴飞行/MQTT/物联网 » AIR720拨号到xx局的网络呢?最近手里面有一个项目, 没有头绪 » 2020-06-03 16:34:24
#关闭自动APN模式
AT+AUTOAPN=0#设置apn网络名称
AT*CGDFLT=1,"IP","priv.vpdn",,,,,,,,,,,,,,,,,,1#设置密码
AT*CGDFAUTH=1,0,"gd3@gd3.vpnd.xj","9999"
用大佬你这个命令在 AIR720上面就可以用, 连接服务器正常。
但是上面的命令AIR724不支持。
我到网上找了两个命令, 经测试AIR724 AT固件可以用:
AT+CGDCONT=1,"IP","private.vpdn",
AT+CGAUTH=1,0,"dghbj2@dghbj2.vpdn.gd","88888888"
但是仍然连不上服务器, 心态要奔溃了。
#76 Re: DIY/综合/Arduino/写字机/3D打印机/智能小车/平衡车/四轴飞行/MQTT/物联网 » AIR720拨号到xx局的网络呢?最近手里面有一个项目, 没有头绪 » 2020-06-03 13:46:58
#77 Re: DIY/综合/Arduino/写字机/3D打印机/智能小车/平衡车/四轴飞行/MQTT/物联网 » AIR720拨号到xx局的网络呢?最近手里面有一个项目, 没有头绪 » 2020-06-03 13:41:26
#关闭自动APN模式
AT+AUTOAPN=0#设置apn网络名称
AT*CGDFLT=1,"IP","priv.vpdn",,,,,,,,,,,,,,,,,,1#设置密码
AT*CGDFAUTH=1,0,"gd3@gd3.vpnd.xj","9999"
这个AT命令在AIR724已经不管用了
全返回 +CME ERROR: 58 错误
AT+AUTOAPN=0

+CME ERROR: 58
AT*CGDFLT=1,"IP","private12.vpdn",,,,,,,,,,,,,,,,,,1

+CME ERROR: 58
AT*CGDFAUTH=1,0,"dghbj235@dghbj21.vpdn.gd","999"

+CME ERROR: 58
AT*CGDFAUTH=1,0,"dghbj235@dghbj21.vpdn.gd","999"

+CME ERROR: 58
AT*CGDFAUTH=1,1,"dghbj235@dghbj21.vpdn.gd","999"

+CME ERROR: 58#79 Re: 全志 SOC » DIY一块全志V3S的学习板,尽量引出所有功能(感谢晕哥支持) » 2020-06-02 22:14:57
https://whycan.cn/files/members/3311/QQ图片20200602215900.jpg
震惊,某男子恼羞成怒居然用这么残忍的方式折磨PCB
该男子居然以此为乐, 乐此不疲,乐不思蜀.
#81 全志 SOC » 如何让 /etc/init.d/ 这个目录里面的脚本能自动开机跑起来? » 2020-06-02 17:28:48
- 我思故我在
- 回复: 2
/etc/init.d/
S01syslogd
S02sysctl
S40network
S50dropbear
S02klogd
S20urandom
S41dhcpcd
S80dnsmasq
手动执行才会跑:
#
# /etc/init.d/S41dhcpcd restart
Stopping dhcpcd...
stopped /sbin/dhcpcd (pid 226)
Starting dhcpcd...
no interfaces have a carrier
forked to background, child pid 255
#
#
#
# /etc/init.d/S01syslogd restart
Stopping syslogd: OK
Starting syslogd: OK
#
#
#
#  /etc/init.d/S50dropbear restart
Stopping dropbear sshd: OK
Starting dropbear sshd: OK
#
#
#
# ps
PID   USER     COMMAND
    1 root     init
    2 root     [kthreadd]
    3 root     [rcu_gp]
    4 root     [rcu_par_gp]
    5 root     [kworker/0:0-pm]
    6 root     [kworker/0:0H-kb]
    7 root     [kworker/u8:0-br]
    8 root     [mm_percpu_wq]
    9 root     [ksoftirqd/0]
   10 root     [rcu_sched]
   11 root     [migration/0]
   12 root     [cpuhp/0]
   13 root     [cpuhp/1]
   14 root     [migration/1]
   15 root     [ksoftirqd/1]
   16 root     [kworker/1:0-pm]
   17 root     [kworker/1:0H-kb]
   18 root     [cpuhp/2]
   19 root     [migration/2]
   20 root     [ksoftirqd/2]
   21 root     [kworker/2:0-eve]
   22 root     [kworker/2:0H-kb]
   23 root     [cpuhp/3]
   24 root     [migration/3]
   25 root     [ksoftirqd/3]
   26 root     [kworker/3:0-pm]
   27 root     [kworker/3:0H-kb]
   28 root     [kdevtmpfs]
   29 root     [netns]
   30 root     [kworker/0:1-eve]
   31 root     [kworker/1:1-rcu]
   32 root     [kworker/2:1-mm_]
   33 root     [oom_reaper]
   34 root     [writeback]
   35 root     [kcompactd0]
   36 root     [crypto]
   37 root     [kblockd]
   38 root     [ata_sff]
   39 root     [watchdogd]
   40 root     [rpciod]
   41 root     [kworker/u9:0]
   42 root     [xprtiod]
   43 root     [kswapd0]
   44 root     [nfsiod]
   46 root     [kworker/u8:1-ev]
   68 root     [spi0]
   69 root     [kworker/3:1-mm_]
   70 root     [irq/23-sunxi-mm]
   71 root     [irq/24-sunxi-mm]
   72 root     [kworker/1:2-eve]
   73 root     [irq/25-sunxi-mm]
   74 root     [kworker/1:3-mm_]
   75 root     [kworker/1:4]
   76 root     [kworker/1:1H-kb]
   77 root     [kworker/0:1H-kb]
   79 root     [kworker/3:2-mm_]
   80 root     [kworker/3:1H-kb]
   81 root     [kworker/3:2H]
   82 root     [jbd2/mmcblk0p2-]
   83 root     [ext4-rsv-conver]
   84 root     [kworker/0:2H]
   86 root     [kworker/2:1H-kb]
  104 root     /sbin/klogd -n
  131 root     [kworker/u8:2-ev]
  134 root     [kworker/u8:3]
  144 root     [cfg80211]
  152 root     -/bin/sh
  155 root     [kworker/2:2H]
  156 root     [kworker/0:2-eve]
  157 root     [kworker/2:2]
  159 root     [brcmf_wq/mmc1:0]
  161 root     [brcmf_wdog/mmc1]
  162 root     [ksdioirqd/mmc1]
  183 root     wpa_supplicant -i wlan0 -D wext -c /etc/wpa_supplicant.conf -B
  255 root     /sbin/dhcpcd -f /etc/dhcpcd.conf
  263 root     /sbin/syslogd -n
  274 root     /usr/sbin/dropbear -R
  276 root     ps
#
如何让他开机就执行?
#82 Re: 君正Ingenic/X1000/X2000/T10/T20/T30 » 潜水很久了, 今天注册发个帖子说说 buildroot busybox 里面 添加 http 网页服务器 » 2020-06-02 17:13:56
#83 Re: 全志 SOC » buildroot 与busybox » 2020-06-02 17:01:59
#85 Re: 全志 SOC » 请教下V3s启动内核后一直打印sunxi-mmc 1c10000.mmc: smc 1 err, cmd 5, RE !!问题 » 2020-06-01 17:37:34
#87 全志 SOC » SDIO ESP8089开源Linux驱动现在可以直接编译通过了, 有没有朋友一起试一试 » 2020-05-09 11:04:31
- 我思故我在
- 回复: 55
1. 克隆:
git clone https://github.com/al177/esp8089
2. 编译:
ARCH=arm CROSS_COMPILE=arm-linux-gnueabihf- make -C ~/A33/mainline/linux M=$(PWD) modules
$ ARCH=arm CROSS_COMPILE=arm-linux-gnueabihf- make -C ~/A33/mainline/linux  M=${PWD}  modules
make: Entering directory '/home/ubuntu/A33/mainline/linux'
  CC [M]  /home/ubuntu/A33/mainline/esp8089/esp_debug.o
  CC [M]  /home/ubuntu/A33/mainline/esp8089/sdio_sif_esp.o
  CC [M]  /home/ubuntu/A33/mainline/esp8089/spi_sif_esp.o
  CC [M]  /home/ubuntu/A33/mainline/esp8089/esp_io.o
  CC [M]  /home/ubuntu/A33/mainline/esp8089/esp_file.o
  CC [M]  /home/ubuntu/A33/mainline/esp8089/esp_main.o
  CC [M]  /home/ubuntu/A33/mainline/esp8089/esp_sip.o
  CC [M]  /home/ubuntu/A33/mainline/esp8089/esp_ext.o
  CC [M]  /home/ubuntu/A33/mainline/esp8089/esp_ctrl.o
  CC [M]  /home/ubuntu/A33/mainline/esp8089/esp_mac80211.o
/home/ubuntu/A33/mainline/esp8089/esp_mac80211.c: In function ‘beacon_tim_init’:
/home/ubuntu/A33/mainline/esp8089/esp_mac80211.c:372:2: warning: ‘memset’ used with constant zero length parameter; this could be due to transposed parameters [-Wmemset-transposed-args]
  memset(beacon_tim_saved, BEACON_TIM_SAVE_MAX, 0);
  ^~~~~~
/home/ubuntu/A33/mainline/esp8089/esp_mac80211.c: In function ‘hw_scan_done’:
/home/ubuntu/A33/mainline/esp8089/esp_mac80211.c:924:9: warning: ISO C90 forbids mixed declarations and code [-Wdeclaration-after-statement]
         struct cfg80211_scan_info info = {
         ^~~~~~
/home/ubuntu/A33/mainline/esp8089/esp_mac80211.c: In function ‘hw_scan_timeout_report’:
/home/ubuntu/A33/mainline/esp8089/esp_mac80211.c:958:9: warning: ISO C90 forbids mixed declarations and code [-Wdeclaration-after-statement]
         struct cfg80211_scan_info info = {
         ^~~~~~
  CC [M]  /home/ubuntu/A33/mainline/esp8089/esp_utils.o
  CC [M]  /home/ubuntu/A33/mainline/esp8089/esp_pm.o
  CC [M]  /home/ubuntu/A33/mainline/esp8089/testmode.o
  LD [M]  /home/ubuntu/A33/mainline/esp8089/esp8089.o
  Building modules, stage 2.
  MODPOST 1 modules
WARNING: "ieee80211_rx_napi" [/home/ubuntu/A33/mainline/esp8089/esp8089.ko] undefined!
WARNING: "ieee80211_queue_work" [/home/ubuntu/A33/mainline/esp8089/esp8089.ko] undefined!
WARNING: "ieee80211_hdrlen" [/home/ubuntu/A33/mainline/esp8089/esp8089.ko] undefined!
WARNING: "ieee80211_beacon_get_tim" [/home/ubuntu/A33/mainline/esp8089/esp8089.ko] undefined!
WARNING: "ieee80211_unregister_hw" [/home/ubuntu/A33/mainline/esp8089/esp8089.ko] undefined!
WARNING: "ieee80211_scan_completed" [/home/ubuntu/A33/mainline/esp8089/esp8089.ko] undefined!
WARNING: "wiphy_rfkill_start_polling" [/home/ubuntu/A33/mainline/esp8089/esp8089.ko] undefined!
WARNING: "ieee80211_stop_queues" [/home/ubuntu/A33/mainline/esp8089/esp8089.ko] undefined!
WARNING: "ieee80211_ready_on_channel" [/home/ubuntu/A33/mainline/esp8089/esp8089.ko] undefined!
WARNING: "ieee80211_tx_status" [/home/ubuntu/A33/mainline/esp8089/esp8089.ko] undefined!
WARNING: "ieee80211_alloc_hw_nm" [/home/ubuntu/A33/mainline/esp8089/esp8089.ko] undefined!
WARNING: "ieee80211_wake_queues" [/home/ubuntu/A33/mainline/esp8089/esp8089.ko] undefined!
WARNING: "ieee80211_remain_on_channel_expired" [/home/ubuntu/A33/mainline/esp8089/esp8089.ko] undefined!
WARNING: "ieee80211_stop_tx_ba_cb_irqsafe" [/home/ubuntu/A33/mainline/esp8089/esp8089.ko] undefined!
WARNING: "wiphy_rfkill_set_hw_state" [/home/ubuntu/A33/mainline/esp8089/esp8089.ko] undefined!
WARNING: "ieee80211_get_buffered_bc" [/home/ubuntu/A33/mainline/esp8089/esp8089.ko] undefined!
WARNING: "ieee80211_register_hw" [/home/ubuntu/A33/mainline/esp8089/esp8089.ko] undefined!
WARNING: "ieee80211_start_tx_ba_session" [/home/ubuntu/A33/mainline/esp8089/esp8089.ko] undefined!
WARNING: "ieee80211_free_hw" [/home/ubuntu/A33/mainline/esp8089/esp8089.ko] undefined!
WARNING: "ieee80211_start_tx_ba_cb_irqsafe" [/home/ubuntu/A33/mainline/esp8089/esp8089.ko] undefined!
WARNING: "ieee80211_stop_tx_ba_session" [/home/ubuntu/A33/mainline/esp8089/esp8089.ko] undefined!
  CC      /home/ubuntu/A33/mainline/esp8089/esp8089.mod.o
  LD [M]  /home/ubuntu/A33/mainline/esp8089/esp8089.ko
make: Leaving directory '/home/ubuntu/A33/mainline/linux'#88 Re: 全志 SOC » ESP8089工作一段时间后掉驱动的问题有人解决了吗? » 2020-05-09 11:02:01
现在还崩吗?我看 https://github.com/al177/esp8089.git 有更新, 但是没有关于崩溃的更新。
#89 Re: 全志 SOC » 买个全志arm9 F1C100s 方案的唱戏机回来拆一拆 » 2020-05-09 07:17:13
#91 Re: VMWare/Linux/Ubuntu/Fedora/CentOS/U-BOOT » 为什么我ssh连接远程服务器, 用&运行一个后台命令,由于我主动退出了ssh终端,这样刚刚运行的后台命令也挂了? » 2020-04-27 08:37:29
#92 Re: 全志 SOC » 终于把V3s三个串口全部榨干, 控制台只能用 ssh 了, 泪崩 (dropbear大法好,还能秘钥登录) » 2020-04-25 10:13:46
确实新建一个用户就能秘钥登录,但是 root 用户却不行, 正在查找原因。
参考这篇博文:
https://blog.csdn.net/huyuan7494/article/details/81627108
root 用户也搞定了, 公钥保存到这个目录就可以了: /root/.ssh/authorized_keys
刚刚一直不成功的原因是 /root 目录的拥有者是 sshd 用户,
改成 root 用户就可以了: chown -R root:root /root/
太感谢 @ifree64 大神了。
#94 Re: 全志 SOC » 荔枝派控制台信息直接输出到液晶屏而不是电脑串口 » 2020-04-25 10:01:32
#define CONFIG_BOOTARGS "console=ttyS0,115200 panic=5 rootwait root=/dev/mmcblk0p2 earlyprintk rw vt.global_cursor_default=0"
我把这一行的ttyS0改为fb0之后,一直卡在Starting kernel ...,就不动了
有没有把 ,115200 去掉?
console=fb0 panic=5 rootwait root=/dev/mmcblk0p2 earlyprintk rw vt.global_cursor_default=0
#95 Re: DIY/综合/Arduino/写字机/3D打印机/智能小车/平衡车/四轴飞行/MQTT/物联网 » 请问 modbus 的功能码 3/4 有什么区别? » 2020-04-25 09:25:50
https://github.com/stephane/libmodbus/blob/master/src/modbus.h
https://github.com/stephane/libmodbus/blob/master/src/modbus.c
#define MODBUS_FC_READ_HOLDING_REGISTERS    0x03
#define MODBUS_FC_READ_INPUT_REGISTERS      0x04
0x03 是holding register
0x04 是input register (readonly)
#97 Re: 全志 SOC » 终于把V3s三个串口全部榨干, 控制台只能用 ssh 了, 泪崩 (dropbear大法好,还能秘钥登录) » 2020-03-25 19:03:11
关于如何编译 dropbear 这个使用 buildroot menuconfig 找到这个软件包开启即可,
然后眼力不好找不到,可以直接打开 .config 文件编辑即可。使用方法可以参考这个:
https://blog.csdn.net/hai__yun/article/details/77966315使用步骤:
dropbear 密钥对登录没搞定,悲伤
#98 Re: 全志 SOC » v3s使用ubuntu根文件系统,加载驱动模块出现问题 » 2020-03-25 18:29:20
#100 Re: 全志 SOC » 试试F1C100s的硬件游标HWC » 2020-03-20 19:20:09
#102 Re: 计算机图形/GUI/RTOS/FileSystem/OpenGL/DirectX/SDL2 » @assert 分享的在littlevgl 调用freetye显示文字, 而不用通过字模软件生成 » 2020-01-12 11:50:00
对接是指如何调用吗?
调用方法可以参考晕哥这个帖子: https://whycan.cn/t_741.html文件系统改改代码估计未必需要, 把需要的字扣出来, 存到另外一个 ttf 文件里面, 然后把文件存数组。
剪裁ttf字库可以参考 中科世为 这个套路: https://developer.flythings.cn/docs/zh/font_cut_tool
噢, 这个好思路, 正愁我的微软雅黑太大呢, 其实也就用几个字而已。
#103 Re: 技术人生/软件使用技巧/破解经验/技术吐槽/灌水 » 据说这几天高速公路收费站乱成一团, 感觉这次zf有点鲁莽了,应该先找两个比较偏远的省份先试点,或者先开放一个省际收费站用于调试 » 2020-01-12 10:58:14

#104 Re: VMWare/Linux/Ubuntu/Fedora/CentOS/U-BOOT » 转发一个opengl 渲染到缓冲区,写到文件的 demo » 2020-01-12 09:48:15
#include <GL/glut.h>
void display(void)
{
	glClear(GL_COLOR_BUFFER_BIT);
	glColor4f(0.2f, 0.4f, 0.6f, 0.0f);
	glRectf(-0.5f, -0.5f, 0.5f, 0.5f);
	glFlush();
}

int main(int argc, char *argv[])
{
	glutInit(&argc, argv);
	glutInitDisplayMode(GLUT_RGB | GLUT_SINGLE);
	glutInitWindowPosition(100, 100);
	glutInitWindowSize(400, 400);
	glutCreateWindow("hello world");
	glutDisplayFunc(display);
	glutMainLoop();
	return 0;
}
顺手写了一个简单的opengl 程序。
#105 Re: VMWare/Linux/Ubuntu/Fedora/CentOS/U-BOOT » 转发一个opengl 渲染到缓冲区,写到文件的 demo » 2020-01-12 09:33:24
#106 Re: RK3288/RK3399/RK1108 » 以太网mac地址设置为随机,会影响联网吗? » 2019-12-14 08:31:32
#107 Re: 计算机图形/GUI/RTOS/FileSystem/OpenGL/DirectX/SDL2 » 发现一个轻量级UI, 移植到 STM32/STM8 不错 ----- µGUI/uGUI » 2019-11-15 08:25:34
#108 Re: DIY/综合/Arduino/写字机/3D打印机/智能小车/平衡车/四轴飞行/MQTT/物联网 » [bilibili] DIY亚克力/塑料瓶/泡沫板简易切割工具 » 2019-11-15 08:22:19
#110 Re: 全志 SOC » 分享一个 5寸的 800x480 的 f1c100s 固件, 感谢 @xm1994, 调试串口UART0 (PB8/PB9) » 2019-11-12 16:59:39
#111 Re: 全志 SOC » 无法安装模块 » 2019-11-12 16:24:55
#113 Re: 全志 SOC » licheePi zero 获取不到设备树方式驱动spi的clk怎么办? » 2019-11-12 15:31:51
https://lkml.org/lkml/2019/4/18/554
Oceanic 5205 5inMFD has MCP2515 CAN device connected via SPI1.
- via SPI1 bus
- vdd supplied by 5V supply along with PL2 enable pin
- xceiver supply same as vdd
- can oscillator connected at 20MHz
- PB2 gpio as interrupt pin
- PD6 gpio as RX_BUF1_CAN0
- PD7 gpio as RX_BUF0_CAN0
Tested-by: Tamas Papp <tamas@osukl.com>
Signed-off-by: Jagan Teki <jagan@amarulasolutions.com>
---
.../sun50i-a64-oceanic-5205-5inmfd.dts | 43 +++++++++++++++++++
1 file changed, 43 insertions(+)
diff --git a/arch/arm64/boot/dts/allwinner/sun50i-a64-oceanic-5205-5inmfd.dts b/arch/arm64/boot/dts/allwinner/sun50i-a64-oceanic-5205-5inmfd.dts
index f0cd6587f619..22535a297f51 100644
--- a/arch/arm64/boot/dts/allwinner/sun50i-a64-oceanic-5205-5inmfd.dts
+++ b/arch/arm64/boot/dts/allwinner/sun50i-a64-oceanic-5205-5inmfd.dts
@@ -21,6 +21,24 @@
chosen {
stdout-path = "serial0:115200n8";
};
+
+ can_osc: can-osc {
+ compatible = "fixed-clock";
+ #clock-cells = <0>;
+ clock-frequency = <20000000>;
+ };
+
+ reg_can_v5v: reg-can-v5v {
+ compatible = "regulator-fixed";
+ regulator-name = "reg-can-v5v";
+ regulator-min-microvolt = <5000000>;
+ regulator-max-microvolt = <5000000>;
+ regulator-boot-on;
+ enable-active-high;
+ gpio = <&r_pio 0 2 GPIO_ACTIVE_HIGH>; /* CAN_3V3_EN: PL2 */
+ status = "okay";
+ };
+
};
&ehci0 {
@@ -77,6 +95,31 @@
status = "okay";
};
+&pio {
+ can_pins: can-pins {
+ pins = "PD6", /* RX_BUF1_CAN0 */
+ "PD7"; /* RX_BUF0_CAN0 */
+ function = "gpio_in";
+ };
+};
+
+&spi1 {
+ status = "okay";
+
+ can@0 {
+ compatible = "microchip,mcp2515";
+ reg = <0>;
+ spi-max-frequency = <10000000>;
+ pinctrl-names = "default";
+ pinctrl-0 = <&can_pins>;
+ interrupt-parent = <&pio>;
+ interrupts = <1 2 IRQ_TYPE_EDGE_FALLING>; /* INT_CAN0: PB2 */
+ clocks = <&can_osc>;
+ vdd-supply = <®_can_v5v>;
+ xceiver-supply = <®_can_v5v>;
+ };
+};
+
&uart0 {
pinctrl-names = "default";
pinctrl-0 = <&uart0_pb_pins>;
--
2.18.0.321.gffc6fa0e3#114 Re: 全志 SOC » licheePi zero 获取不到设备树方式驱动spi的clk怎么办? » 2019-11-12 15:06:59
也可以参考这个,刚好也是全志的
https://github.com/armbian/sunxi-DT-overlays/blob/master/examples/spi-mcp251x.dts
			can0_osc_fixed: can0_osc_fixed {
				compatible = "fixed-clock";
				#clock-cells = <0>;
				clock-frequency  = <8000000>;
			};
mcp2515 {
reg = <0>;
compatible = "microchip,mcp2515";
pinctrl-names = "default";
pinctrl-0 = <&can0_pin_irq>;
spi-max-frequency = <10000000>;
interrupt-parent = <&pio>;
interrupts = <0 7 2>; /* PA7 IRQ_TYPE_EDGE_FALLING */
clocks = <&can0_osc_fixed>;
status = "okay";
};#116 Re: DIY/综合/Arduino/写字机/3D打印机/智能小车/平衡车/四轴飞行/MQTT/物联网 » 一年一度双十一又来到,大家的购物车里面有什么值得推荐的性价比商品? » 2019-11-11 08:13:05

#118 Re: 全志 SOC » V3s SPI NAND u-boot @openwrt » 2019-11-09 09:05:55
#119 Re: 技术人生/软件使用技巧/破解经验/技术吐槽/灌水 » 分享google搜索的一些小技巧 » 2019-11-09 08:39:48

#121 Re: 全志 SOC » 关于buildroot » 2019-11-08 17:13:50
#122 Re: 全志 SOC » v3s rtl8723bs开启蓝牙成功的姿势 » 2019-11-08 17:03:14
#123 Re: 全志 SOC » 关于buildroot » 2019-11-08 16:01:28
#124 Re: 全志 SOC » V3s SPI NAND u-boot @openwrt » 2019-11-07 14:53:07
#125 Re: 计算机图形/GUI/RTOS/FileSystem/OpenGL/DirectX/SDL2 » 移植lvgl,更新版本到6.0.0后,字体结构发生变化,不知道怎么修改?请大神赐教 » 2019-11-05 14:28:33
分享一个好用的 littlevgl 字体生成工具. https://whycan.cn/t_1350.html
#127 Re: 全志 SOC » 荔枝派Zero如何控制单个IO输入输出? » 2019-11-05 14:26:52
命令行控制 PB12 输出高低电平: https://whycan.cn/t_2439.html
#128 Re: 全志 SOC » 尝试从零构建F1C100s开发环境 » 2019-11-04 14:30:25
#129 Re: 站务公告/网站建设 » V3S LRADC按键 » 2019-11-04 14:29:22
# cat /proc/interrupts
           CPU0
 19:    4012472     GIC-0  27 Level     arch_timer
 21:          0     GIC-0  50 Level     /soc/timer@01c20c00
 22:          0     GIC-0  82 Level     1c02000.dma-controller
 23:          0     GIC-0 103 Level     musb-hdrc.1.auto
 24:          0     GIC-0 104 Level     ehci_hcd:usb1
 25:          0     GIC-0 105 Level     ohci_hcd:usb2
 30:          0     GIC-0  62 Level     sun4i-a10-lradc-keys
 33:        425     GIC-0  33 Level     ttyS1
 34:          8     GIC-0  34 Level     ttyS2
 35:    5740272     GIC-0  38 Level     mv64xxx_i2c
 36:        181     GIC-0 114 Level     eth0
 37:    1161519     GIC-0  97 Level     sun6i-spi
IPI0:          0  CPU wakeup interrupts
IPI1:          0  Timer broadcast interrupts
IPI2:          0  Rescheduling interrupts
IPI3:          0  Function call interrupts
IPI4:          0  CPU stop interrupts
IPI5:          0  IRQ work interrupts
IPI6:          0  completion interrupts
Err:          0
30: 0 GIC-0 62 Level sun4i-a10-lradc-keys
主线是这样的。
#130 Re: 全志 SOC » f1c100s和v3s没有内部温度传感器吗? » 2019-11-04 14:26:42
#131 Re: 全志 SOC » f1c100s和v3s没有内部温度传感器吗? » 2019-11-04 14:22:10
#132 Re: 计算机图形/GUI/RTOS/FileSystem/OpenGL/DirectX/SDL2 » UI Future Pack 未来UI视频演示 » 2019-11-04 14:05:22
#133 Re: 全志 SOC » 【汇总】最便宜的A5 A7 A8 A9 A53芯片汇总 » 2019-11-04 14:04:47
http://www.orangepi.cn/downloadresourcescn/
Orange Pi 2G-IoT
Android 源码更新:2019-02-18
Linux 源码更新:2017-08-14
社区文档更新:2019-06-12
官方工具 更新:2018-01-31
用户手册更新:2018-01-31
Ubuntu Server更新:2018-01-31
Debian Server更新:2018-01-31
Raspbian Server更新:2018-01-31
Android Tcard Startup更新:2018-01-31
Android Nand Startup更新:2018-01-31
Linux nand startup更新:2019-05-29
#134 Re: 全志 SOC » v3s的r8723bs驱动是不是也有问题 » 2019-11-04 14:02:35
看这个目录名staging: https://github.com/torvalds/linux/tree/master/drivers/staging/rtl8723bs
总觉得会有些小问题。
#135 Re: 全志 SOC » 全志A40I的video*切换问题? » 2019-10-28 16:00:15
#136 Re: 全志 SOC » linux-4.13.y 4.14 5.2有什么区别? » 2019-10-28 15:59:16
#137 Re: 全志 SOC » 利用fswebcam抓取图像 » 2019-10-28 15:26:26
#138 Re: 全志 SOC » 全志A40I的video*切换问题? » 2019-10-28 15:25:09
#139 Re: 全志 SOC » 全志A40I的video*切换问题? » 2019-10-28 15:14:02
#140 Re: DIY/综合/Arduino/写字机/3D打印机/智能小车/平衡车/四轴飞行/MQTT/物联网 » 你怎么用中文称呼它? » 2019-10-28 14:32:26
https://item.taobao.com/item.htm?id=36024938208
平底尖刀 电脑雕刻刀 木工雕刻精浮雕亚力克 pvc尖刀
#141 Re: 全志 SOC » 利用fswebcam抓取图像 » 2019-10-28 14:21:04
#142 Re: Php/Nodejs/Web/HTML5/Javascript/微信开发/Python » ubuntu 搭建 apache php mysql 运行环境,并在服务器恢复网站数据. » 2019-10-28 10:25:20
#144 Re: DIY/综合/Arduino/写字机/3D打印机/智能小车/平衡车/四轴飞行/MQTT/物联网 » 深水宝果然名不虚传, 标称32G的卡, 只能写进4G (打脸了, 确实是32G的,基本能用,质量未知,风险自担) » 2019-10-28 09:12:39
#146 Re: 君正Ingenic/X1000/X2000/T10/T20/T30 » 潜水很久了, 今天注册发个帖子说说 buildroot busybox 里面 添加 http 网页服务器 » 2019-10-28 08:44:43
#148 Re: 全志 SOC » 我想在V3S的Linux驱动RC522, 到底是在应用层直接uart驱动好,还是在驱动层用spi驱动好? » 2019-10-28 08:42:23
直接在应用层驱动就行了, 配合 libnfc: https://github.com/nfc-tools/libnfc
#149 Re: 全志 SOC » 各位大神荔枝派zero v3s怎么接 1024*600那种LVDS屏? » 2019-10-28 08:38:55
#150 Re: 全志 SOC » Linux系统开机到启动应用 最快的方法需要几s » 2019-10-28 08:37:39
#151 Re: 全志 SOC » f1c100s 一直重启 » 2019-10-26 08:23:39
#152 Re: 技术人生/软件使用技巧/破解经验/技术吐槽/灌水 » 少壮不努力,老大用红米, 终于抢到了传说中的 红米Note7, 这卡成狗的MI5可以退休了. » 2019-10-26 08:22:30
#154 Re: 全志 SOC » V3S的U-BOOT能读写U盘吗? » 2019-10-26 08:09:31
#155 Re: VMWare/Linux/Ubuntu/Fedora/CentOS/U-BOOT » VMWare虚拟机 Ubuntu gnome 没有动画效果, 而真机Ubuntu有动画效果的原因 » 2019-10-15 22:05:17
特意查了一下,我的mac air 是 Intel® HD Graphics 4000 显卡,
用的是 i915 驱动:
MacBookAir:~$ lsmod |grep i915
i915                 1818624  16
drm_kms_helper        180224  1 i915
drm                   483328  6 drm_kms_helper,i915
i2c_algo_bit           16384  1 i915
video                  49152  1 i915
驱动源码: https://github.com/torvalds/linux/tree/master/drivers/gpu/drm/i915
#156 Re: 全志 SOC » 发现淘宝有卖F1C100S源码的 » 2019-10-12 13:41:18
#157 Re: 全志 SOC » 刚入手f1c100s关于docker环境求教 » 2019-10-12 13:39:28
#158 Re: 全志 SOC » f1c100s烧写uboot没有log输出 » 2019-10-11 17:28:47
#159 Re: 全志 SOC » V3s内部的RTC很不准,误差每天接近两分钟!!!? » 2019-10-11 15:50:58
#160 Re: Php/Nodejs/Web/HTML5/Javascript/微信开发/Python » 现在web前端设计效果比起从前的MFC酷多了 » 2019-10-11 13:42:52
请问楼主,如何入门web前端设计?
我也在门外徘徊啊,不过根据网上大神经验,
学点 html,css,js基础, 然后就上 bootstrap/vue 框架, bilibili上面大把视频教程.
我正在研究 bootstrap, 这个发端于推特的前端框架看起来相当不错:
https://getbootstrap.com/docs/4.3/getting-started/introduction/
https://getbootstrap.com/docs/4.3/examples/
#161 Re: 全志 SOC » 荔枝派ZERO运行bsp内核加ov2640 » 2019-10-10 16:01:51
#162 Re: DIY/综合/Arduino/写字机/3D打印机/智能小车/平衡车/四轴飞行/MQTT/物联网 » “微软雅黑”不可商用!为了避免日后被字体公司索(qiao)赔(zha), 请尽快改用商业免费字体. » 2019-10-10 15:57:07
#163 Re: DIY/综合/Arduino/写字机/3D打印机/智能小车/平衡车/四轴飞行/MQTT/物联网 » “微软雅黑”不可商用!为了避免日后被字体公司索(qiao)赔(zha), 请尽快改用商业免费字体. » 2019-10-10 08:36:18
#166 Re: VMWare/Linux/Ubuntu/Fedora/CentOS/U-BOOT » ubuntu18.04 nvidia显卡GPU编程 » 2019-10-08 09:20:41
引言
在本指南中,我们将探讨使用C ++编程的GPU的强大功能。
开发人员可以期望使用C ++具有令人难以置信的性能,
并且使用低级语言访问GPU的强大功能可以生成一些当前可用的最快的计算。
要求条件
虽然任何能够运行现代版本Linux的计算机都可以支持C ++编译器,
但您将需要基于NVIDIA的显卡。如果没有GPU,
则可以使用Amazon Web Services或您喜欢的任何其他云服务提供商来激活实例。
如果决定使用物理机,请确保已安装专有的NVDIA驱动程序。您可以在以下位置找到有关此信息:
https://linuxhint.com/install-nvidia-drivers-linux/
除了驱动程序,您还需要CUDA工具包。在此示例中,我们将使用Ubuntu 16.04 LTS,
但是大多数主要Linux发行版都有可供下载的版本,可以在以下链接中找到:
https://developer.nvidia.com/cuda-downloads
对于Ubuntu,您应该选择下载.deb文件。下载的文件没有扩展名.deb,但是您可以轻松地重命名它。
然后,您可以使用以下命令进行安装:
sudo dpkg -i package-name.deb
可能会询问您是否要安装GPG密钥,如果要安装,请按照提供的说明进行安装。
完成后,更新您的存储库:
sudo apt-get update
sudo apt-get install cuda -y
完成后,建议您重新启动系统以确保所有内容均已正确加载。
GPU开发的好处
CPU处理许多不同的输入和输出,并且包含各种功能,
不仅可以处理各种必需的程序,而且还可以管理各种硬件配置。
它们还处理内存,缓存,系统总线,分段和I / O功能,使它们成为所有任务的服务器。
GPU相反,它们包含许多单独的处理器,它们专注于非常简单的数学函数。
因此,它们处理任务的速度比CPU快许多倍。通过专门研究标量函数(接受一个或多个输入并返回单个输出的函数),
它们以牺牲极度专业化为代价来实现极高的性能。
样例代码
在此示例中,我们将添加两个向量。添加一个带有CPU的版本和一个带有GPU的版本以进行速度比较。
gpu-example.cu 文件包含以下代码:
#include "cuda_runtime.h"
#include <stdio.h>
#include <stdlib.h>
#include <iostream>
#include <cstdio>
#include <chrono>

typedef std::chrono::high_resolution_clock Clock;

#define ITER 65535

// Version CPU de la función suma de vectores
void vector_add_cpu(int *a, int *b, int *c, int n) {
    int i;

    // Add the vector elements a and b to the vector c
    for (i = 0; i < n; ++i) {
    c[i] = a[i] + b[i];
    }
}

// Versión GPU de la función suma de vectores
__global__ void vector_add_gpu(int *gpu_a, int *gpu_b, int *gpu_c, int n) {
    int i = threadIdx.x;
    // No es necesario el loop for por que el runtime de CUDA
    // maneja estos hilos ITER veces
    gpu_c[i] = gpu_a[i] + gpu_b[i];
}

int main() {

    int *a, *b, *c;
    int *gpu_a, *gpu_b, *gpu_c;

    a = (int *)malloc(ITER * sizeof(int));
    b = (int *)malloc(ITER * sizeof(int));
    c = (int *)malloc(ITER * sizeof(int));

    // Necesitamos variables accesibles en CUDA,
    // para eso cudaMallocManaged nos las provee
    cudaMallocManaged(&gpu_a, ITER * sizeof(int));
    cudaMallocManaged(&gpu_b, ITER * sizeof(int));
    cudaMallocManaged(&gpu_c, ITER * sizeof(int));

    for (int i = 0; i < ITER; ++i) {
        a[i] = i;
        b[i] = i;
        c[i] = i;
    }

    // Llama a la versión CPU y la temporiza
    auto cpu_start = Clock::now();
    vector_add_cpu(a, b, c, ITER);
    auto cpu_end = Clock::now();
    std::cout << "vector_add_cpu: "
    << std::chrono::duration_cast<std::chrono::nanoseconds>(cpu_end - cpu_start).count()
    << " nanoseconds.\n";

    // Llama a la versión GPU y la temporiza
    // Los triples <> es una extensión del runtime CUDA que permite
    // que los parametros de una llamada al kernel CUDA sean pasados
    // En este ejemplo estamos pasando un thread block con ITER threads
    auto gpu_start = Clock::now();
    vector_add_gpu <<<1, ITER>>> (gpu_a, gpu_b, gpu_c, ITER);
    cudaDeviceSynchronize();
    auto gpu_end = Clock::now();
    std::cout << "vector_add_gpu: "
    << std::chrono::duration_cast<std::chrono::nanoseconds>(gpu_end - gpu_start).count()
    << " nanoseconds.\n";

    // Libere la memoria basada en la función GPU allocations
    cudaFree(a);
    cudaFree(b);
    cudaFree(c);

    // Libere la memoria basada en la función CPU allocations
    free(a);
    free(b);
    free(c);

    return 0;
}
Makefile包含:
INC=-I/usr/local/cuda/include
NVCC=/usr/local/cuda/bin/nvcc
NVCC_OPT=-std=c++11

all:
    $(NVCC) $(NVCC_OPT) gpu-example.cu-o gpu-example

clean:
    -rm -f gpu-example
要运行该示例,请首先编译:
make
然后运行程序:
./gpu-example
如您所见,CPU版本的运行速度明显慢于GPU版本。
如果不是,则必须将gpu-example.cu 中定义的ITER设置为更高的数字。
这是因为GPU的配置时间比一些占用大量CPU的较小循环更长。
我发现65535在我的机器上可以正常工作,但是其里程可能会有所不同。
但是,一旦清除此阈值,GPU就会比CPU快得多。
结论
希望您从我们的C ++ GPU编程入门中学到很多。前面的示例并没有太大的成就,
但是演示的概念提供了一个框架,您可以使用该框架合并您的想法以释放GPU的功能。
#167 VMWare/Linux/Ubuntu/Fedora/CentOS/U-BOOT » ubuntu18.04 nvidia显卡GPU编程 » 2019-10-08 09:14:00
- 我思故我在
- 回复: 3
wget https://developer.download.nvidia.com/compute/cuda/repos/ubuntu1804/x86_64/cuda-ubuntu1804.pin
sudo mv cuda-ubuntu1804.pin /etc/apt/preferences.d/cuda-repository-pin-600
wget http://developer.download.nvidia.com/compute/cuda/10.1/Prod/local_installers/cuda-repo-ubuntu1804-10-1-local-10.1.243-418.87.00_1.0-1_amd64.deb
sudo dpkg -i cuda-repo-ubuntu1804-10-1-local-10.1.243-418.87.00_1.0-1_amd64.deb
sudo apt-key add /var/cuda-repo-10-1-local-10.1.243-418.87.00/7fa2af80.pub
sudo apt-get update
sudo apt-get -y install cuda
2. 测试代码:
https://linuxhint.com/gpu-programming-cpp/
https://eslinux.com/programacion-gpu-cuda/
gpu-example.cu:
#include "cuda_runtime.h"
#include <stdio.h>
#include <stdlib.h>
#include <iostream>
#include <cstdio>
#include <chrono>

typedef std::chrono::high_resolution_clock Clock;

#define ITER 65535

// CPU version of the vector add function
void vector_add_cpu(int *a, int *b, int *c, int n) {
    int i;

    // Add the vector elements a and b to the vector c
    for (i = 0; i < n; ++i) {
    c[i] = a[i] + b[i];
    }
}

// GPU version of the vector add function
__global__ void vector_add_gpu(int *gpu_a, int *gpu_b, int *gpu_c, int n) {
    int i = threadIdx.x;
    // No for loop needed because the CUDA runtime
    // will thread this ITER times
    gpu_c[i] = gpu_a[i] + gpu_b[i];
}

int main() {

    int *a, *b, *c;
    int *gpu_a, *gpu_b, *gpu_c;

    a = (int *)malloc(ITER * sizeof(int));
    b = (int *)malloc(ITER * sizeof(int));
    c = (int *)malloc(ITER * sizeof(int));

    // We need variables accessible to the GPU,
    // so cudaMallocManaged provides these
    cudaMallocManaged(&gpu_a, ITER * sizeof(int));
    cudaMallocManaged(&gpu_b, ITER * sizeof(int));
    cudaMallocManaged(&gpu_c, ITER * sizeof(int));

    for (int i = 0; i < ITER; ++i) {
        a[i] = i;
        b[i] = i;
        c[i] = i;
    }

    // Call the CPU function and time it
    auto cpu_start = Clock::now();
    vector_add_cpu(a, b, c, ITER);
    auto cpu_end = Clock::now();
    std::cout << "vector_add_cpu: "
    << std::chrono::duration_cast<std::chrono::nanoseconds>(cpu_end - cpu_start).count()
    << " nanoseconds.\n";

    // Call the GPU function and time it
    // The triple angle brakets is a CUDA runtime extension that allows
    // parameters of a CUDA kernel call to be passed.
    // In this example, we are passing one thread block with ITER threads.
    auto gpu_start = Clock::now();
    vector_add_gpu <<<1, ITER>>> (gpu_a, gpu_b, gpu_c, ITER);
    cudaDeviceSynchronize();
    auto gpu_end = Clock::now();
    std::cout << "vector_add_gpu: "
    << std::chrono::duration_cast<std::chrono::nanoseconds>(gpu_end - gpu_start).count()
    << " nanoseconds.\n";

    // Free the GPU-function based memory allocations
    cudaFree(a);
    cudaFree(b);
    cudaFree(c);

    // Free the CPU-function based memory allocations
    free(a);
    free(b);
    free(c);

    return 0;
}Makefile:
INC=-I/usr/local/cuda/include
NVCC=/usr/local/cuda/bin/nvcc
NVCC_OPT=-std=c++11

all:
    $(NVCC) $(NVCC_OPT) gpu-example.cu-o gpu-example

clean:
    -rm -f gpu-example
3. 运行:
gpu-test$ ./gpu-example
vector_add_cpu: 1370132 nanoseconds.
vector_add_gpu: 6445 nanoseconds.#168 VMWare/Linux/Ubuntu/Fedora/CentOS/U-BOOT » 为什么在VMWare虚拟机下面Ubuntu没有动画效果?而真机有接近苹果mac os 的动画效果,是因为GPU没开吗?如何开启虚拟机GPU? » 2019-10-07 10:04:56
#169 Re: 计算机图形/GUI/RTOS/FileSystem/OpenGL/DirectX/SDL2 » arm linux 下littlevgl设置成部分全透明的效果? » 2019-10-06 23:46:39
#170 Re: 全志 SOC » V3S BSP系统可以配置网络吗? » 2019-10-06 22:33:59
这个就是bsp的, ethernet 正常。
#171 Re: 全志 SOC » 重新制作文件系统以后,触摸屏不能使用 » 2019-10-06 18:20:39
#172 Php/Nodejs/Web/HTML5/Javascript/微信开发/Python » 谷歌这个人机身份验证是什么原理?勾选一下checkbox就通过了。 » 2019-10-06 18:05:05


#174 Re: Php/Nodejs/Web/HTML5/Javascript/微信开发/Python » 现在web前端设计效果比起从前的MFC酷多了 » 2019-10-06 16:49:15
https://stackoverflow.com/questions/55278867/video-not-playing-on-android-chrome-and-ios-safari
and most important -pix_fmt yuv420p as Android / iOS does not support Hi444PP profile as stated by aergistal
果然是不支持 444p
成功的把 UI 帖转成视频帖
#175 Re: 全志 SOC » 使用buildroot生成的qt,编译的应用程序不能运行 » 2019-10-06 16:45:10
#176 Re: Php/Nodejs/Web/HTML5/Javascript/微信开发/Python » 现在web前端设计效果比起从前的MFC酷多了 » 2019-10-06 16:37:42
因为命令行打开 firefox 浏览器, 点击前面的视频, 会提示:
[Child 25122, MediaDecoderStateMachine #2] WARNING: Decoder=7f1ed8a26800 Decode error: NS_ERROR_DOM_MEDIA_FATAL_ERR (0x806e0005) - mozilla::SupportChecker::AddMediaFormatChecker(const mozilla::TrackInfo&)::<lambda()>: Decoder may not have the capability to handle the requested video format with YUV444 chroma subsampling.: file /build/firefox-y_KX3Y/firefox-69.0.1+build1/dom/media/MediaDecoderStateMachine.cpp, line 3309
所以我非常确定像素格式引起,只是没想到苹果浏览器都播放不了。
#177 Re: Php/Nodejs/Web/HTML5/Javascript/微信开发/Python » 现在web前端设计效果比起从前的MFC酷多了 » 2019-10-06 16:34:24
现在 safari, chrome, firefox, yandex 都可以播放楼上的视频了。
ffmpeg参考: https://snippets.bentasker.co.uk/page-1904040945-FFMPEG-Convert-YUV444p-to-YUV420p-BASH.html


#183 Re: 全志 SOC » 使用buildroot生成的qt,编译的应用程序不能运行 » 2019-10-06 11:13:25
#184 Re: 全志 SOC » 买个全志arm9 F1C100s 方案的唱戏机回来拆一拆 » 2019-09-25 09:31:31
#185 Re: 全志 SOC » 使用F1C200S做一个视网膜电容屏,并带有AV摄像头的小MP4 » 2019-09-25 09:27:58
#186 Re: 计算机图形/GUI/RTOS/FileSystem/OpenGL/DirectX/SDL2 » [原创开源]emwin自定义控件1-卡片面板 » 2019-09-25 08:47:56
#187 Re: 计算机图形/GUI/RTOS/FileSystem/OpenGL/DirectX/SDL2 » [原创开源]emwin侧边导航框架支持按钮选中效果 » 2019-09-21 14:21:30
#188 Re: 计算机图形/GUI/RTOS/FileSystem/OpenGL/DirectX/SDL2 » [原创开源]emwin侧边导航框架支持按钮选中效果 » 2019-09-21 14:19:09
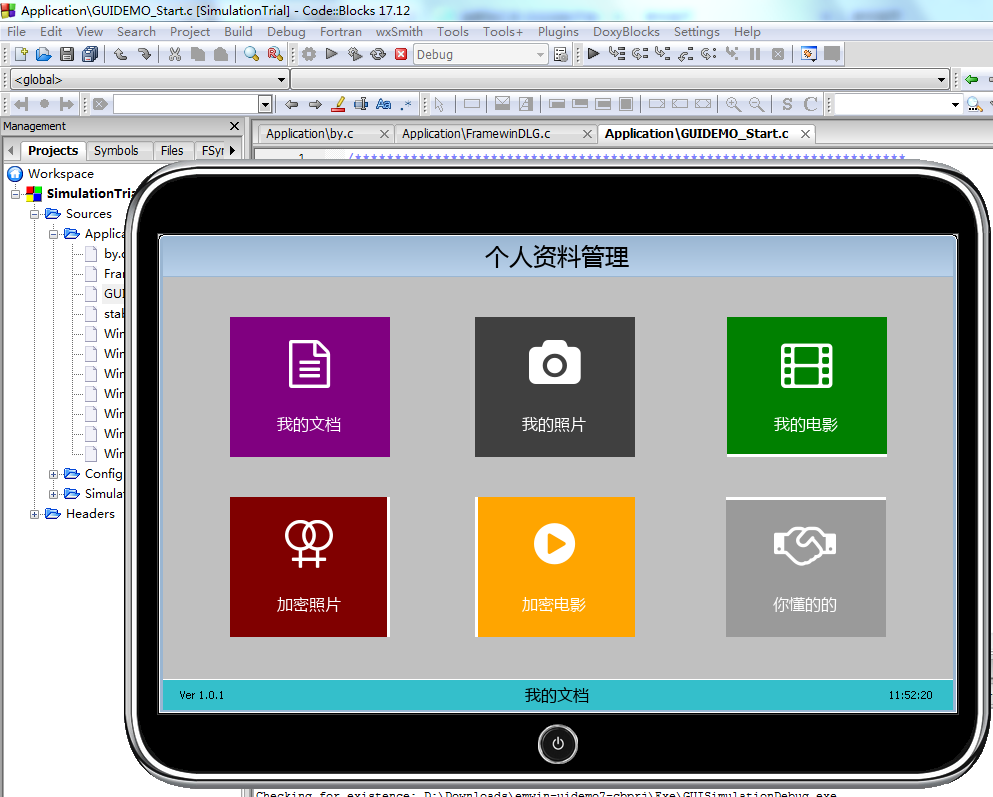
原来上一个包里面已经有了 msyh.ttf, 直接拷过来就可以用了: emwin-uidemo5-cbprj.zip
#189 Re: 计算机图形/GUI/RTOS/FileSystem/OpenGL/DirectX/SDL2 » [原创开源]emwin侧边导航框架支持按钮选中效果 » 2019-09-21 14:15:05
#190 Re: 全志 SOC » lichee nano官方linux config文件踩坑与填坑(常见配置误区) » 2019-09-20 17:13:20
0x04: 运行framebuffer gui程序后,右上角有闪烁的光标
论坛里有修改bootargs的办法:
https://whycan.cn/t_543.html
https://whycan.cn/t_1953.html#p12829
搜索引擎里搜到的基本都说要patch代码但我个人认为两种方法都不是根本办法,其实config中有可以关闭framebuffer 作为console的选项。
修改方法
禁用:Device Driver ---> Graphics support ---> Console display driver support ---> Framebuffer Console support
但这个选项默认无法修改。仔细查看相关的Kconfig文件后,发现这个选项只有启用了专家模式(Expert Mode),且没有其他依赖选项时才可以关闭。
启用专家模式:General setup ---> Configure standard kernel features (expert users) 但不要修改里面的选项
然后就可以禁用:Device Driver ---> Graphics support ---> Console display driver support ---> Framebuffer Console support
这样你的显示器在framebuffer初始化完了就会变成黑色,运行gui程序后也不会有闪烁的光标了。
原来如此
#191 Re: 全志 SOC » 参考http://nano.lichee.pro的步骤编译linux烧写后开机屏幕无打印,黑白条闪烁 » 2019-09-20 17:07:30
https://whycan.cn/t_2703.html#p21662
0x01: 开机卡在waiting for rootfs
原因有两点
1. 找不到SPI flash
f1c100s应使用A31的spi控制器驱动,但lichee官方config中是启用的A10 SoC的驱动。
表现为开机ttl日志中没有dts中的spiflash 分区信息打印,且卡在waiting for rootfs
启用:Device Driver ---> SPI Support ---> Allwinner A31 SPI controller
禁用:Device Driver ---> SPI Support ---> Allwinner A10 SoCs SPI controller
#194 Re: 计算机图形/GUI/RTOS/FileSystem/OpenGL/DirectX/SDL2 » [原创开源]emwin导航界面支持Awesome图标字体 » 2019-09-20 14:52:33
#195 Re: 技术人生/软件使用技巧/破解经验/技术吐槽/灌水 » 没有谷狗的日子,不会编程了,看那个必应搜出来是什么辣鸡, 哥来推荐一个俄罗斯的搜索引擎. » 2019-09-18 15:00:41

#197 Re: 技术人生/软件使用技巧/破解经验/技术吐槽/灌水 » 没有谷狗的日子,不会编程了,看那个必应搜出来是什么辣鸡, 哥来推荐一个俄罗斯的搜索引擎. » 2019-09-18 11:54:07
我思故我在 说:求名字
插件叫 谷歌上网助手
牛叉牛叉: https://github.com/haotian-wang/不可描述-access-helper/releases
果然可以了, 谢谢大神
#198 Re: 全志 SOC » 哪种文件系统合适?文件不大100MB,存储到TF卡 » 2019-09-18 10:15:48
#199 Re: 全志 SOC » V3S无法找到interface文件 » 2019-09-18 09:52:28
#200 Re: 技术人生/软件使用技巧/破解经验/技术吐槽/灌水 » 没有谷狗的日子,不会编程了,看那个必应搜出来是什么辣鸡, 哥来推荐一个俄罗斯的搜索引擎. » 2019-09-18 09:31:03
- 首页
- » 搜索
- » 我思故我在 发表的帖子